Ian@StEnoch’s workbench. A Double Stirling Single.

Ian@StEnochs

Western Thunderer
After about 10 years of off and on activity my S7 version of the Austrian Goods is ready to paint. Something I am not rushing to do but I do intend painting it before the advertised kit goes on sale!

FF1AD84C-E514-4A4B-97C7-F15B4CAB6DD1.jpeg
Concurrently I have been planning my next project and have been inspired by Nick Dunhill’s Stirling 8’ single thread. However, attractive though they are, an 8’ single just doesn’t fit with my main modelling interest, the Sou’West.
Everyone knows Patrick Stirling was the engineer on the GNR at the time of the railway races and the success of the singles is legendary. What is less well known is that before Doncaster he developed his skills at Kilmarnock and designed and had built there 3 classes of Single driver locomotive, He also built various other engines and kept the myriad of earlier ‘primitive’ machines working until his were ready. I need an example of Patrick’s engines to join my collection so a single is an ideal choice.

The early days of the G&SW are not well served with information, few photographs exist and what drawings that have survived are lacking details. Ahrons produced some side views for his Railway Magazine articles, later combined in a book and David Smith used them in his work on G&SWR locomotives.

This the 2 class with 6’6” wheels.
36FAE1BE-2390-49EA-998F-622BF040F871.jpeg

and this the last design, 45 class with 7’ wheels
098C9E4C-13C9-4D1D-9EFA-2C687F1DD57C.jpeg

These combined with what GAs I have gathered has given me a start but it is this one I am building seen here in the early1880s. No 40 of the 40 class which was a development of the 2 class but here as rebuilt/reboilered by Patrick’s Brother James
077F7BB3-07C0-41B3-A5E8-AE6706C0A52A.jpeg

Not many folk remember that Patrick is part of the Stirling family of engineers. His Father, Robert, was a Church of Scotland minister but also the inventor of the Hot Air engine. James his younger brother followed him as loco engineer at Kilmarnock before moving on to the South Eastern Railway. His nephew Mathew was locomotive engineer on the Hull and Barnsley.

I have some drawings, a photograph and a fair bit of experience of building G&SW locomotives so have picked up a working knowledge of that railways standards and practice. This won’t be a 100% accurate model but it will be as near as I can get. Knowing my luck a full set of plans will appear just when I finish, just like the Austrian goods!

Most of these engines started out with 4 wheeled tenders but that behind 40 is easily identified as a 1500 gallon 6 wheeler and I have already built one of those to run with my J Stirling 8 class 2-4-0. Luckily I made extra parts so I had in stock almost a complete tender kit. I always try to make the boring bits first so having that done has got this project off to a flying start!

52D3E17B-000F-4AEA-9F0D-247B9978761B.jpeg

It wasn’t all straightforward as the frames I had had different cutouts at the front so I have had to fill in and recut, looks a bit scabby but I am sure will be ok once painted.
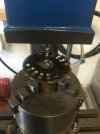
The tank is built on a basic, crude, framework of plate stiffened with bits of 4mm rail which will will never be seen.
6A67F21E-CC29-4112-97AA-3E1147A0CD6D.jpeg

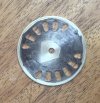
All wheels are carried in outside bearing boxes with coil springs. Next tender job is the boring brakes.

84EFD1E9-4049-4A80-89B8-0D6B35DB663D.jpeg

Ian.
 

Ian@StEnochs

Western Thunderer
I have a bit of workshop time over the last three days so managed to fabricate the brakes for the tender. On the original they are very simple, crude almost, hand applied with only wooden blocks. Not a lot of stopping power there, especially on a wet day.

The hangers are made from a strip of nickel silver with a length of brass micro tube silver soldered on. After cleaning up I sawed strips and drilled a hole for th screw which holds the wood in place. On a very basic jig, a piece of wood with two drills in it, the eye at the top was formed by hand and soldered. The wood blocks were cut from a piece of Jelutong, a nice easily worked exotic timber with very little noticeable grain. The two parts were stuck together with Araldite and once set the screws, piece of 0.5 wire, inserted and trimmed.

The brake hangers are supported on pieces of tube which are in turn held on wires inserted from the outside. These will be trimmed to length later. The pull rods are shaped, four in total, and assembled with full width wires and tube for spacers. The long wires kept things in line during assembly, the blocks were pressed against the wheels but once turned up the correct way and the bearing springs compress there is enough freedom to let the wheels turn.

2E72299C-2AE7-43C9-B2D2-5554F19AA790.jpeg

The whole assembly comes out and permits the wheels to be dropped. 55 individual components, three afternoons work and a pinch of swear words, None on the locomotive so that is a bonus!

CB5DE0FE-EF9A-4FBA-80F4-9958D9F0D7E9.jpeg

That is all I will do on the tender for a while so on with the interesting bits next.

Ian.
 

Ian@StEnochs

Western Thunderer
Some progress with the locomotive. I usually spring mine but for this engine I couldn’t see how I could arrange springs to maximise the adhesive weight on the single drivers. So I have gone for three point compensation. These are the frames ready for assembly.

3E28E0CC-CDDD-4FBB-BD51-EA6590A0DBBB.jpeg

The frames were sawn from nickel silver, two parts soldered together, and holes drilled for temporary frame spacers. The front one will take the cylinders, one in the middle the equaliser bar and the other at the rear for a frame spacer.

Current collection will be split axle so the axleboxes are plastic with brass bearings. The driving one is a Slaters product thinned down a bit and the others are home made from plastic rod. The guides are simply strips of brass angle, functional!

Driving wheels. I couldn’t find anything suitable, thought about having a pair 3D printed and cast in brass, but once I found out how long it would take, and cost, rejected the idea. Back to old school model making, turned rims, shaped centre and spokes cut from sheet brass all soldered up in a simple aluminium jig. The assembly was finished with a turned steel tyre soldered on and a 1/8” steel stub axle pressed in. The wheels were then fitted onto an insulated 3/16” tubular axle.
No very precise quartering needed but I pressed a plastic insulating bush into the crankpin hole.

Luckily I had some iron castings for the carrying wheels so turned them and fitted steel tyres.

9466672D-45E3-4805-A7B0-FBC93BE73848.jpeg

Next job will be to assemble the frames.
 

Ian@StEnochs

Western Thunderer
Not much progress as I have been away from home. However I did get time to make the main bearing springs, dummy of course, and probably hardly visible on the finished model.

A pleasant hour or so at the bench building a pair from strips of 10 thou NS cut on the guilotine then pulled through a bit of emery to round off the edges and impart a slight curve. Holes idrilled using a little jig on the drill press and each individual leaf marked off with dividers. I just sniped each leaf with tinsnips and dressed the ends with a file before assembing onto a central wire. Held together with pliers while a smear of solder was applied from the back, then a buckle was folded up from more strip.

20240225_142541.jpg20240225_105523.jpg

Here they are assembled onto the frames with the wheels and motor trial fitted. They are there but as expected hardly seen! Motor is just experimentaL, I will wait until I get some of the body assembled for best fit.

DF8D232A-7ECC-4A09-99AA-CED5BB037465.jpeg

Next job will be the cylinders etc.

Ian
 

Ian@StEnochs

Western Thunderer
There has been a lot of distractions this last 6 weeks with holidays etc. However the weather has been reasonable so I have started the paint job on the Austrian goods. It’s not much fun watching paint dry so in between sprays I have made a bit of progress on the single.

I fabricated the bottom of the firebox and ashpan and filled it with lead before attaching it. Not a lot of weight but every little helps.

The cylinders are turnings in Nickel silver with simulated bolt heads spaced and drilled on the rotary table and mill. Each cylinder is held to the mainframes by a single 8BA stud and nut, the outer end of the sidebars will be fixed by the motion bracket when I get them made. The next job is the running plate and splashers. The crankpin is temporary!

8E4C58BD-4472-45E8-ABBA-6130487115DF.jpeg
 

john lewsey

Western Thunderer
Superb,I'm going to enjoy seeing this as already it is fascinating to me.
I am close to starting a single in S7 . I will let you guess which one.
John
 

Les Golledge

Active Member
Some progress with the locomotive. I usually spring mine but for this engine I couldn’t see how I could arrange springs to maximise the adhesive weight on the single drivers. So I have gone for three point compensation. These are the frames ready for assembly.

View attachment 210986

The frames were sawn from nickel silver, two parts soldered together, and holes drilled for temporary frame spacers. The front one will take the cylinders, one in the middle the equaliser bar and the other at the rear for a frame spacer.

Current collection will be split axle so the axleboxes are plastic with brass bearings. The driving one is a Slaters product thinned down a bit and the others are home made from plastic rod. The guides are simply strips of brass angle, functional!

Driving wheels. I couldn’t find anything suitable, thought about having a pair 3D printed and cast in brass, but once I found out how long it would take, and cost, rejected the idea. Back to old school model making, turned rims, shaped centre and spokes cut from sheet brass all soldered up in a simple aluminium jig. The assembly was finished with a turned steel tyre soldered on and a 1/8” steel stub axle pressed in. The wheels were then fitted onto an insulated 3/16” tubular axle.
No very precise quartering needed but I pressed a plastic insulating bush into the crankpin hole.

Luckily I had some iron castings for the carrying wheels so turned them and fitted steel tyres.

View attachment 210993

Next job will be to assemble the frames.
In post no 3 6 March 2024You mention the difficulty of fitting springs, I you haven't seen it the following may be of help:-
Brettell Road, 1960s black country (ish) Post 24
which shows a method of springing that divides a CSB in two.
Hope this of interest or maybe help.
Regards,

Les.
 

Ian@StEnochs

Western Thunderer
Superb,I'm going to enjoy seeing this as already it is fascinating to me.
I am close to starting a single in S7 . I will let you guess which one.
John

Thanks John.

A Problem perhaps? I will admit to having a fancy to build one also but modelling time is too short to be diverted from one’s main interest. Perhaps when/if I complete my plan of 1 of each of the Sou’ Wests loco classes I will find time!

Ian.
 

Ian@StEnochs

Western Thunderer
In post no 3 6 March 2024You mention the difficulty of fitting springs, I you haven't seen it the following may be of help:-
Brettell Road, 1960s black country (ish) Post 24
which shows a method of springing that divides a CSB in two.
Hope this of interest or maybe help.
Regards,

Les.

Les,

Thank you, I hadn’t seen that.

On the first S7 4-4-0 I built in the early 90’s I used spring wire between the drivers which sprung and compensated at the same time. Works fine. It also gives equal weighting on each driver. However most of my recent builds have incorporated individual coil springs on each axlebox. A combination of different spring rates and shim packing permits me to load each axle differently.

The springy beam looks to me to be to complex especially as one cannot know what the final weight distribution will be until the model is completed. With coil springs I can adjust the load on each axle to keep the engine level once I have finished building and adding weight.

For this engine, which is quite small, I just couldn’t see how to fit my coil springs to get maximum load on the driver so have opted for 3 point compensation with the levers biased towards the driving axle.

Ian.
 

Ian@StEnochs

Western Thunderer
Some progress. First job was to make the splasher fronts. I used engraving brass and turned a disc with the outer beading and a recess for the tops before setting out the top and bottom of the fan shaped openings. I used engraving brass because it turns easily without the tendency to chatter under the cutter which sometime happens with nickel silver.
4F5FA9A4-1FAF-45A4-A035-9A3DA0D2E29A.jpeg
The blank was soldered onto a piece of brass for holding in the Chuck so I could transfer it to my rotary table on the mill and drill the holes. I used an end mill and set out the holes by using the angle scale on the table. Once drilled the rest was sawn and filed to shape. One disc made the two splashers, the blacking is marker pen to make the scribed lines easier to see.

The footplate and valances were assembled from parts cut on the pantograph mill. I made a couple of formers at the same time to aid bending the footplate and the valance was soldered on while the blank was on the former. The cut out for the wheel was done with a slitting disc after each side was soldered onto the end spacers.

1E61AD5A-30B1-46CA-AC14-0AB0FA43B1A8.jpeg

The parts before assembly, splasher tops riveted and the bottom beading ready to solder to the splasher front.

1B468E7B-860D-4D79-9C1A-EDA9F27E14C5.jpeg

That stage completed so on with the boiler and cab.
 

Attachments

  • F3EB9C6C-BB23-41A7-9B11-0C5AFB8E392D.jpeg
    F3EB9C6C-BB23-41A7-9B11-0C5AFB8E392D.jpeg
    104.3 KB · Views: 6
  • 2BE47251-9451-4412-BD30-2B0C72F14EA5.jpeg
    2BE47251-9451-4412-BD30-2B0C72F14EA5.jpeg
    200 KB · Views: 6
Top