You are using an out of date browser. It may not display this or other websites correctly.
You should upgrade or use an alternative browser.
You should upgrade or use an alternative browser.
Downton Train Crash of 1884 in EM Gauge
- Thread starter Stevers
- Start date
Stevers
Western Thunderer
These photos have all been featured on my workbench thread, but I also need to update the dedicated DTC thread...

Lots of 3D printing resulting in one of the close coupled '3-sets'; this one two Thirds 'piggy backed' to a First. The close coupling is via a single normal length buffer and a pad. Each Third has full length buffers one end and a pad the other making it possible to add a coach whilst maintaining the correct orientation of the assymetrical Newall brake shaft - I don't know if this was the actual arrangement but it seems most likely to me. The buffer housings are all 3D printed and the sprung buffers AGW coach ones turned down in my cordless drill to wagon dimensions. I had thought that the foot boards would need shortening, but that's not the case. A tad wavy for my liking, if they are to be 3D printed then they could benefit from an extra (unprotypical) support at each end. The first and third class coaches are the same length and it's astonishing that what is effectively a whole extra compartment has been squeezed in. Running on pinpoints the coaches vary in their free running, but are so short that propelling them through my crossover works well.

A revised 1862 First with the extra unprototypical footboard brackets at each end to keep them straight(er). Close inspection of the tumblehome will reveal the pixellated steps that Anti-Aliasing (if genuinely available on the Mono 4K) might soften. 3D printed steps for access to the oil lamps and fillers are provided at one end of the unbraked First Class coaches. The intention is still to fit suspension to my train via my own W Iron etches, so these are really test prints to iron out any problems with the CAD models and limits of the resin material and my 3D printer. This side of the coach is partially unhinged, but I can't remember if the central bottom hinge didn't print, or has just pinged off.
Beyond it is an 1859 Pass. Brake sporting what may be a 'Nine Elms' style caboose, painted, glazed and most importantly, safely separated from the edge supports and fitted without accident. This is the version raised by 0.5mm compared with the Weddell drawings to better match photos. Happily the templates I made for the original version now fitted perfectly! The double sided tape that I used to secure template to glazing had a more sticky and less sticky side. The stickier side needs to be on the template not the glazing - don't ask me how I know! The use of a brand new Swann Morton blade being essential when attempting to cut this (or probably any) sort of 'Plastiglaze'.

More 3D printing fug, and I had the other flavour of close coupled 3-set for the Downton Train Crash. Nearest is an 1862 First, then an 1862 Second and finally an 1865 Third. The First is unbraked, the Second and Third are braked and have pads on the nearer ends. All have the extra brackets to keep the footboards nice and straight. The First class was printed without Anti-Aliasing (AA), the Second and Third was printed with some measure of AA. The settings used were AA=4 and Gray Level=1. With AA on, the 'Cones of Calibration' tests became the 'Cones of Contradiction'. The cones would suggest over exposure when the sword fitted beautifully in the skull and wouldn't fit in either rock. Similarly the ale was a perfect fit in the mug. With AA exposure was increased from 2s to 2.4s. AA has softened the pixellated lines with no apparent loss of detail. It is striking how low the roofline of these coaches is compared with the AW diseasel, W Class or other modern stock. These coaches are very free running in both directions - the W Irons being a tad thicker, the pinpoint pockets slightly closer together and the wheel scallops in the floor a little deeper.
Lots of 3D printing resulting in one of the close coupled '3-sets'; this one two Thirds 'piggy backed' to a First. The close coupling is via a single normal length buffer and a pad. Each Third has full length buffers one end and a pad the other making it possible to add a coach whilst maintaining the correct orientation of the assymetrical Newall brake shaft - I don't know if this was the actual arrangement but it seems most likely to me. The buffer housings are all 3D printed and the sprung buffers AGW coach ones turned down in my cordless drill to wagon dimensions. I had thought that the foot boards would need shortening, but that's not the case. A tad wavy for my liking, if they are to be 3D printed then they could benefit from an extra (unprotypical) support at each end. The first and third class coaches are the same length and it's astonishing that what is effectively a whole extra compartment has been squeezed in. Running on pinpoints the coaches vary in their free running, but are so short that propelling them through my crossover works well.
A revised 1862 First with the extra unprototypical footboard brackets at each end to keep them straight(er). Close inspection of the tumblehome will reveal the pixellated steps that Anti-Aliasing (if genuinely available on the Mono 4K) might soften. 3D printed steps for access to the oil lamps and fillers are provided at one end of the unbraked First Class coaches. The intention is still to fit suspension to my train via my own W Iron etches, so these are really test prints to iron out any problems with the CAD models and limits of the resin material and my 3D printer. This side of the coach is partially unhinged, but I can't remember if the central bottom hinge didn't print, or has just pinged off.
Beyond it is an 1859 Pass. Brake sporting what may be a 'Nine Elms' style caboose, painted, glazed and most importantly, safely separated from the edge supports and fitted without accident. This is the version raised by 0.5mm compared with the Weddell drawings to better match photos. Happily the templates I made for the original version now fitted perfectly! The double sided tape that I used to secure template to glazing had a more sticky and less sticky side. The stickier side needs to be on the template not the glazing - don't ask me how I know! The use of a brand new Swann Morton blade being essential when attempting to cut this (or probably any) sort of 'Plastiglaze'.
More 3D printing fug, and I had the other flavour of close coupled 3-set for the Downton Train Crash. Nearest is an 1862 First, then an 1862 Second and finally an 1865 Third. The First is unbraked, the Second and Third are braked and have pads on the nearer ends. All have the extra brackets to keep the footboards nice and straight. The First class was printed without Anti-Aliasing (AA), the Second and Third was printed with some measure of AA. The settings used were AA=4 and Gray Level=1. With AA on, the 'Cones of Calibration' tests became the 'Cones of Contradiction'. The cones would suggest over exposure when the sword fitted beautifully in the skull and wouldn't fit in either rock. Similarly the ale was a perfect fit in the mug. With AA exposure was increased from 2s to 2.4s. AA has softened the pixellated lines with no apparent loss of detail. It is striking how low the roofline of these coaches is compared with the AW diseasel, W Class or other modern stock. These coaches are very free running in both directions - the W Irons being a tad thicker, the pinpoint pockets slightly closer together and the wheel scallops in the floor a little deeper.
Stevers
Western Thunderer

Courtesy of Keith, not the Downton Train Crash formation, but a very close coupled rake of 3D printed coaches of the required types crossing Bob Alderman's viaduct on South Junction. The 1864 Passenger Brake is leading two 1865 Thirds, an 1862 Second and 1862 First, with the 1859 Passenger Brake bringing up the rear.
The Black Motor 30692 is the least inappropriate engine that I currently have to haul them, although it is at least a Sal&D engine. Built from a Jidenco kit by someone who really knew what they were doing and bought secondhand. The somewhat undercooked Jidenco 00 Gauge underpinnings were replaced using Persy chassis kits built to EM Gauge. Those familiar with my projects will guess that this could be made more complicated than it really needed to be:
Black Motor re-chassis in EM Gauge
Last edited:
Stevers
Western Thunderer

A slightly cruel close up of the the 1864 Passenger Brake, showing that the roof line is even lower than the 1862 First that's next to it. This van is seriously diminuitive with doors scaling at just 5'6", a photo of one at Crediton in 1906 next to a later van appears to confirm just how small it was. Visible in a window is the seat for the guard, also visible on the prototype. There are a lot of horizontal rounded beads on these and I suspect that it was another vehicle of teak construction, though painted by my time frame.

An 1862 First close coupled at one end by virtue of a set of buffer housings being replaced by pads. My little Anycubic Photon Mono 4K doing well with the tumblehome on this one with a degree of Anti-Aliasing.

There was much agonising over how these should be close coupled. Being a fixed rake there is no need to be able to auto uncouple them in normal service, and magnetic couplings seemed the most promising option. These are Porterhouse Models #21 and perfect for this application. They're set so that the buffers or pads just kiss and set like that a 3' 6" curve can be negotiated with ease. Two pieces of lead are epoxied at each end and a 1/16" inch hole can be screwed into with an 8BA brass bolt to secure the coupling. Seeing the closely coupled rake snake its way round South Junction through use of these couplings was a very pleasing sight.
Stevers
Western Thunderer

A complete Downton Crash Train: From the left (and trailing) an 1859 Passenger Brake Van, then a close-coupled 3-set made up of two 1865 Thirds and an 1862 First, next a second close coupled 3-set made up of 1862 First, 1862 Second and an 1865 Third and leading the 1864 Passenger Brake. The nearest third has slightly larger windows and the previously missing beading between the two windows each side of the central (and only) partition. In my experience 3D resin printing has a sort of additive kerf, and I'm thinking that it's made the windows a bit smaller than they should be, but by no more than 0.1mm The 1864 brake seems worst affected having the smallest windows.

Lion Class Stour in the erecting shop, and yes 'tis a tiny little thing! This build will be featured in detail on my workbench thread, and so far at least not the disaster it could have been.
Last edited:
AJC
Western Thunderer
Fantastic! Odd to see a full 8 coach train occupying roughly the physical space taken by a pair of Mk 1s and say an Ivatt 2 (or pull and push plus M7 if you prefer), and the Stour class must be smaller than many of my industrials; amazing to think how the railway changed in only the 30 or so years after the vehicles in the train were built. Thank you for sharing that.
How was the exercise in panel beating that constitutes the weatherboard?
Adam
How was the exercise in panel beating that constitutes the weatherboard?
Adam
Stevers
Western Thunderer
Surprisingly the rake including vans is about 1 1/2" shorter than my Maunsell 3-set (Ian Kirk), as used on the Sal&D in the fifties. Those had six compartment brakes so 19 compartments compared with 22 compartments in 1884. Martin Finney's Semley by comparison is very much a modern railway.Odd to see a full 8 coach train occupying roughly the physical space taken by a pair of Mk 1s and say an Ivatt 2 (or pull and push plus M7 if you prefer)
My cunning plan for that survived contact with my hand cut test piece, and then mostly with the etched version with one unforeseen snag.How was the exercise in panel beating that constitutes the weatherboard?

I had made a former with curved edges that exactly fitted the inside of the cab and another to hold the front flat. I could then just push the roof and sides into place. That was perfect for the hand cut test cab, but my (over) half etched rebates for the glazing in the etched cab had drastically thinned the metal round the windows, and that caused a bit of distortion there that did need rework - unintended consequences and all that!


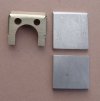
There are a couple of other issues: I had tried to lightly etch a thin groove for the spectacle frames, but being (over) half etched from both sides the rings fell into the acid bath, when of course I could at least have broken the ring to represent the pivots. The loss meant that I had to solder slices of tube into the half etched material by putting just the right amount of taper on the tube to seat it at the right depth. The other inexplicable problem was that the bottom of the cab front appeared to be 1mm too narrow (see below) for where the cab splashers have been set. In that context also inexplicable is that the top of the cab appears to be the correct width (also see below!) - luckily I could pad the inside of the splashers to make up the gap.
The problem at the moment is that there is a 1mm or so gap between the inside of the rear splasher boxes and the firebox that shouldn't be there. On checking the dimensions of the built splashers against the 3D CAD, it seems the outside of the splashers are 0.5mm too wide (at least part of the error), which would make the bottom of the cab correct and the top wrong. Time to lie down in a darkened room while I contemplate my dilemma, but it looks like I will need to make new splasher fronts with a handrail bracket that I can move to be in the correct alignment with the others - and then correct the etch if any more are ever wanted. And there are other other less serious errors!
Attachments
Stevers
Western Thunderer

My putative Stour passing my interpretation of the Downton box on its way to disaster. New splasher fronts 0.5mm wider (with the handrail brackets) have been fretted out and fitted. Happily they have closed up the gaps to the firebox, and were perfectly straightforward to make as it turns out. Cosmetic frame stubs (at the correct width) have been fitted so that I can mount the 3D printed buffers. The almost unfeasibly tall Beattie chimney from my Ks Falcon Class kit has been cleaned up and poked in a new hole in the smokebox. The K's chimney comes with a spigot that will make blending it to smokebox tough, so that will be going, and it lacks the eight highly visible securing fasteners of the prototype. The overlong guard irons (to be shaped then cut to length) are integral to the cosmetic frames. Today's job (on a wet and windy day) is to build the High Level gearbox and compensating beams and to fabricate some sort of central pivot for the rear axle at the correct height ready to fit wheels. My Sony DSC-H2, excellent in almost every other way, is really not as good as my old Olympus at this sort of thing.
Herb Garden
Western Thunderer
Now that's a lovely piece of Victoriana!
Stevers
Western Thunderer

Lion Class Stour in my best guess at 1884 condition posed in front of the box at Semley. That Beattie chimney still looks tall and I will measure the total height to check it's in loading gauge if nothing else. To fit the HLK RoadRunner gearbox and M1220 I needed to hollow out the ribs within the firebox. In the process it cracked, so there will definitely now be a better formed firebox/boiler/smokebox with thicker walls that will fit better. The strength (toughness) of 3D printing resins is definitely still an issue for me. The Lion Class is ready for the AG wheels to go on, so I will need to consider painting the frames which my reading of the livery registers suggests would be the main body colour on the outside and vermilion on the inside in this period. Adams Umber with black borders with orange lining (From BR Express passenger transfers) is what I think will be most appropriate for this loco and my limited artistic skillset. If not strictly correct, I hope that it can be neatly done and at least create the right impression.

The 1859 brake and revised 1865 Third (with the slightly larger windows) under the footbridge at Semley. The lighting (fluorescents) as with the rest of the layout is simply superb. For some reason the bolection mouldings on the First and Second class coach windows (not seen here) looked particularly good in this lighting. Thinking ahead, would the underframes have been dark brown with black metalwork at this time?
AJC
Western Thunderer
View attachment 264919
Lion Class Stour in my best guess at 1884 condition posed in front of the box at Semley. That Beattie chimney still looks tall and I will measure the total height to check it's in loading gauge if nothing else. To fit the HLK RoadRunner gearbox and M1220 I needed to hollow out the ribs within the firebox. In the process it cracked, so there will definitely now be a better formed firebox/boiler/smokebox with thicker walls that will fit better. The strength (toughness) of 3D printing resins is definitely still an issue for me. The Lion Class is ready for the AG wheels to go on, so I will need to consider painting the frames which my reading of the livery registers suggests would be the main body colour on the outside and vermilion on the inside in this period. Adams Umber with black borders with orange lining (From BR Express passenger transfers) is what I think will be most appropriate for this loco and my limited artistic skillset. If not strictly correct, I hope that it can be neatly done and at least create the right impression.
View attachment 264920
The 1859 brake and revised 1865 Third (with the slightly larger windows) under the footbridge at Semley. The lighting (fluorescents) as with the rest of the layout is simply superb. For some reason the bolection mouldings on the First and Second class coach windows (not seen here) looked particularly good in this lighting. Thinking ahead, would the underframes have been dark brown with black metalwork at this time?
Nice, verry nice, in fact and the setting obviously adds to it.
Might I suggest using N gauge versions of the passenger lining transfers? I don't only mention this because I have some that you are welcome to (used for lining a Sentinel - who also used orange/black/orange lining, and nice right angled corners, so all the curves are available), but the sheet is doing nothing very useful in my drawer.
Adam
Stevers
Western Thunderer
Yes please Adam! Stour is such a tiny thing that I reckon that it's an excellent idea to use N gauge transfers.Might I suggest using N gauge versions of the passenger lining transfers? I don't only mention this because I have some that you are welcome to (used for lining a Sentinel - who also used orange/black/orange lining, and nice right angled corners, so all the curves are available), but the sheet is doing nothing very useful in my drawer.
AJC
Western Thunderer
Yes please Adam! Stour is such a tiny thing that I reckon that it's an excellent idea to use N gauge transfers.
Right, I think I still have your address, I shall ferret around in the transfer collection later.
Adam
Stevers
Western Thunderer

This is the revised boiler printed on my Mono 4K. It's much more accurately formed with thicker walls (1.2mm), and was supported on a grid with knife edge supports to start the print properly. It has fixed cutouts for the splashers and variable cutouts for different gauge wheelsets, and as a result it is a much better fit to the etched parts. On the question of unfeasibly tall chimneys, the K's chimney is a scale 5' (same as the driving wheel diameter). A photo of the original Lion suggests that this relationship is entirely feasible, and as it happens it's just a little taller than that on the AW Diseasel. What the chimney could use is a copper cap and a copper bolt is on its way for me to use as something to abuse with files in my cordless drill.

The chassis has the equalising beams and HLK RoadRunner gearbox built up and fitted. A steel wire has been soldered in as a sprung central pivot to give my crew a more comfortable ride. The grate area has been filled with sheet lead contributing a fair bit of weight. The rear motor shaft still needs to be removed. There will be some scope to add weight round the motor and above the wheels at the front of the rear splashers, as well as in the domes, smokebox and boiler. Seen are the fixed cutouts for the splashers and the additional cutouts needed for EM Gauge wheels which of course are inboard of where they should be. There's plenty of room for the M1220, but only with the ends filed off the protruding motor fixing lugs. I did have to fairly drastically thin the centre bearing hornblocks and gearbox bearings to get the 0.5mm side play that I reckoned will be required for a 3'6" minimum radius curve.

On mature reflection (in conjunction with someone who should know), I've moved the regulator to the middle and fitted two gauge glasses, one a mirror of the other. On the left is a JH Beattie version of the revised backhead test fitted in the JH Beattie cab. In the middle the same in 7mm scale, printed with a view to encouraging a friend to build a 7mm scale Lion. On the right a nickel silver version of the smokebox front with handrail and lamp iron rivets set using a less pointed punch in my GW Models rivet press - with that it was much easier to centre the tool in the half-etched holes, thus ensuring that the embossed rivet is accurately placed - a tip courtesy of the late great Mr F. It's been fitted with a revised smokebox door with a slightly deeper rebate.
Stevers
Western Thunderer

Steps assembled and fitted, and the rear splashers now soldered on. Quite fiddly, but no problems other than the slots being a fraction too wide. So far only 188C multicore solder has been used, carrying the solder to the job to burn off the unwanted resin flux in the process. The forward steps were a later upgrade to the Lions, and as I like the look of them they've been fitted. Rather than cut the second shaft off what turns out to be my only M1220, I've ordered an HLK 1219 coreless motor, and removed the M1220 so that I could pose the loco with the backhead in place. The motor is further forward in the Vesuvius and there might therefore be scope for a flywheel needing at least some of that second shaft. The reverser lever has been assembled (foreground), and I will need to represent the reversing lever that emerged from the rear splasher on the other side. Height of top of the chimney from rail height is 54mm which is a scale 2" greater than the LSWR loading gauge of 13' 4". When I make the copper top I'll drop the height by about 1mm.
I can't put off painting the chassis and wheels much longer. Having never modelled any loco where the wheels were anything other than filthy black, can I just apply my PP 'LSWR Umber' to the AGW plastic centres without priming them? Will they need flatting or anything else? I am assuming that the rims were black and will clean and etch prime those.
AJC
Western Thunderer
I can't put off painting the chassis and wheels much longer. Having never modelled any loco where the wheels were anything other than filthy black, can I just apply my PP 'LSWR Umber' to the AGW plastic centres without priming them? Will they need flatting or anything else? I am assuming that the rims were black and will clean and etch prime those.
I don't think there's a special need to prime Gibson wheel centres, but I invariably do - usually nothing more complex than Humbrol (or whatever) matt white in order that I can be sure that I've actually painted everything.
Adam