4mm Brassmasters Rebuilt Royal Scot, 46109

Len Cattley

Western Thunderer
Dave your work on the Rebuilt Scot is fantastic, Brassmasters should have done the inside cylinder, it's a good job you are a excellent modeller.

Len
 
I have a number of Brassmasters kits sitting in the ToDo pile as I'm reluctant to start them until I'm as proficient as possible in kit building. I've built many kits from many other sources and would consider myself reasonably good, but I still haven't mustered the courage to open one of the Brassmasters boxes as yet. Your standard of excellence with this Scot is only exacerbating my anxiety - what you have done is absolutely amazing. Thanks a mil for the superb pictures too, which I'll doubtless be scouring in detail when that bid day finally comes.
 

Dave Holt

Western Thunderer
Thanks for the kind comments, gents.
I'm sure your suggestion of split axles is tongue in cheek, Howard. A bit late for that kind of change, now.
I'm intending to use wiper pick-ups bearing on the top of the wheel flanges, inside the splashers. Even with full compression of the suspension, there's enough clearance to avoid any shorting. So, not that hard to do, but why plough on when you can procrastinate, eh?
Dave.
 

LarryG

Western Thunderer
Amazing modelling which I have come to expect from your workbench. I can't jesting.........It'll probably derail on the 7 chains curve at Delph Junction....:p
 
Last edited:

Dave Holt

Western Thunderer
Thank, Larry.
A good point about the curve. That and the lack of push-pull apparatus were probably the main reasons Scots weren't used often on the Delph Donkey.
I am a bit worried about this model's ability to take the sort of curves we tend to use on model layouts. A bit of grinding away of offending items might be required once it's self propelled and can be test run.
Dave.
 

J_F_S

Western Thunderer
I'm sure your suggestion of split axles is tongue in cheek, Howard. A bit late for that kind of change, now.

Dave.

No!! Not at all!!

The key word is AMERICAN - ie loco to one side, tender to the other. I have always used it for tender locos and it works like a charm. I appreciate that it would have been easier to fit the sorting strips earlier, but it won't easy fitting wipers at this stage either! Even if you don't want to fit shorting strips to the drivers, you can fit them to the bogie wheels and then fit wipers to one side of the drivers - which is a lot easier when you can solder them to the frames rather than tp a bit of PCB!

I appreciate that having "live" frames presents challenges, but a smear of Araldite can cure a wooden leg in my experience! (and certainly can insulate the body!

Best Wishes,
Howard
 

Dave Holt

Western Thunderer
A couple of hours with a rotary burr have resulted in this. Quite a lot of material has been removed to accommodate the 16 mm diameter motor and to get the boiler casting to sit down onto the footplate. I'm quite pleased with the fit around the splashers and some very minor gaps will be filled by the glue used to fix the boiler in place - probably some sore of epoxy.
Scot_156.JPG
Dave.
 

Dave Holt

Western Thunderer
Progress continues at a glacial pace.
Arrangements have been made to allow the boiler unit to be attached and removed from the footplate assembly. The kit intends two 10 BA screws though the slots in the footplate into holes tapped directly into the resin under the smokebox saddle. The firebox end remains free until finally glued to the cab front. I really didn't like this arrangement, partly because my representation of the inside cylinder and exhaust passageways are in the way of the suggested screws, and mainly because I wanted a more secure attachment to the cab. I find that, inevitably, the boiler gets used as a handle for picking up the loco (I know it shouldn't, but that's my experience) and the idea of it all just hanging on a glued joint didn't fill me with confidence.
So, alternative arrangements have had to be made.
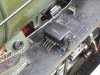
At the front, a single 14 BA countersunk screw, somewhat further forward than the kit design and clear of the internal gubbins, passing through the resin into a nut soldered to a backing plate which, in turn, is epoxy glued inside the smokebox, as shown here:
Scot_157.JPG
At the rear, brass wire pegs have been fixed into holes drilled into the rear face of the firebox. These engage with the opening in the front of the cab which both centralised the firebox and held it tight down onto the splasher tops and footplate.
Scot_158.JPG
In the kit, the cover plates along the bottom of the firebox, between the rear splashers are supplied as white metal castings. I thought these might be tricky to solder to the footplate and to have the pipes running along the top fixed without melting part of them so i replaced them with items made from brass strip.
A start has been made to represent the various pipe runs from the cab and along the tops of the rear and centre splashers. Some of these were steam to the sanders and are shown on the Pipe & Rod drawing. An additional, slightly smaller pipe, on each side, is clearly visible in photos but does not appear on the P&R, so I suspect they are either a later modification or are lubrication pipes of some sort.
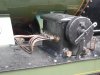
Here are the pipes on the LHS made from 0.2 mm copper (5 amp fuse wire) for the sander steam and 0.182 mm brass for the mystery additional pipe. The small securing clips are made from flatted 0.2 mm copper.
Scot_159.JPG
On with the RHS next. Three pipes on that side.
Dave.
 

Dave Holt

Western Thunderer
A little more progress has been made with detailing the footplate.
I've finally got round to re-attaching the sand box filler pipe support plates, three of which I accidentally broke off the footplate etch way back in the construction. I broke the forth one off deliberately, to make them all the same. It's been a real fiddle to position the loose plates and hold whilst getting a tack of solder to retain them. However, after some frustrating missteps, they're all now fixed in an acceptable position. Actually, the original arrangement, where they folded up from the inner edge of the footplate was wrong as the bottom edge of the plates should be set away from the edge by some distance. Having them detached has allowed this to be replicated.
Also added is an additional two feed oil pot on each side, forward of the mechanical lubricator and orientated at right angles to the loco. These are not mentioned in the kit instructions but clearly show in photos. Perhaps these pots were added after the initial rebuilding?
Rather cruel enlarged shot showing the sand box fillers and additional oil pot. Looks like a bit more cleaning up is required on the forward plate.
Scot_160.JPG
Dave.
 

Dave Holt

Western Thunderer
Onwards! Now you see it, now you don't. The kit provides a very nice, multi-part support bracket for the reach rod. Unfortunately, i found it necessary to cut 2 mm from the back of the base plate and stiffening rib to allow the reach rod to align with the slots in the cab front and the reversing arm on the weigh shaft. In any case, it becomes completely hidden from view by the extra rear sand boxes that were fitted shortly after rebuilding the locos.
Reach rod in place, with support bracket.
Scot_161.JPG
And there it is - gone!
Scot_162.JPG
Dave.
 

Dave Holt

Western Thunderer
Here's hoping someone can help me with some photos or information.
I'm currently preparing the mechanical lubricators for fitting to the footplate - drilling out and fitting lengths of 0.5 mm O/D tube to represent the oil pipe gland nuts and 0.5 mm wire for the blanked off ports.
I have a fair understanding of the oil pipe runs for the cylinder lubricator/atomisers on the drivers (LH) side but can't find any details about the pipe runs for the mechanical lubricator on the firemans (RH) side. I could just assume they are routed parallel with the lubricator body and disappear over the back edge of the footplate and inside the frames, but does anyone know the actual arrangement?
Dave.
 

Dave Holt

Western Thunderer
Len (and Dikitriki),
Thanks very much for the photos which will really help. They show that I've mounted the 4 feed oil pots in the wrong place - I inserted the sprue through the hole in the footplate where some of the oil pipes pass through, so the pots are much too far outboard.
Hope the preserved Royal Scot doesn't differ too much from locos in BR service - there appear to be a couple of extra, largish, pipes - perhaps something to do with the air brakes - which are not original fittings.
Thanks again,
Dave.
 

Dave Holt

Western Thunderer
The offending oil pots have been moved inboard. It was a bit of a struggle to hold them in the right position and upright in two planes without the locating peg. Sadly, the LH, 4-feed has suffered somewhat and the fairly neat pipe runs I'd achieved originally are no longer as good as I would like. That said, they don't look as bad on the actual model as they do in a several times full size photo! The hole in the footplate, through which several oil pipe pass, but which I had wrongly used to locate the bottom of the oil pot, is plainly visible. The much larger hole is where the mechanical lubricator fits. However, the lubricator casting is flat at the bottom and devoid of a locating peg, so the hole is totally redundant.
Also visible are the oil pots on the front splashers and the atomiser cock cover on the side of the smokebox. The W/m casting is a spare from a Brassmasters Black 5 kit, kindly donated by a friend, as the one in the Scot kit is quite the wrong shape.
Scot_163.JPG

Another request for help. I thought I had the nameplates for this loco - 46109, Royal Engineer, but now I've taken a proper look at them, I'm not happy with their appearance and scale size. Unfortunately, my normal source of numbers and plates - 247 Developments, doesn't list this particular loco. Can anyone suggest another source of suitable plates. 4 mm scale, of course.
Dave.
 

Dave Holt

Western Thunderer
Just had to have a go at improving the oil pot pipes. I also noticed that the front pipe was missing - lost during the removal tussle, so that's been replaced and the other pipes re-bent to neaten them up a bit. Still not as good as they were originally, but better than before. I think.
Scot_164.JPG
Dave.
 

AJC

Western Thunderer
Another request for help. I thought I had the nameplates for this loco - 46109, Royal Engineer, but now I've taken a proper look at them, I'm not happy with their appearance and scale size. Unfortunately, my normal source of numbers and plates - 247 Developments, doesn't list this particular loco. Can anyone suggest another source of suitable plates. 4 mm scale, of course.
Dave.

Fox? They do most things, I think? Perhaps Jackson Evans via Model Master? You’re certainly bringing out the best in the kit. Superlative stuff.

Adam
 

Dave Holt

Western Thunderer
Adam.
Thanks for your kind words and the suggestion. I've just had a very kind offer of a set of Jackson Evans plates from a fellow S4 Society member, so I'll wait to see how they look. Thanks again.
Dave.
 
  • Like
Reactions: AJC
Top