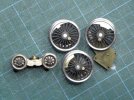
4mm Brassmasters Rebuilt Royal Scot, 46109

Dave, again thanks for your pointers and picture. I elected to adjust the bend radius and position at the front of the motion bracket, fabricate the footplate as a reference check, and presto, all fits as it should.
The motion bracket now fits the slots in the chassis front and back, and slots nicely into the footplate with a small gap left to accommodate the outer overlays. I’m a happy camper.
The footplate is slightly tight over the chassis lengthways, so some fettling required here in due course.
The imposter at the back of the picture is a Comet Ivatt 2MT that I worked up over past fortnight on the bench at home while laid up.
 

Attachments

  • IMG_1420.jpeg
    IMG_1420.jpeg
    291.9 KB · Views: 44
  • IMG_1422.jpeg
    IMG_1422.jpeg
    294.1 KB · Views: 44
  • IMG_1419.jpeg
    IMG_1419.jpeg
    309.6 KB · Views: 45

Dave Holt

Western Thunderer
Mmmm. Quite a while since I last posted about the Scot (Jan 2022 in fact). Since then, it's been put away in it's box awaiting me getting round to painting the chassis.
Recently, a friend asked about some technical details of the build, causing me to take it out. I was quite shocked how rusty the steel parts - wheel tyres and axle ends - had become, causing me to strip it down with a view to preparing the chassis parts for painting. The body and tender body will be painted, lined and weathered by another friend.
I started by cleaning up the driving wheels and axle ends using a small scraper followed by a fibre glass brush. They came up quite well and show quite a difference to the untreated bogie wheels.
Scot_230.JPG
Needless to say, the disassembly didn't go entirely smoothly as I managed to lose one of the modified 16BA crank-pin retaining nuts and the 0.7 mm diameter pin connecting the RH radius rod to the top of the combination lever had come out. Both now rectified.
Dave.
 

Dave Holt

Western Thunderer
Assembly of the chassis is now more or less complete. Further work on the weathering, especially the valve gear is still required.
Here the loco chassis is loosely fitted to the unpainted body and the inner tender chassis roughly positioned.
Scot_233.JPG
Over the weekend, an hour or so was spent in bemused attempts to set up the DCC chip. I'm sure that if you're doing this regularly, it's no big deal, but if it's once every few years then it's quite an ordeal. The chip used (Digitrax DZ126T) would not read back the programmed CV values but seemed to accept the input values, including the 4 digit address, so all appears to have turned out OK. Still bemused, though.
Dave.
 

45609

Active Member
Looking good Dave. I know what you mean re programming chips. Every time I try to do one there seems to have been an upgrade to the JMRI software. Open source so to be expected I suppose and because I have an old SPROG DCC programming device I find it usually needs a bit of faffing about to get it to talk to the computer. Having said that the my most recent use of the SPROG to setup the chip (a ZIMO MX616R) in my model of 45654 went without a hitch. Must have just been lucky this time. Keep persevering.

Cheers...Morgan
 

Dave Holt

Western Thunderer
Thanks, Morgan.
Chassis painting is more-or-less finished and, hopefully, will be handed over with the body for painting and weathering at the forthcoming S4Crewe exhibition.
Scot_234.JPG
I think I might have overdone the "fresh oil and fuel spills" coating on the valve gear as it's dried rather on the glossy side. Perhaps it a can be slightly toned down with some satin varnish dry brushed on?

Dave.
 

Dave Holt

Western Thunderer
The Scot has now been painted, lined and lightly weathered by friend David Clarke. I've re-assembled the bodies and chassis, temporarily, and fitted buffer heads and AJ couplings. Cab glazing, crew and coal in the tender still to do.
Here's a glimpse. Somehow, I've managed to lose the tender buffers in this shot.
Scot_236.JPG Dave.
 

Dave Holt

Western Thunderer
Well, that was a bit of a disappointment. The Scot went to visit Barrow Road today and disgraced itself by refusing to respond to either DCC or DC power supply, so just had to pose on the main line near the shed. Pity that it will have to be dismantled to investigate as there is always the risk of handling damage.
In fact, the visit was a very mixed bag. The Jubilee had a return crank unscrew, so couldn't be run and Black 5, 45232 kept shorting on the tighter curves but ran nicely in a straight line! On the other hand, the Caprotti Black 5 and Ivatt 2-6-2 tank ran well.
Here are a few photos to record the event.
BRV_001.JPGBRV_002.JPGBRV_003.JPGBRV_004.JPGBRV_005.JPGBRV_006.JPG
Dave.
 
Good to see you yesterday Dave despite the problem with the Scot and Jubilee I do admire the quality of your models. To cheer you up here is a video of your push pull train headed by 41282 followed by the down TPO, the 1V22 ex Newcastle, headed by your Caprotti Black 5 '44741'.
Maybe I should have kidknapped it as it was allocated to Barrow Road between 1950 and 1955:D
Enjoy

Robin
 

Dave Holt

Western Thunderer
Yippee! We have locomotion.
The problem turned out to be that all three LH pick-ups were not collecting power. The front had paint on the wire, just where it contacts the rear of the wheel rim, the rear had got slightly bent and was no longer bearing on the back of the wheel. Not so sure about the middle, but after tweaking outwards and caressing with some fine emery, it too worked.
The loco is now reassembled with multiple checks that it still worked before the fixing screws were fitted and after tightening.
In the photos Robin Whittle and I took at Barrow Road, I noticed that the inside of the tender front bulkhead has some green overspray, so that will be corrected before re-connecting loco and tender.
Dave.
 

dibateg

Western Thunderer
Just like the real thing Dave!
I found that most of my new builds need a tweak or two before they run properly...

Regards
Tony
 
Top