Back into the shed...

Simon

Flying Squad
Last night I managed to get myself away from the computer, out of the house and down to the shed.

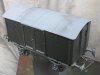
I got all the Manning Wardle bits together and thought about it a bit, but then decided to first try sorting out the Iron Mink that has been languishing there for over a year.

When last featured on the web it looked like this:
 

Attachments

  • Minklast.jpg
    573.5 KB · Views: 1

Simon

Flying Squad
So left to do were putting in functional springs on top of the axleboxes, fitting axleguard keeps, birchwood caseying wheel rims, making three rivetted strips to improve the smooth strips on roof as per kit, correcting my non GW brake safety loops and fitting couplings.

I'm not sure I will "improve" the cast on door opening gear as it looks good enough to me, I think.

After a marathon session (I am slow) I completed all of the above tasks and now have a completed Iron Mink, all it needs is painting.

This gives me something to try out my Halfords U Pol acid etch primer on, ahead of the Manning Wardle, to which I think I ought to return.

I will at least try to take a picture of the results out on the line today.
 

Simon

Flying Squad
Out on the line this morning. The sun doesn't get on to the track in the morning any more as it is too low at this time of year.

If everything warms up I might try the painting today.
 

Attachments

  • Minkdone1.jpg
    856 KB · Views: 5
S

Simon Dunkley

Guest
John D said:
    I don't believe it ...........!!!!!!!!!!!!!!!!!!!!!!!!!!!!!!!!!!!!!!!!!!!! :eek: :eek: :eek: :eek:                :D
You shouldn't believe it, as he went on to say that he then did something else! :)
 

Simon

Flying Squad
Its painted!

First shot shows up ended and masked as appropriate mink on hi tech painting cradle in my purpose built spray booth (greenhouse).

Second shot shows U Pol acid etch applied. This went on really nicely and easily and gave a good finish. Nice powerful smell ;)

Third shot shows right way up mink after first coat of GW grey had been sprayed (with the model up-ended as before)

Fourth shot shows completed job. I'm pretty happy with it although I have got a definite Longbridge "orange peel" finish to the paint. I should have paid more attention to the distance of can to job. Once its lettered, varnished and then weathered I think it will be fine. Must do better when I get to the Manning Wardle painting though!

Fifth shot shows it out on the line about an hour ago, before it rained.

Next stop Manning Wardle?
 

Attachments

  • Minkpaint1.jpg
    1.1 MB · Views: 8
  • Minkpaint2.jpg
    798.7 KB · Views: 0
  • Minkpaint3.jpg
    Minkpaint3.jpg
    203.7 KB · Views: 1
  • Minkpaint4.jpg
    724.8 KB · Views: 1
  • Minkpaint5.jpg
    917.6 KB · Views: 1

Simon

Flying Squad
Thanks for the comments, I'm a great fan of margarine tubs :))

The kit is a Barrett Engineering one. It's to 10mm scale, but by cutting out a section along the centre it makes up into a pretty good model of the first 16' 6" long batch. I only know this because of "All about Iron Minks", one of my favourite books.

I will endeavour to letter it up and finish it so that it can move off the bench, I'm determined to crack on with a few of my projects, not least the Manning Wardle.

As regards this last, truth is that I'm a bit like Jordan and his Class 14 chassis, in that I know I haven't got it quite right/good enough yet (the chassis with regard to wheels, axles, squareness etc)

Bullets must be bitten, nettles grasped....
 

Phill Dyson

Western Thunderer
Nice to you back in the shed Simon  ;D & a very nice Iron Mink it is too  :bowdown:..........I'll have to get some of that new fangled Halfords spray gubbins for my playroom/modelling area  :thumbs:

Phill  :wave:

P.S. Don't worry about not doing the Manning Woggle ...........whatever that is  ??? ;D..........stick with the Hydraulics (you know it makes sense ) :))
 

Jordan

Mid-Western Thunderer
Simon said:
... not least the Manning Wardle.

As regards this last, truth is that I'm a bit like Jordan and his Class 14 chassis, in that I know I haven't got it quite right/good enough yet (the chassis with regard to wheels, axles, squareness etc)
The difference being you likely know how to fix your's.... :scratch: :-[ :bowdown:

I like the neat way you've hooked the 3-links up during painting - neat trick that! :thumbs:
 

Steve Cook

Flying Squad
Thats come up really well Simon  :thumbs:

Did you chemically blacken the roof before painting? If so, a good idea which I shall 'borrow' in future  8)

Steve
 
S

Simon Dunkley

Guest
Looking good, Mr. C.

Steve Cook said:
Did you chemically blacken the roof before painting? If so, a good idea which I shall 'borrow' in future  8)
Isn't that such an obvious idea - once someone else has done it?
Also worth considering for anything which might get rubbed.
 

Jordan

Mid-Western Thunderer
(Re Chemical blacking)
Simon Dunkley said:
Isn't that such an obvious idea - once someone else has done it?
Also worth considering for anything which might get rubbed.
I've seen it recommended for loco footplates; the edges always seem to get worn/chippped no matter how much etch primer goes on. I don't know if anybody's actually done it?
 

28ten

Guv'nor
Jordan said:
(Re Chemical blacking)I've seen it recommended for loco footplates; the edges always seem to get worn/chippped no matter how much etch primer goes on. I don't know if anybody's actually done it?

I always use metal black before priming on anything likely to get damaged handling.
 

Simon

Flying Squad
Yes there is some brass blackening and I'd love to say that I did it as part of a logical sequence in the way that Cynric and Simon suggest.

Truth is that I went out to the shed to see if brick acid would dull down some stainless wheels after a telephone conversation with Steve Cook (it doesn't). I then idly applied the brick acid HCl to the iron mink roof to see what would happen, and then equally idly applied some positively ancient Carrs metal black that has been knocking about for years. Result was Hydrogen Suphide (or something equally foul smelling) where I didn't wash all the brick acid off and the blacking.
 

Attachments

  • Minkmess.jpg
    1 MB · Views: 2

Simon

Flying Squad
I feel a bit happier with it today as I have used some "crocus paper" (very fine abrasive paper which is yellow) to soften my orange peel finish. The photographs on here didn't show how bad it was, but it now looks like this:


Attachments

  • Flattermink.jpg
    1.1 MB · Views: 2

iploffy

OC Blue Brigade
Simon the only examples I have seen of these wagons had PO markings or war footing markings on them so as far as liveries go anything you put on it is protypical as I am sure they had more than the liveries I know about.
By the way still looks good.
Ian
 

Simon

Flying Squad
I have managed to letter the mink up today. I used "Onebits" waterslide transfers and applied them as best I could using "Microset" solution. "All about iron minks" published by the HMRS was my source of information regarding number, tare weight, positioning of letters etc.


Attachments

  • minklet.jpg
    878 KB · Views: 2
Top