A Barclay pug in 7mm scale

George M

Active Member
I've always had a soft spot for the humble Barclay 0-4-0ST. I'm (just) too young to remember steam on the British mainline, but have happy memories of watching industrial steam on SE Scotland and NE England as well as on many fledgling preservation schemes.

51940828587_11500b2810_b.jpg

No.6 at Prestongrange in East Lothian awaiting its moment

51941687551_1ab9f6ae75_h.jpg

Restored and in use at Bo'ness.

I've long wanted to build one and a couple of years ago bought the Mercian Models kit for the 14" version before Trevor's sad passing.

53365860931_9b4a81a47e_k.jpg

This is for an earlier version than No.6 above, but I will not be building it to any specific prototype. This will be a slow build as it is not my primary focus at the moment but, as I finally put solder to metal last night, I thought I'd start this thread to document the build.

First impressions are good. Nice clean etches, lots of nickle silver! Quite a few options catered for with no less than 3 cabs (with or without backsheet), 2 funnels, backheads, smokebox doors buffers etc. Then I started to dig in a little more detail ...

53366178399_f2cf17e35a_k.jpg

The kit is definitely showing its age with many of the castings quite flashy, most cleaned up OK but a few were a bit too deformed or dented for my taste. Others looked like they had just been brought in from other kits and were not right for a Barclay. The backhead is a work of fiction and the sand boxes are more conical than rectangular. First target, the smokebox.


53366178354_20c82c4132_k.jpg

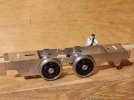
The smokebox protrudes a little from the front of the saddle tank and this is represented with a cast whitemetal disk. Not bad but had a bit of a divot out of it and was not quite as sharp as I would have liked. Also an easy fix with the lathe so I spun up a new one in brass, adding a peg to the back for a more positive location on the tank front.

53381536793_2b07cb1226_k.jpg

Now soldered to the tank front, I'll epoxy the door on when I've finished soldering brass and nickle silver.

53364969027_a9f0b693bb_k.jpg

The crossheads are a bit of a puzzle. Three options are provided, two cast and one etched. I can't for the life of me work out how the etched version is supposed to work, there appears to be a front (No. 66, above) but no center or rear. How do they stay in place?! Of the cast options, one has the piston gland/rear and slide bars as a single brass casting, while the other has these components separate in nickle silver and whitemetal (there are two options for motion bracket and cylinder etches to match the various options) Of the 4 cast crossheads, only 1 has a recess for the connecting rod to sit in, the other 3 are solid!

53273449494_8042b02cdc_k.jpg

I've opted for the brass casting, although I reserve the option to go for one of the others once I start building up the chassis. The castings were quite distorted and a significant amount of material needed removed to get the crossheads to fit the slidebars. the hole in the piston gland is quite large so I will probably sleeve that and may replace the piston rod with a steel pin which will be rounder, straighter and look more like steel!

This will be a slow-burn project, the kit currently sits in my home-office and provides a pleasant distraction of cleaning up parts when I need a break.

best regards from Stockholm, George!
 

Ian@StEnochs

Western Thunderer
I have a soft spot for Barclays too. Most of the pits around where I grew up used them and my local preseved line relies on them. I have been involved in their maintenance and got to drive them too. Simple rugged machines.

I did a test build of the kit for Trevor before he put his 14" kit on the market. Fit was good and the castings of good quality. Certainly not like those ilustrated. I got to keep the model. Fictional livery but very similar to that adopted by NCB Ayrshire areas.

Ian.
20231207_143605.jpg
 

George M

Active Member
Thankyou for your replies!

I have a soft spot for Barclays too. Most of the pits around where I grew up used them and my local preseved line relies on them. I have been involved in their maintenance and got to drive them too. Simple rugged machines.

I did a test build of the kit for Trevor before he put his 14" kit on the market. Fit was good and the castings of good quality. Certainly not like those ilustrated. I got to keep the model. Fictional livery but very similar to that adopted by NCB Ayrshire areas.

Ian.
View attachment 203518


Ian, A very nice build. I think the problems I have encountered so far can all be attributed to the age of the molds, and most can be dealt with easily with a file. I assembled the coupling rods last night and they were spot on (more than can be said for some kits I've built!) My only (very minor) grip is that the cotter pin and oil pot are etched on all 3 layers, but are easily removed from the outer and inner, which aids the sense of depth on these components.

I've long admired the work of the ARPS, your No.16 is the prime inspiration for this build and I will seek to produce a slightly simplified version of her current livery when I get to that stage ...

best regards from Sweden, George!
 

PhilH

Western Thunderer
George,
I posted some detail photos of a similar 14" loco (AB 1142) here which may be of use if you haven't already seen them:
Prototype - PhilH's Industrial Railway Photos
Post #140 (bottom of the page)

No.6 was a larger 16" cylinder loco and I saw it working at Kinneil Colliery on a rather overcast day in July 1976, not far from where its based now and in fact the Bo'ness & Kinneil Railway runs through the former colliery site. It was in remarkably clean condition and a credit to its driver who obviously took a pride in the appearance of his locomotive.


25023B © PGH.jpg


25031B © PGH.jpg
 

George M

Active Member
Many thanks @PhilH

There are so many similarities between the 14" and 16" that all photos are both useful and very welcome, especially as I am not modelling a specific locomotive.
 

robertm

Active Member
This is my 16”, built from Mercian kit. Like yours, lots of extra and confusing bits but I muddled through. The chimney is awful and I would like to source one like on NCB No6.
i shall follow your progress to see where I went wrong!
BobIMG_0716.jpeg
 

George M

Active Member
20231208_225445~2.jpg

Well the Barclay continues to entertain ...

Rods are fairly conventional, made of 3 layers of etched NS, and a couple of bits of brass to represent the brasses. The only challenge here was the presence of 4 etched coupling rods that are slightly longer than all the others. I'm guessing some of the etches are shared with another kit and these came along for the ride.

20231210_002041.jpg

After taking care to assemble the rods the same length, and ream the holes for the bearings together, I dropped everything in the chassis jig and ... nothing lined up!

Took me an age to chase down the problem (checking everything twice, saying many words naughty and not so many nice). Turns out one of yhe bearings wasn't concentric!

20231210_001603~2.jpg

Right hand one in this picture. Probably should have spun up a new one on the lathe but was feeling stubborn so elongated the hole in the frame until everything lined up and I could solder it solid. The outer rim of the same bearing turned out to be too thick as well and bound when I tightened the Slaters wheel in place, so had to gently file and sand that back as well (should have made a new one ...)

20231210_010451.jpg

Anyway, I now have a nice square free runnung chassis with all 4 wheels on the ground.

Best regards from Stockholm, George!
 

Attachments

  • 20231210_010451.jpg
    20231210_010451.jpg
    198.3 KB · Views: 3

Ian@StEnochs

Western Thunderer
View attachment 203675

Well the Barclay continues to entertain ...

Rods are fairly conventional, made of 3 layers of etched NS, and a couple of bits of brass to represent the brasses. The only challenge here was the presence of 4 etched coupling rods that are slightly longer than all the others. I'm guessing some of the etches are shared with another kit and these came along for the ride.

View attachment 203676

After taking care to assemble the rods the same length, and ream the holes for the bearings together, I dropped everything in the chassis jig and ... nothing lined up!

Took me an age to chase down the problem (checking everything twice, saying many words naughty and not so many nice). Turns out one of yhe bearings wasn't concentric!

View attachment 203677

Right hand one in this picture. Probably should have spun up a new one on the lathe but was feeling stubborn so elongated the hole in the frame until everything lined up and I could solder it solid. The outer rim of the same bearing turned out to be too thick as well and bound when I tightened the Slaters wheel in place, so had to gently file and sand that back as well (should have made a new one ...)

View attachment 203679

Anyway, I now have a nice square free runnung chassis with all 4 wheels on the ground.

Best regards from Stockholm, George!

Nice work George, I share your pain at the wonky bearing. I have had that experience too and it can take an age, and a lot of frustration, to find the problem.
Now I alway incorporate springing, or at least compensation, in all my locos to help with good current collection and it is a lot easier than trying to get that exactly square chassis! Just remember when you get the body built it will be rigid and it is only too easy to put a twist on your chassis when you screw the two together. I learned that lesson many years ago when a free running chassis suddenly became a basket case once the body was on. Compensation gets rid of the problem. A short wheelbase pug needs very little and mine only get a rocking front axle.

Ian.
 

George M

Active Member
A few new challenges with the wee Barclay.

The buffer beam is made up of 3 layers of etch, 2 NS and 1 brass. I found that one brass layer was missing ( could easily have been my fault as this build is split between 2 sites). No problem to knock up a new one from scap etch and decorate it with rivets from my stash from Scale Hardware. Indeed it looks so much better than the pressed out half etches at the other end I may drill them out and substitute cosmetic rivets there as well.

20231215_004046.jpg

Now, I thought I'd better check the fit of the footplate at this point ... oh dear.

20231214_182714.jpg

The rear of the footplate has a loop that supports the handbrake column, I assumed the footplate would lie over the rear buffer beam.

20231214_182724.jpg

But this leaves a substantial gap at the front, more than one buffer beam worth. Also, none of the bolt holes line up. More seriously...

20231214_182906.jpg

The wheel rims stick up above the frames, interfering with the footplate.

20231214_182847.jpg

This one will require a bit of thought. A couple of spacers? A bit of cut n shut? Probably a combination of both. I think i may put some of the major superstructure components together first to see how everything lines up before deciding.

All the best from Stockholm, George!
 

Ian@StEnochs

Western Thunderer
George,

You must have a different set of etches to the one I built. My footplate fitted between the centres of the buffer planks ok and the handbrake support is in the correct place.

The Slaters wheels you have are 3’8”, only Barclay wheel they do, so I think oversize for the prototype. I used the same wheels but they are turned down to S7 profile so just give running clearance under the footplate.

Ian.
 

AJC

Western Thunderer
George,

You must have a different set of etches to the one I built. My footplate fitted between the centres of the buffer planks ok and the handbrake support is in the correct place.

The Slaters wheels you have are 3’8”, only Barclay wheel they do, so I think oversize for the prototype. I used the same wheels but they are turned down to S7 profile so just give running clearance under the footplate.

Ian.

3’ 8” would be right for a 16” (same issue occurs in 4mm, incidentally - Gibson only do this larger wheel rather than any to suit the smaller types).

Adam
 

George M

Active Member
After a bit of a pause due to the usual Christmas shenanigans, and the rest of the family taking turns with some 'orrible lurgy no. 1 wee guy brought back from school, I'm finally back at the workbench.

20231230_003514.jpg

A little fun with the lathe. While the casting for the tank filler was far from the worst offering and, with a little work, quite usable, I have a lathe so why not. It is a bit taller than the original casting as I will enlarge the hole in the tank and embed it rather than just solder on top.

20231230_003537.jpg

Anyway, I wanted to be able to open it! I will probably fit this loco with RC and this would be a great place to put either the On-Off switch, or the charging socket. I'm also working on a solution to the somewhat oversized wheels of which more anon ...

20231230_005613.jpg
 

George M

Active Member
The wheels provided in the kit protrude 0.75mm above the frames and foul the underside of the footplate.

20240108_005602~2.jpg

My solution is to add a pair of 1mm brass plates to the top of the frame stretchers.


20240108_005714~2.jpg

This in turn means the top of the buffer beam, which lines up with the top of the frame, is now too low. I didn't want to just move it up as the bottom should align with the bottom of the frame, so I made a pair of new ones, suitably decorated with Scale Hardware rivets, from the same 1mm thick brass sheet. This to my mind looks better than the triple laminate provided on the kit anyway.

20240108_005803.jpg


While I was at it, I altered the chassis-body fixing arrangement. The bolt holes on the rear stretcher didnt line up anyway! The rear spacer sheet is extended forward about 2mm.

20240108_005841~2.jpg

A corresponding slot is built on the underside of the footplate. This is a neat fit between the frames.


20240108_005954~2.jpg

The forward fixing botis attached to the footplate and passes through an elongated slot in the forward stretcher.

20240108_010018~2.jpg


The footplate then slides back to engage the rear stretcher. I think I found this idea in one of Ian Rice's writings, the idea being with only one bolt, the chances of the body distorting the chassis is reduced. The use of 1mm brass plate will certainly help here!

20240108_010235~2.jpg

So the required clearance has been created and the subterfuge will be hidden by the valances when fitted

20240106_022451.jpg


Best regards from an icy Stockholm, George!
 

George M

Active Member
Work and family keep intruding on modelling time, however a little progress on the wee Barclay. I'm awaiting the arrival of a new 3.7v motor from China, very delayed, probably travelling via Cape Town rather than Suez right now, but decided to press on with the body.


20240316_132841.jpg


Generally the fit of parts here has been good and the cast safety valves are some of the best castings in the kit.

20240316_132750.jpg

The chimney needed a bit of work, there was a quite prominent parting line and the curvature of the base was too tight. In the end i drilled out the centre of the casting, taking out the spigot in the process, and reformed the base using a combination of bending and sanding against the tank itself. While you cannot see it here, I've also made some large cutouts in the back of the tank so I can get the battery and RC gubbins in. Also thinking of ways to make it easy to dismantle for painting. Beginning to look like a Barclay now ...

Meanwhile, a bit of a rabbit hole has developed...

20240316_010936~2.jpg

One of my favourite runs when I lived in Switzerland was the pendelzug on the Furka Oberalp. I've been slowly assembling an HOm set via ebay.

20240316_010818.jpg

It is a very pleasant job gently adding and refining the detail on these supurb models.

Best regards from Stockholm, George!
 
Scottish Wagon Works Pickering end-door wagon New

George M

Active Member
As a bit of light relief I put together one of the new 7mm scale Scottish Wagon Works R Y Pickering end-door wagons:

53659085647_4bbe3d1791_o.jpg

These are high quality 3D prints, the level of detail is amazing and makes the whole painting and weathering process a real pleasure.

53659946716_82e4b145c5_o.jpg

Hard to believe those end-door clips are plastic!


53660171023_741dde6e37_o.jpg


53659085832_c94562dc7c_o.jpg

When I bought this kit, my one thought was that they need to carry a stock of those extras you need to, or might want to buy for this kit. In this day of predominantly internet shopping, a one-stop-shop is definitely preferred, especially for us internationals! I don't mind (too much) paying the import duties, I do after all work for the (Swedish) government, taxes pay my salary and fund my work. I do however object to paying an exorbitant fee on each parcel to a failing privatised public service for the privilage of taking my money. So limiting the number of parcels is welcome.

When I checked back to their website today I was very pleased to see they now carry a stock of wheels, couplings and steel buffer-heads! I'll definitely be back for more from these people.

best regards from Sweden, George!
 
Top