You are using an out of date browser. It may not display this or other websites correctly.
You should upgrade or use an alternative browser.
You should upgrade or use an alternative browser.
7mm Richard's 9f workbench
- Thread starter richard carr
- Start date
richard carr
Western Thunderer
richard carr
Western Thunderer
A bit more progress on the coupling rods.

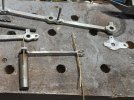

I've now finished the second side of my coupling rods.
I also found some photos I took, a long time ago of the rods and valve gear of Evening Star at the Swindon museum (is it still there ?)
I then realised I was using the main rod the wrong way round, so I just had to swap the left hand with right hand ones over.
I have also started progressing one of the chassis, as I want to get the cylinders and side bars added to test the clearances, there is a great deal of side play at the moment.


I've now finished the second side of my coupling rods.
I also found some photos I took, a long time ago of the rods and valve gear of Evening Star at the Swindon museum (is it still there ?)
I then realised I was using the main rod the wrong way round, so I just had to swap the left hand with right hand ones over.

I have also started progressing one of the chassis, as I want to get the cylinders and side bars added to test the clearances, there is a great deal of side play at the moment.

Stephen
Western Thunderer
I also found some photos I took, a long time ago of the rods and valve gear of Evening Star at the Swindon museum (is it still there ?)
She's up in York now on display. I'm sure when I looked over her, she had rods off of other 9Fs, and it was well known that there was a merry go round of parts from the various preserved 9Fs.
When 92085 was cut up at Woodham's in the early 80's, two of the chaps restoring 92240 at the Bluebell, drove up there in a Volvo estate and filled it up with whatever parts they could. It looks like some of the motion on 92207 is also from 92085.
If you need any more photos of 9F motion, let me know and I can grab some next time I rostered at the Bluebell - 92240 is quite conveniently parked in Sheffield Park station.
Cheers,
Stephen
Tim Humphreys ex Mudhen
Western Thunderer
Richard,
There's a 9f at Bressingham Museum, I believe its 92203 on loan from the NNR. Not far away for a look around it.
Tim
There's a 9f at Bressingham Museum, I believe its 92203 on loan from the NNR. Not far away for a look around it.
Tim
richard carr
Western Thunderer
Thanks Nick
Those are really useful.
Richard
Those are really useful.
Richard
James
Western Thunderer
Evening Star at the Swindon museum (is it still there ?)
It's at the NRM.
richard carr
Western Thunderer
I started work on the cylinders last night. There's quite a few parts to put together, it's not like a DJH cast in one piece job.

So the first job is to solder the nuts in place and then fold up the etch to get this
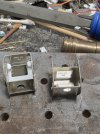
Lots of tabs holding everything together whilst you solder it.

Then you need to start adding the castings, very nice castings I have to say and the wrapper to get a finished cylinder.


The wrapper is a bit of a faff to get it in exactly the right place and all square, and without burning your fingers, only 5 more to make, hopefully the others will be a bit quicker.
Richard

So the first job is to solder the nuts in place and then fold up the etch to get this

Lots of tabs holding everything together whilst you solder it.

Then you need to start adding the castings, very nice castings I have to say and the wrapper to get a finished cylinder.


The wrapper is a bit of a faff to get it in exactly the right place and all square, and without burning your fingers, only 5 more to make, hopefully the others will be a bit quicker.
Richard
richard carr
Western Thunderer
So last night I finished off the second cylinder, fortunately this one only took 30 minutes about a third of the time of the first one.
Next it's the motion brackets, these need drilling out for and tapping for a 12ba screw and the the holes for the slide bar need cleaning out to 0.7mm. Some more gorgeous castings.
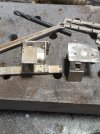
The slide bars are in 3 parts, 2 separate lower bars and a single top bar, you can see that in the photo above and below are the 2 lower bars these are still attached to one another and will stay that way until they have been fixed to the top bar and soldered in place.

The cross head needs fixing in place at the same time, and the instructions suggest that the piston valves etc need fitting at the same time
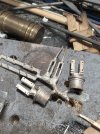
Next it's the motion brackets, these need drilling out for and tapping for a 12ba screw and the the holes for the slide bar need cleaning out to 0.7mm. Some more gorgeous castings.

The slide bars are in 3 parts, 2 separate lower bars and a single top bar, you can see that in the photo above and below are the 2 lower bars these are still attached to one another and will stay that way until they have been fixed to the top bar and soldered in place.

The cross head needs fixing in place at the same time, and the instructions suggest that the piston valves etc need fitting at the same time

richard carr
Western Thunderer
More progress last night.
I got the first slide bar together with it's crosshead and mounted onto the slide bar bracket, it really does look good.
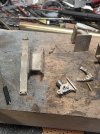
The instructions recommend test fitting everything before soldering the piston rod into the crosshead.
So here the slide bar bracket is screwed to the frames, the cylinders are just clipped in
The piston rod needs to be shortened that's why I have pulled it out.
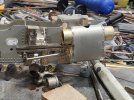
The 3 part slide bars are pinned together with 0.6mm NS wire.
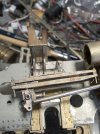
One thing I did find was that for one of the kits there are 2 right hand slide bar brackets and no left hand one, but a call to Dave Sharp this morning and a replacement will be with me very soon, great support as always.
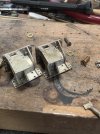
I got the first slide bar together with it's crosshead and mounted onto the slide bar bracket, it really does look good.

The instructions recommend test fitting everything before soldering the piston rod into the crosshead.
So here the slide bar bracket is screwed to the frames, the cylinders are just clipped in
The piston rod needs to be shortened that's why I have pulled it out.

The 3 part slide bars are pinned together with 0.6mm NS wire.

One thing I did find was that for one of the kits there are 2 right hand slide bar brackets and no left hand one, but a call to Dave Sharp this morning and a replacement will be with me very soon, great support as always.

richard carr
Western Thunderer
It's been a busy week for work, so I haven't had that much time for modelling.
I have been building up the other 4 cylinders
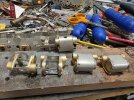
4 are done and I still have to add the wrapper to the final two. I have also been checking the kits to make sure that I have everything and I think I do, I also found that the kits include spare wrappers for the cylinders, clearly Dave was expecting us to have difficulty with this part.
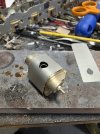
I find that the best way to bend them is to start with the cylinder itself, this gives a bend but it just isn't tight enough

So I'm using some 12mm brass bar to help, as off the cylinder this is what you get

and after bending round the bar you get this.

Then you can put it back on the cylinder frame to start the second bend and then finish it with the bar to get this
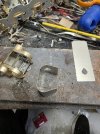
So hopefully now this will only take 10 minutes to solder the wrapper onto the frame.
I have been building up the other 4 cylinders

4 are done and I still have to add the wrapper to the final two. I have also been checking the kits to make sure that I have everything and I think I do, I also found that the kits include spare wrappers for the cylinders, clearly Dave was expecting us to have difficulty with this part.
I find that the best way to bend them is to start with the cylinder itself, this gives a bend but it just isn't tight enough

So I'm using some 12mm brass bar to help, as off the cylinder this is what you get

and after bending round the bar you get this.

Then you can put it back on the cylinder frame to start the second bend and then finish it with the bar to get this

So hopefully now this will only take 10 minutes to solder the wrapper onto the frame.

Ian@StEnochs
Western Thunderer
Nice to see your bench is as cluttered as mine!
richard carr
Western Thunderer
Ian
That's after a tidy up too.
Richard
That's after a tidy up too.
Richard


