1/32 finescale in the garden

andrew60

Member
After cutting and aligning, the long section of plain line was connected up with a bus wire and droppers well soldered to the undersides of each of the approx 6ft rail lengths (these are connected with plastic rail joiners). Holes were drilled through the concrete for the droppers, to avoid unsightly straggly bits of wire on the surface, then time for a first test.....part-finished Druid did the honours, complete with magnificently earthy sound chip. Ignore the colours - Youtube's algorithms seem to think Warships should be painted luminous pink with Dayglo ends:


Turning my attention to the colour of the track, I was aware that what works indoors probably won't in the garden, so not a simple matter of a quick spray with Railmatch track colour. Neither was hand painting an option given the lengths involved. Long story short, after several experiments and blind alleys I settled on the application of three layers: Upol Acid8 etch primer as a base, followed by Halfords outdoor Camouflage Brown. This looks more 'Lindt chocolate selection' than 'rusty rail sides' so the third layer was a light pass of Molotow Orange Brown (graffiti art). Overlaying one colour with another often produces a pleasing effect, and a slightly translucent quality. It all sounds a bit of a faff, but each layer is very quick drying, and as with all spraying, it's the masking which takes the time, and the actual painting is very quick.

IMG_6079.jpg Masking up to leave the rail sides and chairs exposed on one side, but with both rails dealt with at the same time.


IMG_6051.jpg
After spraying the etch primer and brown on one side and before the orange-brown overspray which produced a pleasing rust tint. Any slight unevenness is fine, reflecting variations in the real thing. On the visible sections, the process was repeated from the other side.

IMG_6052.jpg
I was pleased with the result - just needs ballast now.
 

Penrhos1920

Active Member
So that's what put me onto portable steel sections; readily moved aside for mending fences etc, and totally effaceable in a day.​
I started experimenting with galvanised - cheap and guaranteed to outlive me - but hit corrosion wherever I cut, joined, rubbed or bent it.​
Rather than have each component Hot-Dipped (zinced inside every hole and over every weld), I took a very deep breath and went Stainless.​
But, in going all-out for portability and low maintenance, I've had to sacrifice Scenic, and that really hurts!

Do you have any photos or drawings that you can share please?
 

David Halfpenny

Western Thunderer
DH: I took a very deep breath and went Stainless.

Penrhos1920: Do you have any photos or drawings that you can share please?

Just one photo, as I don't want to hi-jack Andrew's Finescale thread.
Steaming bay under construction. Bricks represent support points.​
I can carry this 3,300mm x 500mm 'board' with one hand. David​

Steaming Bay (before brazing).jpg
 

andrew60

Member
DH: I took a very deep breath and went Stainless.

Penrhos1920: Do you have any photos or drawings that you can share please?

Just one photo, as I don't want to hi-jack Andrew's Finescale thread.
Steaming bay under construction. Bricks represent support points.​
I can carry this 3,300mm x 500mm 'board' with one hand. David​

View attachment 248680
Thanks David, interesting. I'm fine with bringing in other construction techniques on this thread by the way, if it encourages a wider discussion on modelling in the great outdoors.
 

David Halfpenny

Western Thunderer
Given that generous spirit, Andrew, I'll venture just another couple of Under Construction photos.
The technique is to cut-and-braze 3m lengths of 304 stainless 'wire-basket' cable tray, and perch them on adjustable scaffold jacks.
I concede that, at this stage, it's even less scenic than roofing felt, but it does meet Mrs H's requirement to "see the garden through the railway".

Silverhill Under Construction.jpg

One day there may be Scenic Cameos but, until then, it's a Shiny Garden Sculpture + Old Gits' Playpen + Toddler Magnet:

IMG_6030 copy.jpg
.
 

simond

Western Thunderer
I fondly remember “Playmobile days” with the offspring. We had a wide variety including pirate ships and low loaders, but no trains.

the toys are super-robust and often available at boot fairs. A quick trip through the dishwasher and they’re good as new!
 

James

Western Thunderer
I fondly remember “Playmobile days” with the offspring. We had a wide variety including pirate ships and low loaders, but no trains.

the toys are super-robust and often available at boot fairs. A quick trip through the dishwasher and they’re good as new!
We still have Playmobil days! Though the trains have all been acquired over the last ten years or so. In the eighties Playmobil Trains were very expensive, allowing for inflation a basic set would cost around a grand in today's prices!

PSX_20240812_185546.jpg

For play value it takes a lot of beating!
 

andrew60

Member
Ballasting supplied by Cliff Barker has been carried out in the usual way. Spread out a section at a time, and tidied up with soft brushes to try and emulate that banked up appearance adopted by BR. Mist spray with water and a dash of washing up liquid to break the surface tension, then SBR applied. Two methods have been used: spraying is quick but messy, and requires the rails masking first. Even so there is considerable overspill from flooding the ballast with the SBR. A tidier but slower method is to use a pipette between the sleepers, which doesn't require much clean up. The jury's still out on which I prefer. SBR does leave a shiny appearance, but UV starts to break this down after a few weeks. I also tried concrete sealer, which is duller, but isn't weather resistant and breaks down at the first drop of rain.

Huge apologies for the absence of Playmobil!;) 'Bulldog' will have to do instead for fans of esoteric hydraulics....

IMG_6346.jpg

IMG_6340.jpg
 

David Halfpenny

Western Thunderer
Huge apologies for the absence of Playmobil!;) 'Bulldog' will have to do instead for fans of esoteric hydraulics....
Bulldog is fine, Andrew.

For your future Open Days, our Playmobil trailing wheels are readily re-turned or swopped-out. (Powered wheels are more tricky._
Will let you know about Playmobil loading gauge requirements ;-)​
 

andrew60

Member
Bulldog is fine, Andrew.

For your future Open Days, our Playmobil trailing wheels are readily re-turned or swopped-out. (Powered wheels are more tricky._
Will let you know about Playmobil loading gauge requirements ;-)​
Very happy to try them through the pointwork, David!:) I feel the need for guidance from a certain Association....:D
 

andrew60

Member
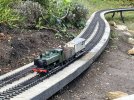
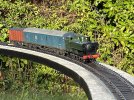
Some other areas of the garden line which haven't really featured so far, and with a visiting San Cheng/Bachmann Pannier tank...

IMG_6251.jpg
Emerging from underneath the ever-growing willow tree.

IMG_6253.jpg
In the loop area, which may one day become a station, with tracks temporarily laid.

IMG_6254.jpg
On the elevated turnback section, complete with 'out of period' Collett K42 BG - not one for those of a sensitive chocolate and cream disposition. :D
This more or less brings things up to date, so I'll do further posts as and when there is significant progress. The next job is to wire up the second part of the layout, including an automatic reverse controller for DCC operation on the turnback loop; and then there's more ballasting.
 

andrew60

Member
A largely dry day today allowed me to finally complete the wiring of the run-round loop, having previously prepped as much as possible of the track and points indoors. This area is surface wired by linking the various rail sections; the wires will be hidden in the ballast. Microswitches are activated by manually switching the points, but at present they are temporarily fixed until there is something approaching dry atmospheric conditions. This significantly increases the play potential of what was previously a long section of plain line. The turnback loop will be finished and wired up next. D6318 did the honours before gathering dusk and the threat of rain, and minutes after the big soldering iron went pop on the final lap....


David Halfpenny

Western Thunderer
Andrew, what kind of power are you using - DCC? PWM? plain DC?
(Not sure of the jargon - I've never had a 2-rail layout, but plan to electrify my end-to-end line for visitors.) Thanks
 

andrew60

Member
David, it's DCC, using ABC motor gearboxes in the locos. The rails usually need a good clean before a running session but I will probably fit 'stay alive' capacitors in each loco, to avoid those annoying power breaks, which are more noticeable outside the summer.
 

simond

Western Thunderer
Are you going to change your steps to a footbridge? It’ll be a very effective trap for visitors if not!


( there was a cellar bar in Poland that I used to visit. It had one irregular step in the staircase. It got a few on the way down, and rather more on the way up… :) )
 

andrew60

Member
It is slightly awkward, but the steps have a practical function as an access point where the mains plugs and unplugs underneath the concrete deck, being roughly at the mid point of the line, and a waterproof box will sit between the deck and the step for the electrical gubbins (the two ends of the layout will be on separate circuits). Maybe visitors should carry out their own risk assessment, and sign a legally binding disclaimer, as well as pay damages if they trip over and damage my stuff! ;) Or they can just walk around on the grass....
 

David Halfpenny

Western Thunderer
David, it's DCC, using ABC motor gearboxes in the locos. The rails usually need a good clean before a running session but I will probably fit 'stay alive' capacitors in each loco, to avoid those annoying power breaks, which are more noticeable outside the summer.
Thanks, Andrew,
Does that mean every loco to run on your track has to have exactly the same onboard DCC gear?
And why are microswitches needed, please? D

(Simon, it's said that, in the days when big houses sometimes hid heretic priests, some fitted uneven staircases, in the hope that a fleeing priest would have learned the sequence, while pursuing soldiers would tumble in a heap of sharps.)
 

andrew60

Member
I use ESU decoders in my three locos, and only operate basic functions - speed control and a few noises, but apparently other decoders such as Zimo could be operated too (unless someone on here knows different).
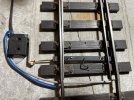
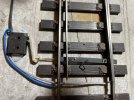
Microswitches are positioned next to the point blades and are operated by physically changing the point via an insulated tie bar (see photos). Wired up to the rails, there is also a common wire to the rails at the nose, which is changed +/- by the switch. The pics are just rigged up indoors rather than outside, but the wires should be lost in the ballast; the tie bar and 'Peco-type' switch between the blades should be covered by one of those metal cover plates, while the microswitch itself will have a timber-like footboard cover with sloping ends which was sometimes used to cover point rodding. The tie bar itself is not of course prototypical but won't be very visible, and some compromises are necessary for ease of operation.IMG_6393.jpgIMG_6392.jpg
 
Top