JimG
Western Thunderer
Things have moved on a bit in the last couple of weeks. I had a chat with Richard (Dikitriki) about needing to build about twelve feet of low relief buildings and at the time of our discussion I had only achieved about one foot of this. ") So after sorting out the windows for the first building, I opted to build more in the style of this building so that the work on the windows wouldn't go to waste.
So after sorting out the windows for the first building, I opted to build more in the style of this building so that the work on the windows wouldn't go to waste.


The first building is on the right and the new work fills up the rest of the board - three feet's worth. What I'm also trying to achieve is plenty of relief on the buildings to get away from the low relief slab against the backscene scenario. A gantry crane will poke out of the top of the large opening just to the right of the railroad car. This crane would have been to load/unload from the railroad siding or from a barge. There will be a narrow tie-up jetty roughly parallel to the siding for barges of for the railroad float car. I'm thinking I might have to make the crane de-mountable since it could be liable to damage during carriage to and from exhibitions.


Just a couple of low angle shots to show a bit more of the detail.

...and a shot showing more details of the protrusion at the end. I might colour the brickwork differently on this part to show a later built extension. I'm going to site a tank for some liquid in this space, hence the containment wall and the doorway part way up the wall. There will be a flight of steps down from the door, and a lot of excuses for plenty of pipework, valves and pumps.
I've learned a lot while building this on how to make sure everything stays stuck together. The MDF delaminates quite easily, especially on the brick etched side , so I found that depending solely on a joint between MDF parts didn't last all that well. So I've now devised a system of re-enforcing all the corners so that things stay stuck together in the rough and tumble of building them.
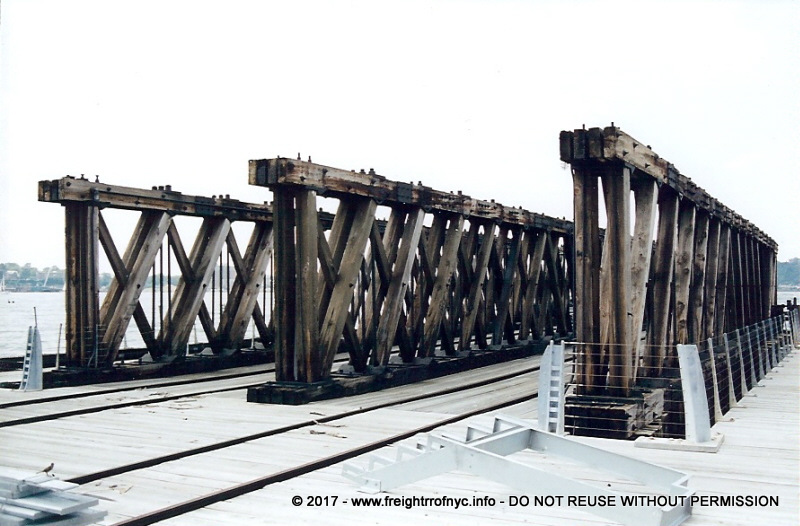
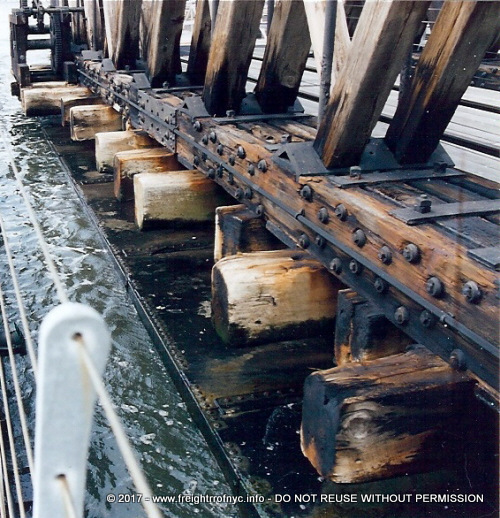
The next job on this board will be to arrange the transfer bridge for the car float. I want to find out the gradient I can incorporate in the bridge so that all my locos and stock can negotiate it with no problems. This will also establish the height of the deck on the car float.
Jim.
So after sorting out the windows for the first building, I opted to build more in the style of this building so that the work on the windows wouldn't go to waste. The first building is on the right and the new work fills up the rest of the board - three feet's worth.
What I'm also trying to achieve is plenty of relief on the buildings to get away from the low relief slab against the backscene scenario. A gantry crane will poke out of the top of the large opening just to the right of the railroad car. This crane would have been to load/unload from the railroad siding or from a barge. There will be a narrow tie-up jetty roughly parallel to the siding for barges of for the railroad float car. I'm thinking I might have to make the crane de-mountable since it could be liable to damage during carriage to and from exhibitions.Just a couple of low angle shots to show a bit more of the detail.
...and a shot showing more details of the protrusion at the end. I might colour the brickwork differently on this part to show a later built extension. I'm going to site a tank for some liquid in this space, hence the containment wall and the doorway part way up the wall. There will be a flight of steps down from the door, and a lot of excuses for plenty of pipework, valves and pumps.
I've learned a lot while building this on how to make sure everything stays stuck together. The MDF delaminates quite easily, especially on the brick etched side , so I found that depending solely on a joint between MDF parts didn't last all that well. So I've now devised a system of re-enforcing all the corners so that things stay stuck together in the rough and tumble of building them.
The next job on this board will be to arrange the transfer bridge for the car float. I want to find out the gradient I can incorporate in the bridge so that all my locos and stock can negotiate it with no problems. This will also establish the height of the deck on the car float.
Jim.