Unklian's G3 workbench .

AndyB

Western Thunderer
Hi Ian,
A couple of questions if I may?
Which way will you put the split line in the mould for the housing?
Is the green bit brass (painted?), and the white bits plastic - superglued on?
I have a few 'special' buffer housings to produce myself at some point, so just collecting ideas.
Andy
 

unklian

Western Thunderer
Hi Andy,
I will split the mould horizontally in half along the middle of the white rib, there is one on the other side too.
The turned green bit is pattern makers resin and the white ribs are styrene superglued on as you so rightly surmised.
The brass core is K&S rod and tube, the brass nuts are 16BA and the backplate and nuts is all styrene.
I can get way with these materials because I use the Tirantis Centricast system which uses cold cure rubber for the moulds. Rather than the traditional whitemetal casting technique with heat vulcanised moulds.
Hope that helps Ian
 

unklian

Western Thunderer
With the weather being a bit grotty and me being too tired for gardening I got back to the bench. I have a few little problems to decide about on the LNWR D88 van, so I got these two Williams Models Brighton opens up and rolling. RIMG4166.JPG
I decided to cut down the ends of one for variety and because very few of them reached the Isle of Wight with curved ends. I did say I like the Isle of Wight didn't I ? So a bit more brake gear and they will be off to the paint shop. I love one piece bodies :D
 

unklian

Western Thunderer
And back to the D88 for a bit.RIMG4166.JPG

I thought I would back track and add a couple of thumbnails of the D88's underside. The kit is a bit unusual in that it comes with a one piece body including the roof, but no floor. Great but not so good for installing the under gear. There is a suggested method in the instructions but I decided to fit a floor. So I cut one as a loose fit from 9mm ply and glued it in with car body filler. I cut and screwed some bits of wood to it to set it at the right level relative to the solebars, the w-irons are held on with wood screws and some stripwood glued on provides location for the brake gear.D88 2.JPG RIMG4175.JPG
 

geoff_nicholls

Western Thunderer
If you give the inside of the LBSC opens a thin wash of black paint, it brings out the bolt detail. I used black and rust coloured permanent markers on my wagon, after painting the inside a wood colour.
 

Jon Nazareth

Western Thunderer
Ian

What is your success rate with using the chemical blacking process? For me it seems to become very flaky very quickly. I did dilute the blacking liquid and achieved a fairly good result the time before last but when I used the same solution on another component, it just kept flaking off, very annoying :headbang:

Jon
 

unklian

Western Thunderer
Hello,

Jon N, I too have found the whole Chemical Blackening process a bit variable. There seem to be a number of variables that affect success. The first is the type of metal, nickel silver and some steels seem particularly awkward. Then there is the surface finish , polished, cast or hard surfaces don't blacken as well. The part to be blackened has to be very clean and grease free. Some sort of mild acid cleaning solution works well. It is as well to dilute the blackening solution, but see also any instructions on this. Some solutions don't work well colder than room temperature ie. 20C. As you say when the blackening doesn't 'take' it either goes powdery or flakes off. I think this can be because the chemical reaction is going too fast. I have had some success with Birchwood Casey gun blue on brass, which you paint on and wash off with water, although you have to do a few applications to get any depth of finish. On steel I have been using some chemicals, a four part process, I got years ago from the M.E. exhibition, called METALBLAK from an outfit called Delway Technical Services, although I am not sure if they are still going. Another factor seems to be the age of the chemicals, they do go off after a few years. There are a lot of companies offering blackening kits, just be sure what you get is for the type of metal to be blackened, the main difference being between ferrous and non-ferrous. One further thing is the final finish, most processes recommend soaking in de-watering oil or jade oil to finish. This helps to fix the finish and protect it a bit. One thing I discovered is that blackening doesn't rust proof steel, the oil helps prevent it. The whole process can be very messy and leaves you with all sorts of horrible chemical leftovers to get rid of .
RIMG4169.JPG

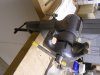
Pictured, Slaters steel tyred wheels and steel buffer heads treated with METALBLAK and dewatering oil. Brass axleboxes treated with Birchwood Casey brass black ( see background ) and jade oiled. The wheels in the background ended up being painted as it took so much chemical blackening them, but I still think the chemical finish is nicer. You can't really see it in the pic but ( disappointingly) the Mansell wheels are starting to rust .

Finally John F you had me puzzled there, but what I think you are looking at is my ancient swivel vice. Bought for me by my dad at an M.E. exhibition many, many years ago, and so very useful ever since, a true third hand. Sadly it doesn't sharpen pencils .RIMG4170.JPG
 

Attachments

  • RIMG4170.JPG
    RIMG4170.JPG
    427.5 KB · Views: 14

JohnFla

Western Thunderer
Thanks Ian, I had to ask :) in the pic it reminded me of the sharpeners we had at school ( apart from the anvil ) lovely tool I bought a swivel one it lasted a month before it snapped, they don't make em like that any more.
 

Jon Nazareth

Western Thunderer
Ian

Thanks for that. The regulator on my Manning Wardle is brass and an attempt was made at blackening with Carr's. I thought that it had worked quite well and I did give it a good wash afterwards. However, looking at it last night, I noticed that the 'black' was flaking off and when I touched it, even more so and, I did dilute the solution quite a lot. There's not much that I can do now as it the regulator is fixed in place and it will have to discolour with age in situ. I like the idea of applying oil. Where can one buy Jade oil?

Jon
 

unklian

Western Thunderer
John F, yes indeed modern cast iron can be very low in strength, although I must admit I try not to tighten or abuse my old vice too much. I have a more conventional engineers vice bolted to a piece of thick ply for bending and hitting things on.

Jon N, you can get Jade oil from a company called Liberon who specialise in furniture restoration materials. You used to be able to get other metal treatments from them but they seem to have stopped doing blackening or cold patination chemicals. The sculptors suppliers Alec Tirantis do some patination chemicals if you are near Reading way. I think I got my Birchwood Casey Brass Black from Eileens or maybe C&L. Otherwise your local field sports supplier . Interesting hobby model railways when you end up rubbing shoulders with sculptors, artists and gunsmiths .
 

unklian

Western Thunderer
The saga of the three wagons continues. With the three of them into basic colours it was time for the lettering. The D88 van turned out to be the simplest as I just used the appropriate lettering from the sheets of transfers provided in the Slaters Midland van kit. Fortunately I won't need them for the kit as I shall probably letter it for the Midland or something more obscure.
D88 10.JPG
It now awaits lacquering and final assembly.
The two Brighton opens have been a very different story. I thought I could use GRS Southern transfers from their van kit, but none of the letters were the right size and the legend ' 10 TONS' was missing. Mike Williams to the rescue with some LNWR transfers that fit the bill for the smaller lettering. But still how to do the large SR 4 times ? After a lot of head scratching I decided to try stencils and spraying them. So I enlarged my drawing to 1:22.5 and double sided it to some 20 thou styrene, carefully cut the letters out, RIMG4170.JPG double sided the stencils to the wagon, and roughly masked off the rest,RIMG4171.JPG
and blew some paint at it. Well it was alright as long as you didn't look too close, remember the next image will be about 4 times real size on a normal monitor !!RIMG4173.JPG
But with a bit of touching up it compares quite favourably with the transfers.RIMG4176.JPG
 
Last edited:

Mike W

Western Thunderer
I have no knowledge of this, but surely it would have been easier for them to spray the real ones using stencils too? Does anyone know?

Mike
 

unklian

Western Thunderer
Thank you Heather I am hoping it will all look better with a coat of matt lacquer too .

Mike I think spraying is a relatively modern industrial technique, although stencilling lettering with a sheet metal mask and a stiff brush, stippled through the stencil is an old technique. See all those Army containers for example. I think the railways stuck to brush painting as they had the skilled workers to do it. Also the old oil based paints are swines to spray. They did use transfers for the more complicated stuff like heraldic devices though .
 
Last edited:

unklian

Western Thunderer
The next stage to finish the wagons was nearly a disaster. Some of the transfers had lifted at the edges a little and there were a few bits of 'silvering' too. So I thought I could run a bit of thinned varnish over them with a brush before I did an overall spray. Well the transfers bubbled up and turned to mush. It appears that they are not compatible with oil/spirit varnish. I experimented with Precision satin varnish and Humbrol Satincote with the same result. A rummage in the paint store and I dug out the old stand by, Tamiya XF22 Clear with matting base and acrylic thinners, and it went on with no ill effect, phew.RIMG4177.JPG

The other advantage was that the Tamiya acrylic was dry in a couple of hours, so I was able to get on and do the final assembly.RIMG4178.JPG

I guess I will have to think about tackling the Iron Minks in the background next, at least the livery is simple on those. Hope you all liked the build description, I tried to make it warts and all without going on too much .
 
Last edited:

unklian

Western Thunderer
Thank you Jamie, they turned out OK considering it was something I tried on the hoof as it were. I think I can add some further refinements to my technique next time .
 
Top