You are using an out of date browser. It may not display this or other websites correctly.
You should upgrade or use an alternative browser.
You should upgrade or use an alternative browser.
The Heybridge Railway, 1889 to 1913
- Thread starter Richard Gawler
- Start date
Threadmarks
View all 81 threadmarks
Reader mode
Reader mode
Recent threadmarks
"A first Loco with Radio Control" (GOG Gazette Feb 24) MR fitted van Diagram 360 (1899) GER 10 ton van (1910) - buffers and completion Rebalancing the Wagon Fleet New Standards for Building Plain Track New Sleeper-built buffer stop New Yard crane New Water column Newsimond
Western Thunderer
Richard.
might it be worth making a gauge which could then be used to do both ends of all double ended units, and the business end of the single ended unit?
In a sense, you already have, but if it were only a few (20?) mm thick, the chances of misalignment would be negligible, I think.
might it be worth making a gauge which could then be used to do both ends of all double ended units, and the business end of the single ended unit?
In a sense, you already have, but if it were only a few (20?) mm thick, the chances of misalignment would be negligible, I think.
Richard Gawler
Western Thunderer
I expect some modellers would make a CAD drawing of a template able to locate every rail end and including two holes able to slip over a dowel or contain a dowel to put into a socket. And have this laser-cut out of sheet steel.
This might work for a group of mdellers working on the same project. But it is only me making this layout, so I expect it will all come out right if I persevere.
At the moment I am facing up to a particularly stupid mistake.
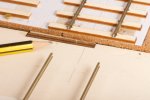
The long dashed pencil line (drawn last summer) marked a rail of the track. The short pencil line marked the centre line.
With all the care I am putting into this, how could I be so stupid?
The newly-fixed track gives me room in the fiddle yard for a main line; a run-round road spaced with a 6-foot; a siding spaced with a 10 foot; and an empty space wide enough to hold extra wagons. Whatever happens (probably, rework the edge of the basin on the navigation) I will not be taking it all up
This might work for a group of mdellers working on the same project. But it is only me making this layout, so I expect it will all come out right if I persevere.
At the moment I am facing up to a particularly stupid mistake.

The long dashed pencil line (drawn last summer) marked a rail of the track. The short pencil line marked the centre line.
With all the care I am putting into this, how could I be so stupid?
The newly-fixed track gives me room in the fiddle yard for a main line; a run-round road spaced with a 6-foot; a siding spaced with a 10 foot; and an empty space wide enough to hold extra wagons. Whatever happens (probably, rework the edge of the basin on the navigation) I will not be taking it all up

Last edited:
Richard Gawler
Western Thunderer
They didn't have to contend with spikes shoved right through the sleepers and down into the sub base 

"A first Loco with Radio Control" (GOG Gazette Feb 24)
Richard Gawler
Western Thunderer
liked your article in the gazette
Thanks Ken.
It seems amazing looking back, that this article took most of ten months in all from proposal to publication. This all began with an approach to Philip Willis, the editor of the Gazette last April, followed by a draft article in July. The draft included the photos on the garden railway but I was lacking a photo of the loco in a scenic setting.
I eventually managed to provide two - one at Taw Magna (courtesy of the Ilford and West Essex club) and one at Debenham (courtesy of a member of WT). The first became the title photo but the second was omitted.
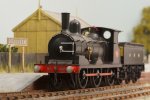
This is the lost photo from Debenham.
Of course, by the time I submitted these extra photos I had completely forgotten about the sentence, "I have the cab side plates on order and I expect I will add these next". Oh well.
I am still pleased with this model. It looks "right" to me, though the lack of a boiler backhead and crew is going to limit the angles for photography for some time

Richard Gawler
Western Thunderer
I have been finding out about page layouts for magazines.
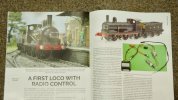
Looking at pp 66-67 of the GOG Gazette, February 2024 . . .
Fundamentally, the right-hand page is the better of the two pages for reader impact. The most premium space is the top half of the right-hand page. For some publications, the top right is an expensive area for advertising, second only to inside the front cover and the back cover. So, for my article I can see two "technical" photographs (the model on its own and the r/c equipment) in this premium space. This leaves the top left space for the title photograph, with this photo being chosen to "set the scene".
And at Taw Magna, the loco is heading towards the reader, i.e. from left to right, towards the centre of the spread and out of the page. So while the shot at Debenham is historically and geographically more believable, and therefore more appropriate for the subject, the loco is facing the wrong way.
And this photo wasn't used. This is something I need to watch. I am left handed - I usually put the light over my right shoulder, a reflector to the left, and I look for a flow from right to left. And here, I put the loco on the track the wrong way round.
There is a whole science of page layouts based on the likely behaviour of readers. Page 3 is the most read page in a newspaper — so you want (or really don’t want) your story there. The most read words are the picture captions and headlines, so put the key facts/messages in those. Faces (or locos) should face into the page. And so on. The layout should work with the predictable behaviour of the reader and will be more effective/influential if it does.
Richard Gawler
Western Thunderer
I imagine, the photos in wildlife and nature magazines get flipped to improve page composition. Not possible for a scene with clear lettering, let alone a loco with a conspicuous reverser reach rod.
Yorkshire Dave
Western Thunderer
I have been finding out about page layouts for magazines.

Looking at pp 66-67 of the GOG Gazette, February 2024 . . .
Fundamentally, the right-hand page is the better of the two pages for reader impact. The most premium space is the top half of the right-hand page. For some publications, the top right is an expensive area for advertising, second only to inside the front cover and the back cover. So, for my article I can see two "technical" photographs (the model on its own and the r/c equipment) in this premium space. This leaves the top left space for the title photograph, with this photo being chosen to "set the scene".
And at Taw Magna, the loco is heading towards the reader, i.e. from left to right, towards the centre of the spread and out of the page. So while the shot at Debenham is historically and geographically more believable, and therefore more appropriate for the subject, the loco is facing the wrong way.
And this photo wasn't used. This is something I need to watch. I am left handed - I usually put the light over my right shoulder, a reflector to the left, and I look for a flow from right to left. And here, I put the loco on the track the wrong way round.
Interesting. I would concur the header photo on the left page is the wrong way round and should have been taken 3/4 with the loco smokebox on the left as shown by your 'lost' Debenham photo.
We naturally read from left to right (apart from some middle eastern and asian languages) and in this case our eye is initially drawn to the smokebox door which then leads the reader down the platform edge straight to the text and photos on the opposite page. Looking at the header photo as it stands it is unnatural for us to study the photo from right to left, effectively zig-zagging all over the place, to look deeper into the picture and then to the text below. Whether a smaller picture bounded by a frame would alleviate this effect I don't know.
As you have alluded to the Debenham photo would have been better as we would read the picture from left to right starting at the smokebox. Then drop down to the text below.
Like all publications, at the end of the day it's the editors decision on how to fill and maximise the use of page space.
Lyndhurstman
Western Thunderer
Hmm.. the smokebox being on the right leads the eye into the middle of (and thus across) the page for me. But then I'm left handed...
Well done on the article, though.
Cheers
Jan
Well done on the article, though.
Cheers
Jan
MR fitted van Diagram 360 (1899)
Richard Gawler
Western Thunderer
One of my ideas behind the Heybridge Railway is to show how freight vehicles evolved during my chosen period 1889 to 1913. I sold my GWR Hydra because it didn't quite fit with the look I want for the project, and this left me without a fitted wagon. So I succumbed quite easily to buy this example from the Midland Railway.
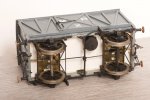
Rocking axle at one end. Perhaps the plain sheet floor is a substitute for an original kit part.
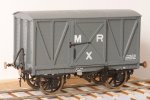
I suspect the door handle has dropped and would be better re-fitted horizontally. The vacuum hoses have been made froma flexible material, perhaps insulation from electrical wire closely-wound springs and are very flexible.
The wagon is "to carry 5 tons Passenger Trains and 8 tons Goods Trains".

Rocking axle at one end. Perhaps the plain sheet floor is a substitute for an original kit part.

I suspect the door handle has dropped and would be better re-fitted horizontally. The vacuum hoses have been made from
The wagon is "to carry 5 tons Passenger Trains and 8 tons Goods Trains".
Last edited:
Richard Gawler
Western Thunderer
Yes the springs appear to have hardly any vertical movement. The buffer centres are 25 mm above the rail head. So this might be an empty wagon; or a wagon designed for 3ft 1in wheels now riding on 3ft 7in wheels.
Last edited:
Richard Gawler
Western Thunderer
Tony please don't start to do model making. You are a mine of information and it will distract you from providing so much helpful information.
Rob Pulham
Western Thunderer
Slaters usually provide lengths of spring for vacuum hoses, in the past I have covered these in heat shrink tube, perhaps that's what's been done in this case too.The vacuum hoses have been made from a flexible material, perhaps insulation from electrical wire.
Richard Gawler
Western Thunderer
Slaters usually provide lengths of spring for vacuum hoses, in the past I have covered these in heat shrink tube, perhaps that's what's been done in this case too.
Rob you are correct, I didn't look closely enough. I've corrected my mistake in post number 1,273.
With regard to the wagon floor Slaters kits come with chassis framing so to fit etched/rocking w-irons you need to either cut some of it away to make room for them, or just replace the floor completely. Just dug out a comparison of a couple of Slaters, one with the framing as per kit and fixed wheels/axles and another where I cut it away for the w-irons.
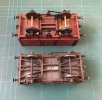
Plain sheet floor is obviously the easiest and quickest way.
Bob

Plain sheet floor is obviously the easiest and quickest way.
Bob
Threadmarks
View all 81 threadmarks
Reader mode
Reader mode


