Finally found some time to do a bit of painting on the van.
I have used Vallejo acrylic paints from my airbrush. I used the grey and the black primer for the first bit. I decided to have a go at 'pre-shading' at the priming stage. I have never done this before but the idea is that the primer coats will show through the thin top coats to give depth and interest to the finish. So rather than shading and weathering over the top coat it should show through from underneath.

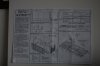
Here is the van in all its pre-shaded glory.


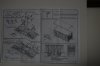
Here is the finished top coat. I made up the bauxite colour from Vallejo Model Colour Cavalry Brown (70.982) and Orange Brown (70.981) mixed 1:1. I had to thin the paint with Vallejo Airbrush Thinners to enable it to be sprayed (1:1:1) as the Model Colour paints are designed to be brushed on and are much thicker than the Model Air colours.
I'm fairly pleased with how it worked out. I could have gone a little heavier with the black in places but the varying tones are quite pleasing. This is the first thing I have airbrushed (another new skill being learned) and I am sure that I will improve but it shows what a complete novice can achieve. I still have the pin wash to apply to pick out the planking and raised details and some washes around the more worn surfaces after I have found and applied the transfers. Where did I put them safely away so that they do not get lost????
The roof of the van shows my aborted attempt at using tissue to create texture to the surface. I found that the tissue puckered and made too many creases to be believed. fellow WT'ers will put me straight on method (thank you Mr. P.I for your input already

).
Cheers,
Keith