7mm Ressaldar's Workshop - a paintshop diversion

Ressaldar

Western Thunderer
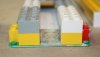
What you have described is Nature in action.... the thinners has run under the influence of gravity and run in a way which replicates (probably) the prototype. I have just looked at the referenced picture and I like the result.

regards, Graham

Hi Graham,

glad you like it.

cheers

Mike
 

Phill Dyson

Western Thunderer
Like the class 33 Mike :) .......very nice, very subtle :thumbs: ........I would be tempted to give the window a bit of a clean though ;)
 

Phill Dyson

Western Thunderer
Hi Phill,

glad you like it - I have 'cleaned' the windows - to some extent, but it does not show too much on the other photos

View attachment 11089

but I'll get the windowlene out tomorrow:thumbs::thumbs:

cheers

Mike
I quite like the dirt on the headcode panel window though, I think I would be tempted to leave that as I don't think anyone would bother to clean those windows as often ;)

Phill :)
 

alcazar

Guest
The weathering on the 33 is pretty good, but could do with more "shine" on greasy, oily areas and those scuffed by feet and hands?
 

Ressaldar

Western Thunderer
Nice and filthy just the way it should be, well done Mike

Hi Ian,

glad you like it - especially as the blue is green!:eek::))

I quite like the dirt on the headcode panel window though, I think I would be tempted to leave that as I don't think anyone would bother to clean those windows as often ;)

Phill :)

Hi Phill,

that thought had also crossed my mind and I'd decided to leave well enough alone on the headcode boxes

The weathering on the 33 is pretty good, but could do with more "shine" on greasy, oily areas and those scuffed by feet and hands?

Hi Alcazar,

agreed, I'll be getting the polishing cloths out later this morning and see what elbow grease I have left after doing a spot of fencing - requirement by SWMBO
cheers

Mike
 

iploffy

OC Blue Brigade
I never mentioned the sickish looking colour as the model it is under is what matters but since you mention it paint it BLUE you know it makes sense
 

Ressaldar

Western Thunderer
I never mentioned the sickish looking colour as the model it is under is what matters but since you mention it paint it BLUE you know it makes sense

just checking that you were not changing your colours on the mast:eek:

cheers

Mike
 

Ressaldar

Western Thunderer
I got to with the window cloth/oily rag and 'cleaned' the windows and then lightly burninshed the steps as suggested

IMG_3176.JPG

IMG_3177.JPG

IMG_3178.JPG

IMG_3179.JPG

so it will be taken down to the club tonight for a good run

cheers

Mike
 

Ressaldar

Western Thunderer
having mentioned the 'forming/extrusion' tool on another post, I thought that I should continue mention of it here.

As I said earlier, the need for the tool arose from the requirement of over 20' of actual coping for the boundary wall that is currently under construction on the layout. I thought of timber strips, but the top surface would need to be shaped in some way and that would be difficult without using a router etc, which I do not have in the workshop. So I hit on the idea of extrusion, using the 'air drying' modelling clay that I have had, unopened, for a couple of years. Then I came up with a method using Lego blocks as the main body and a piece of 30 thou brass with the shape filed out, fixed across an aperture within the Lego body.

IMG_3183.JPG
the 'box', plus ram on the right with the white end and the 'forming plate' between the grey and white blocks in the foreground.

IMG_3185.JPG

showing the end of the 'forming plate' and it's keeper block. The yellow block was cut with a junior hacksaw and as can be seen by the marks on the green 'button' in front of the plate, this row of buttons had to be cut back and also form a support at the bottom of the plate against the thrust of the ram

IMG_3186.JPG

the feed chamber with lids removed. The blue block with the white plasticard face acts as a stop for the clayat the top of the chamber.

IMG_3187.JPG

the chamber with end stop in place

IMG_3188.JPG

end aperture with ram alongside. The white plasticard allows the ram to slide rather than bump along on the 'pips' - ram shown right way up.

IMG_3190.JPG

ram and top covers shown in position in feed gap

IMG_3191.JPG

side view of previous shot.

Those of you that have made it thus far will have noticed evidence of trials having taken place and as with most trials, this one did not go too well - in as much as the clay was used straight out of the pack and the forces required to push it through the former were somewhat larger than I had anticipated, so i added some water to another sample and pushed away, this time, it was too soft and did not 'hold together'. So further experiments with mix ratios are required. Also the clay that I have has a fibre content and this may be playing a part in the procedings, so I shall be trying other clays as well to come up with an acceptable mix solution.

I also need to buy some replacement Lego blocks before the grandaughter's next visit:)):))

regards

Mike
 

Attachments

  • IMG_3184.JPG
    IMG_3184.JPG
    120.5 KB · Views: 3
  • IMG_3189.JPG
    IMG_3189.JPG
    183.1 KB · Views: 4

Dog Star

Western Thunderer
Thank you for the photographs and description. Might the clay need to be "worked" before putting into the extrusion tool? After all, the potter's of old used to have a pug-mill for working the clay before throwing pots.

Like the idea of using Lego! Do you need any clamping force to stop the "tool" from bursting under load?

regards, Graham
 

Ressaldar

Western Thunderer
Thank you for the photographs and description. Might the clay need to be "worked" before putting into the extrusion tool? After all, the potter's of old used to have a pug-mill for working the clay before throwing pots.

Like the idea of using Lego! Do you need any clamping force to stop the "tool" from bursting under load?

regards, Graham

Hi Graham,

you are correct, I should have paid more attention during art classes at school.

The clamping force so far, has been my left hand pushing down over the 'point of impact' whilst pushing the ram with my right hand. The side and end 'loading' of the Lego blocks is very good, so long as you have all of the blocks firmly pressed home, it means that the up thrust is only in this one area so applying downward pressure is thankfully, limited.I did not want to have too much 'body' in the lid and also wanted to keep the 'feed gap' to a reasonable size. Further experimentation should come up with a solution - I hope. There may well be a need for a delivery apron - no more than 5mm deep otherwise the extrusion would not move on to it. This apron could be screwed to the worksurface and the forming tool would be pushed against it and that would give additional thrusting - this time against the ram and should therefore assist with the 'delivery'

cheers

Mike


cheers

Mike
 

Dog Star

Western Thunderer
Thanks Mike - just keep on trying and when the going gets tough then just remember how many experiments were conducted by Josiah Wedgwood before he found a "body" which would throw and fire well enough to be a commercial success.

regards, Graham
 

Ressaldar

Western Thunderer
Hi Graham,

but I don't think that we will be having flowers painted on a 'blush' body colour on this though - it certainly will not be seen on Flog-it that's for sure.:)):)):))

cheers

Mike
 

Dog Star

Western Thunderer
Sorry Mike, sometimes my sense of humour is too much (and then even I lose the plot).

Maybe it is time for a stay in the Day Care Centre, I shall ask Jordan for directions to the WT Home for Those who are "Beyond the Pale".

regards, Maharg, :confused:
 
Top