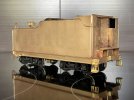
7mm Poor man's Alamosa.

PhilH

Western Thunderer
I'm pleased you've found a smokebox front, saves the trouble of measuring mine although the holes for the handrail (if that's what they are) look a little odd. Still easier to modify than start from scratch.


Smokebox Front.jpg


C48 Cab Side B.jpg

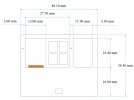
As for the cab side - basic measurements as shown above. I can give more detailed measurements or send a copy of the CAD file if required. The four pane window is fixed on the PFM model but would have slid forward on the prototype, and there would have been another sliding window to cover the rear of the opening. The panel in front either had a fixed four pane window or was plated on the inside (as on the PFM model) or on the outside. Check your prototype loco for the detail at the date required. The sunshade measures 31mm long x 5.5mm wide (in the flat) and the armrest sticks out 1.5mm from the cab side.


Cab Side.jpg

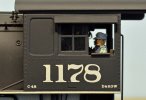
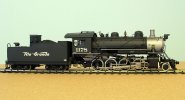
There weren't many of these available and as far as I know only 233 were produced in 1971 (info from the Brass Guide) so its surprising that two have come up for auction recently. The price of the sold one seems reasonable, until of course you add on the buyers commission ! I paid about the same for mine 30 years ago, but the £ was nearer the $2 mark back then. It just shows the vagaries of the brass market and it depends what's in demand at the time.


1178B.jpg

They were originally fitted with an open frame motor and I changed mine to a Pittman can motor and made various other modifications including a complete repaint in 'Flying Grande' livery, fitting DCC sound, etc.
There's plenty of prototype photos of these on the Denver Public Library website.
 

mickoo

Western Thunderer
Well that’s one crisis averted.


They also have the head lamp bracket casting too.

JB.
I very much doubt that's a C-48 smokebox front, more likely a generic type and labelled as C-48.

As far as I can tell, C-48's were not modified with the the additional big hinges to allow the whole front to open, they retained their 'port hole' smoke box doors as their only front end access.
 

Scale7JB

Western Thunderer
I'm pleased you've found a smokebox front, saves the trouble of measuring mine although the holes for the handrail (if that's what they are) look a little odd. Still easier to modify than start from scratch.


As for the cab side - basic measurements as shown above. I can give more detailed measurements or send a copy of the CAD file if required. The four pane window is fixed on the PFM model but would have slid forward on the prototype, and there would have been another sliding window to cover the rear of the opening. The panel in front either had a fixed four pane window or was plated on the inside (as on the PFM model) or on the outside. Check your prototype loco for the detail at the date required. The sunshade measures 31mm long x 5.5mm wide (in the flat) and the armrest sticks out 1.5mm from the cab side.


There weren't many of these available and as far as I know only 233 were produced in 1971 (info from the Brass Guide) so its surprising that two have come up for auction recently. The price of the sold one seems reasonable, until of course you add on the buyers commission ! I paid about the same for mine 30 years ago, but the £ was nearer the $2 mark back then. It just shows the vagaries of the brass market and it depends what's in demand at the time.


They were originally fitted with an open frame motor and I changed mine to a Pittman can motor and made various other modifications including a complete repaint in 'Flying Grande' livery, fitting DCC sound, etc.
There's plenty of prototype photos of these on the Denver Public Library website.
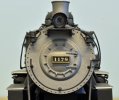
Phil, that’s magnificent. Thanks for all your help as ever. Invaluable information. Just need to see if anyone has some space for a couple of items now.

Well the auction just finished and the final hammer price was $775, a great deal less than the last one, but still an awful lot more than I paid. Ah well shouldn’t shout too loudly yet as who know how many bits I need for it.

I’m sure there will be other areas where I may need a dimension or two. I’m desperately hoping that I can change the the driven axle to the rearmost to preserve the daylight under the boiler, but this will involve milling some material out of the frames.

JB.
 

Scale7JB

Western Thunderer
I very much doubt that's a C-48 smokebox front, more likely a generic type and labelled as C-48.

As far as I can tell, C-48's were not modified with the the additional big hinges to allow the whole front to open, they retained their 'port hole' smoke box doors as their only front end access.
Having had a quick look you may be right, but then I’d be a fool to doubt you..

My chosen loco 1146 - with the sliding coupler.


JB.
 

PhilH

Western Thunderer
My chosen loco 1146 - with the sliding coupler.
JB.

If you go to the DPL website: CONTENTdm
and type "D&RGW 1146" in the advanced search box (top right hand corner) you'll find 10 photos of 1146 including two said to be on the last mixed gauge passenger train south of Alamosa with 3 narrow gauge cars.
 

mickoo

Western Thunderer
Having had a quick look you may be right, but then I’d be a fool to doubt you..

My chosen loco 1146 - with the sliding coupler.


JB.
Oh you should always doubt me :))

As I said to a previous manager in a heated debate about my skills to diagnose a (as it turned out particularly expensive) problem, I may not always be right, but more importantly, I'm never always wrong!

I've not got any pictures with the extra door brackets, D&RGW didn't seem to take them up like other railroads, maybe it's a time frame/engine size thing, bigger more modern engines appear to have them more often, perhaps there are parts inside later engines just too big to get through the normal port hole door.

It's certainly a maintenance/repair feature, you'd not want to be doing with all those nuts or bolts just to clear out the smoke box, not necessary on oil burners mind.
 
Last edited:

Scale7JB

Western Thunderer
If you go to the DPL website: CONTENTdm
and type "D&RGW 1146" in the advanced search box (top right hand corner) you'll find 10 photos of 1146 including two said to be on the last mixed gauge passenger train south of Alamosa with 3 narrow gauge cars.
Thanks again Phil.

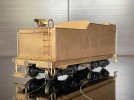
I think I have seen those before, and definitely spent many an hour searching their archives. It did remind me of the cracking shot of the rear of the tender showing the two couplers though!

Going to cost a fortune in Protocraft Type E’s :))

JB.
 

Scale7JB

Western Thunderer
Really keen to get the C-48 back into bare brass, and cellulose thinners won’t aren’t touching it at all.

It’s a shame really as the paint job is really good but it needs to come off.

Any preferences on hardcore paint stripper?

JB.
 

mickoo

Western Thunderer
Really keen to get the C-48 back into bare brass, and cellulose thinners won’t aren’t touching it at all.

It’s a shame really as the paint job is really good but it needs to come off.

Any preferences on hardcore paint stripper?

JB.
I found the same when I tried to cut back the lacquer on a Challenger tender, nothing touched it, ended up using a bead blaster at low pressure, took ages to get back to bare metal.
 

simond

Western Thunderer
JB,

Please forgive the possibly numpty question, but if the paint is good, why take it off?

Can you not overcoat it without it being too thick?
 

Scale7JB

Western Thunderer
JB,

Please forgive the possibly numpty question, but if the paint is good, why take it off?

Can you not overcoat it without it being too thick?
It’s a good question for which im not sure of the answer yet.

There is a lot of work to do to the model, and I plan to super detail it, especially the area under the cab. Maybe I can just selectively take back the paint with a glass fibre brush where required and waft over those areas when done..

JB.
 

mickoo

Western Thunderer
There is a lot of work to do to the model, and I plan to super detail it, especially the area under the cab. Maybe I can just selectively take back the paint with a glass fibre brush where required and waft over those areas when done..

JB.
You know that's the wrong answer ;), given the work planned then you need to do it correctly and get it all off, it'll be near impossible to blend where you've scratched it off with a smooth layer over the top.
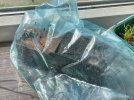
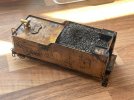
You might have to leave it in celly thinners for a few days, I've heard it can take a couple of weeks before it starts to budge. I was to impatient myself but now that I have space in the new workshop I might dunk a trial truck in there as I want to add extra brake detail and under frame detail to a few RTR models.
 

Scale7JB

Western Thunderer
You know that's the wrong answer ;), given the work planned then you need to do it correctly and get it all off, it'll be near impossible to blend where you've scratched it off with a smooth layer over the top.
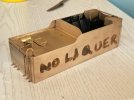
You might have to leave it in celly thinners for a few days, I've heard it can take a couple of weeks before it starts to budge. I was to impatient myself but now that I have space in the new workshop I might dunk a trial truck in there as I want to add extra brake detail and under frame detail to a few RTR models.
You could be right.

I’d love to know what the primer and paint was that was used. It really is bullet proof!

JB.
 

Scale7JB

Western Thunderer
Had a bit of time yesterday so nipped down to the hardware store to get some paint stripper. Bought a couple of different options, Nitromors and Strypit.

Strypit wasn’t great as it seemed to evapourate off of the surface too quickly even once wrapped up in a plastic bag, so pushed on with the Nitromors.

It worked well, though had to leave it to soak in for a couple of hours to get the paint really soft and blistering.

DFBDF129-618C-4D35-B2C1-832765B56560.jpeg

I thought I’d leave it in the sun to speed up the process but only had the opposite effect and needed another coat, but got there in the end.

11111A12-2D1D-42D1-ACC7-4765BAE58BA2.jpeg
I used a brass bristle brush to get all the remainder off which worked nicely with only a little collateral damage.

I was reminded by Mick that the stripper may take the paint off but would it take the lacquer off? I did a mis-spelled test with some Birchwood Casey Gun blue.

DB4B7E50-B671-49BE-94A3-CDA25DD94209.jpeg

And finally….

7B941865-6655-4675-8BEE-F322C18B169E.jpeg44A2C23E-982E-41D2-A8BD-9EF4334EB8E8.jpeg

Now on to the slightly tricker bit.

JB.
 

Scale7JB

Western Thunderer
Too add, the fumes from the paint stripper in the bag softened the glue holding in the coal load nicely and it pulled right out without any force.

JB.
 
Top