You are using an out of date browser. It may not display this or other websites correctly.
You should upgrade or use an alternative browser.
You should upgrade or use an alternative browser.
Matt's random workbench
- Thread starter matto21
- Start date
Caggers
Western Thunderer
Thank you for the likes and comments, much appreciated!
No modelling time at the moment as I'm currently upgrading the room I've been lucky enough to be able to use for the last few years. My wife, however, has now decided that this room needs to be converted into an office as she is still working from home, until the start of the next academic year at least.
So, in the spirit of compromise, I have been busy decorating and generally tidying the room up. The compromise being I get a new, bigger desk, but I have to free up space for her to have a desk too.
So queue some furious stash sorting and selling where appropriate and storing in the attic where not!
Hopefully by the end of next week, I'll be in a position to set my bench up again and resume some wagoneering!
Hi all,
Well the room clear up/sort out is done and I now have a nice tidy space in which to model. As is usual for me, my modelling focus has shifted back to aircraft building and that's what I've been concentrating on recently.


Today, however, saw me dust off a long forgotten about project. I've always had an interest in NG railways (model and real life) and several years ago I bought a Smallbrook Studios "Faun" kit and the recommended Bachmann Bill/Ben loco. Back then I disassembled the donor loco and promptly got sidetracked. One of the benefits of the room tidy up was finding the kit.
I've done a bit of work today mocking things up to see where things stand.
The biggest issue is the cab, as the motor is really visible. This hasn't been helped by my decision to remove the "door" (done because I think it makes it look more "narrow gauge"). My plan is to hide as much as I can with a driver figure...we'll see how that goes!

I'm probably going to reduce the height the buffer bufferbeam and add some cosmetic springs to the sides to disguise the obvious squareness. Buffers...not a clue so any suggestions would be most gratefully received.
Thanks for looking
Matt
Well the room clear up/sort out is done and I now have a nice tidy space in which to model. As is usual for me, my modelling focus has shifted back to aircraft building and that's what I've been concentrating on recently.


Today, however, saw me dust off a long forgotten about project. I've always had an interest in NG railways (model and real life) and several years ago I bought a Smallbrook Studios "Faun" kit and the recommended Bachmann Bill/Ben loco. Back then I disassembled the donor loco and promptly got sidetracked. One of the benefits of the room tidy up was finding the kit.
I've done a bit of work today mocking things up to see where things stand.
The biggest issue is the cab, as the motor is really visible. This hasn't been helped by my decision to remove the "door" (done because I think it makes it look more "narrow gauge"). My plan is to hide as much as I can with a driver figure...we'll see how that goes!

I'm probably going to reduce the height the buffer bufferbeam and add some cosmetic springs to the sides to disguise the obvious squareness. Buffers...not a clue so any suggestions would be most gratefully received.
Thanks for looking
Matt
MartinWales
Western Thunderer
So queue some furious stash sorting and selling where appropriate and storing in the attic where not!
mmm....anything nice?
mmm....anything nice?
I sold a load of 1/72 and 1/48 kits plus a few others I'd been hoarding!
MartinWales
Western Thunderer
Freeing up some funds for more railway stuff....
Freeing up some funds for more railway stuff....
No Martin, need to free up space and reduce the amount of stuff I'd hoarded which I'll never build.
I need to be more focused and see projects through. In the spirit of trying, I currently have a 1/48 Fw190, a 1/72 Hawk, a 1/20 F1 car, several railway-related items and the NG loco on the go (fallen at the first hurdle)!
Matt
MartinWales
Western Thunderer
Think I need to be trying harder.....
Since my last post, I've re-evaluated the loco - one thing that irritates me is the stepped footplate under the cab door. I've had a go at making a replacement footplate from plastic sheet. This looks better, but will obviously lead to more work filling the gaps underneath, and extending the rear cab to fit.

I've also purchased a Peco NG coach - for "research purposes"! Since this photo was taken, I've added full length footboards just for a bit of individuality.

I'll be repainting this, although not decided what colour yet.
Matt

I've also purchased a Peco NG coach - for "research purposes"! Since this photo was taken, I've added full length footboards just for a bit of individuality.

I'll be repainting this, although not decided what colour yet.
Matt
Hello,
Welcome to the latest installment of the tape and bluetack workbench!
I know that buffers on NG stock is unusual - far more likely are central chopper style arrangements, however I really like my coach with buffers and I'm not confident I could get choppers to work.

Note footboards and the fact I've removed the left side door droplight (would have been far easier before assembly) so I can simulate an open window.
Where was I? Buffers. I've mocked how buffers would look on the loco - and I think they look OK.

Obviously a bit wonky here. I've also replaced the door dart and safety valves with 4mm scale items which look far better. The whistle and driver are both from Modelu.

On the subject of the driver, he fulfills my original hope in that he obscures the visible motor quite convincingly.
Matt
Welcome to the latest installment of the tape and bluetack workbench!
I know that buffers on NG stock is unusual - far more likely are central chopper style arrangements, however I really like my coach with buffers and I'm not confident I could get choppers to work.

Note footboards and the fact I've removed the left side door droplight (would have been far easier before assembly) so I can simulate an open window.
Where was I? Buffers. I've mocked how buffers would look on the loco - and I think they look OK.

Obviously a bit wonky here. I've also replaced the door dart and safety valves with 4mm scale items which look far better. The whistle and driver are both from Modelu.

On the subject of the driver, he fulfills my original hope in that he obscures the visible motor quite convincingly.
Matt
Hello all,
I've been whiling away a few hours making some fake-Hunslet progress...
The cab sides as they home are way too thick, so I've replaced them with some cut from plastic sheet.

Looks better, but the roof no longer fits, as my cab is slightly narrower. I'll have to scratchbuild a replacement.
The original stepped footplate means the kit supplied rear cab piece is too short. So I cut the lower piece off and extended it to the correct length, again by using plastic sheet. The join will be further disguised later.

Slow but steady progress but I'm really pleased with how it's looking.
Matt
I've been whiling away a few hours making some fake-Hunslet progress...
The cab sides as they home are way too thick, so I've replaced them with some cut from plastic sheet.

Looks better, but the roof no longer fits, as my cab is slightly narrower. I'll have to scratchbuild a replacement.
The original stepped footplate means the kit supplied rear cab piece is too short. So I cut the lower piece off and extended it to the correct length, again by using plastic sheet. The join will be further disguised later.

Slow but steady progress but I'm really pleased with how it's looking.
Matt
Hi all,
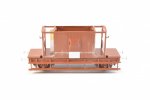
I've been plodding along, doing a few more experiments to see if this scale is doable for me. I knocked up this quick freelance wagon:

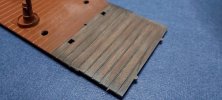
Started life as a Smallbrook Studios slate wagon, but I decided to just use the underframe parts. After a bit of tweaking, it's a reasonably convincing open wagon. I am pleased with the wooden deck made from coffee stirrers though.

I've also taken the plunge and had a go at constructing a very simple building. I'm completely out of my comfort zone here, as I've never attempted anything larger than 4mm scale before.
I wanted to have a go at scribed surface detail rather than embossed plastic sheet which I've used on most of my 4mm buildings.
I attempted to apply a layer of DAS clay roughly 1mm thick, but in reality it was difficult to get any sort of consistent thickness.


This has moved on since these photos and I also now have a roof and scratchbuilt guttering to apply.
Matt
I've been plodding along, doing a few more experiments to see if this scale is doable for me. I knocked up this quick freelance wagon:

Started life as a Smallbrook Studios slate wagon, but I decided to just use the underframe parts. After a bit of tweaking, it's a reasonably convincing open wagon. I am pleased with the wooden deck made from coffee stirrers though.

I've also taken the plunge and had a go at constructing a very simple building. I'm completely out of my comfort zone here, as I've never attempted anything larger than 4mm scale before.
I wanted to have a go at scribed surface detail rather than embossed plastic sheet which I've used on most of my 4mm buildings.
I attempted to apply a layer of DAS clay roughly 1mm thick, but in reality it was difficult to get any sort of consistent thickness.


This has moved on since these photos and I also now have a roof and scratchbuilt guttering to apply.
Matt
Hi all,
I felt I should probably relocate my wagon building here rather than clutter up my layout thread. This seems a more appropriate place!
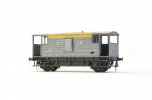
I've been working on a (relatively) new Hornby LMS brake van. While I really like the model, and it's a big improvement over the old Airfix/Dapol/Hornby RTR version, the drooping handrails really annoy me! So much so, I chopped them off and replaced them with wire.
I also made a few other, very basic adjustment (Smiths couplings, new rainstrips).
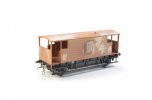
I've now managed to get the first coat of paint on it:
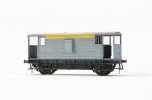
Makes a nice change to do something grey!
Matt
I felt I should probably relocate my wagon building here rather than clutter up my layout thread. This seems a more appropriate place!
I've been working on a (relatively) new Hornby LMS brake van. While I really like the model, and it's a big improvement over the old Airfix/Dapol/Hornby RTR version, the drooping handrails really annoy me! So much so, I chopped them off and replaced them with wire.
I also made a few other, very basic adjustment (Smiths couplings, new rainstrips).

I've now managed to get the first coat of paint on it:

Makes a nice change to do something grey!
Matt
AJC
Western Thunderer
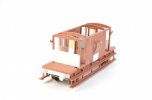
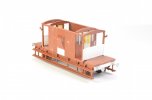
Also started this:
View attachment 162860
Another Airfix brake van, this time with roller bearings and sheeted ends.
Matt
Hi Matt,
A bit of a Parkside chassis in there too? The springs are wrong on that - you can get complete sets at a very reasonable £1.50 a set from Rumney Models with the correct J hangers. And yes, there are visible, even with the footboards! Faff though it is, replacing the handrails in the Midland van was well worth it.
Adam
Thanks Adam, I'm aware the springs are not 100% accurate but...ahem...they're good enough for me at the moment. J hangers on the other hand are proving to be more complicated to solve...Hi Matt,
A bit of a Parkside chassis in there too? The springs are wrong on that - you can get complete sets at a very reasonable £1.50 a set from Rumney Models with the correct J hangers. And yes, there are visible, even with the footboards! Faff though it is, replacing the handrails in the Midland van was well worth it.
Adam
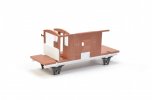
J hanger problem sorted - I've reverted back to the kit parts.
I'm a bit annoyed with myself - despite taking care when assembling the solebars, and then attaching then to the floor, the wagon had a noticeable and infuriating wobble that I could not eradicate.
So, off they came (and got destroyed in the process) and I reverted back to the kit parts.
I will try building a roller bearing van, but not this time!
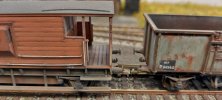
Also, another #^&& up - I managed to gouge the bodysides when removing the handrails which then needed filling as evidenced by the grey line in this photo.
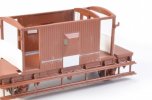
Matt
I'm a bit annoyed with myself - despite taking care when assembling the solebars, and then attaching then to the floor, the wagon had a noticeable and infuriating wobble that I could not eradicate.
So, off they came (and got destroyed in the process) and I reverted back to the kit parts.
I will try building a roller bearing van, but not this time!
Also, another #^&& up - I managed to gouge the bodysides when removing the handrails which then needed filling as evidenced by the grey line in this photo.

Matt


