Hayfields work bench

Hayfield1

Active Member
I am currently building a Springside 7mm scale Manning Wardle 0-4-0 saddle tank loco. Its something I found on eBay in a mixed lot of kits

89.jpeg 
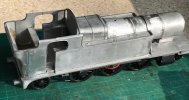
This is more or less how I found it. the first job was to buy a set of instructions then assess what was missing, not as east as you think as the parts were all mixed up with other models/parts

90.jpeg

Whilst I was waiting for the missing parts I took the chassis apart and started to clean everything up. I am very lucky as most of the large parts have been very neatly soldered together.

133.jpeg

The chassis was painted (cylinders were left as parts still need to be fitted137.jpeg

I replaced the missing plunger pickups as well as fitting the existing two, which is a job for more than one pair of hands

141.jpeg

This is the state of play by this afternoon, at lunchtime the parts I had ordered dropped through the letterbox.

I had planned to do something else as I did not expect the items to arrive so quickly. So the afternoon was spent ticking off what has been done by the previous builder, simply so I know what has been missed and where the previous builder got to.

My build plan has been revised so the body will be put aside until I get the chassis working
 

Hayfield1

Active Member
Sadly there are very few model railway shops now and to find one selling anything but RTR is even harder, this one came with a lot of incomplete kits, strangely enough required a couple of parts, which I have brought, but just realized I have only 1 step instead of two. Still not a problem Grahame at Springside is always helpful. This one owes me nothing
 

Hayfield1

Active Member
147.jpeg

I started off by tidying up the wiring, as the motor is so close to the rear axle, the axle is supplied turned down by a third between the wheels.
Then after reaming the coupling and connecting rods I fitted the cylinders

148.jpeg

The chassis was both tested without then with the body, it now runs very well

Crankpins need cutting back, then the last few chassis details need fitting, plus a bit of filling prior to painting
 

Hayfield1

Active Member
152.jpeg

The break gear is finished, tested the running again, now ready for painting

153.jpeg

About half way through the final body derailing, must order the missing step. I have decided to fit some of the cab details after painting, simply to make painting easier. I will prime the body and loose parts, then wait for better painting conditions as I air brush my models in the shed

I have decided on Prussian blue and black for the colour scheme
 

Hayfield1

Active Member
John

Thanks, I get a good deal of pleasure in finding things on eBay that others missed/failed to recognize/would not take the risk. The lot is probably my best ever find and one which has given me up to 7 items to build

I have brought incomplete Springside kits twice before and Grahame has come to the rescue supplying all the missing/broken parts. I brought very cheaply a 48xx part soldered together incorrectly and missing over 100 parts, I brought a de-solder station and was able to unsolder the main castings and start again. So it was a qualified risk, I bid on what I can see and put a worst case value on the lot. I also know even incomplete kits or spares do have a value and if priced accordingly are scooped up by other kit builders

This kit it came with other kits in both 4mm & 7mm, most missing parts from a few to quite a lot, but the parts were all mixed up. With this kit I needed to buy cast slide bars, a set of steps, crankpins, instructions and paper gauge faces, so little additional cost. I also got a Collet goods to build. Missing a few more parts, but more or less complete now just needs building. However one of my earlier finds (45xx) is next in line

Another thing I have done a few times in the past (with 4mm kits) to buy a badly built kit (very) cheaply and rebuild it, I have found it more rewarding rescuing a kit than building a new one.
 

Hayfield1

Active Member
154.jpeg

The cab parts I want to fit prior to painting are now fitted, I think I will run a bead of epoxy between the spectacle plate and firebox purely for strength, hopefully at normal viewing angles and distance it will not be too noticeable

155.jpeg

Ready for a coat of primer

156.jpeg

These are the parts which are easier to paint before fitting.
 

Hayfield1

Active Member
Looks nice. What a good find.

John
John

Something I get enjoyment from, finding something that needs rescuing

157.jpg

Something I found on eBay 2 years ago, in desperate need of a rebuild, the first Springside kit I brought with missing parts. A kit of 2 parts (perhaps even 2 builders). The chassis was well built, as you can see the tank top/boiler was soldered on top of the tank tops, the cab front was cut down to fit. Boiler ill fitting

Thankfully it was soldered together with low melt solder and came apart easily once I brought a de-solder station (both cheap and a great addition to the workshop. Its part way through the rebuild. I paid just under £93 for it and spent just over £100 (more than I ever spent on a new 4mm scale kit) replacing lost or damaged parts.

To date its been a satisfying rebuild added to by rescuing something which went wrong and perhaps the body seen as bin fodder.
 

simond

Western Thunderer
quick and effective means of desoldering low melt whitemetal.

Place model in sink - if it is particuarly heavy (and the 14 / 48xx is...) then pre-warm using hot water from the tap. Then pour a kettle full of boiling water over it. Hey Presto - a new kit!

I have built one of these, a 45 and a Hall from Springside - very happy with them but the 14/48 chassis is not fit for purpose. I recommend slotting the driving axle bearings and making a pair of rocking beams to secure the bearings. These can be pivoted in the middle of the coupled wheelbase, and the rear axle springing replaced with a central bearing. This gives very good three-point compensation. Alternatively fit hornguides and spring the loco, but given the massive cab and bunker and relatively small smokebox, the CoG is well aft, and it will be difficult to do. I guess it is possible with CSB, but I have not tried, as the compensation was satisfactory.

It's interesting, there is a debate on @Nick Dunhill thread about "unbuildable" locos - whilst I was not at all happy with the chassis, this loco is very definitely buildable - so the builder did something "off piste" with the one you bought!

looking forward to seeing it finished!
cheers
Simon
 

Hayfield1

Active Member
Simon

In 4mm scale I agree its easy to undo low melt solder in the steam of a kettle. With the Springside 48xx it was undoing large lumps of whitemetal acting as heatsinks

167.jpeg

This is a very cheap bit of kit (£30) and made life so much easier, even in construction as I failed to solder one side tight to the footplate, my attempts with a temperature controlled soldering iron proved fruitless, with this I was able to coax the joint flat. It also has many other uses especially with heat shrinking wires, plus a lot less wet and painless than the steam from the kettle
 

Hayfield1

Active Member
The next loco for the workbench is a Springside (7mm) 45xx, another eBay find. Incomplete and no motor/gears. Its been handing around for nearly 2 years

163.jpeg

The chassis looks well built and painted, I have a motor and gears in the spares box and about a year ago I got round to ordering the missing parts.

Well its time has arrived, I have practiced on both the Manning Wardle and a Springside 14xx backhead kit
 

Attachments

  • 161.jpeg
    161.jpeg
    77.9 KB · Views: 7

Hayfield1

Active Member
171.jpeg

The 45xx chassis stripped down, wheels removed and cleaned up and threads oiled. sprung pickups also removed

175.jpeg

bearings had paint removed and were cleaned and reamed until the wheels ran smoothly. Them it was the coupling rods turn, cleaned, reamed and crankpins fettled and 1 replaced, now runs freely. Sadly I broke another slide bar (thankfully have spares), plus I think I have found another missing part (G arm support)

Also taken the opportunity to check out the motor and gear meshing, all seems OK

I think I have found out why the previous builder stopped/paused the build, the wheels were not free running, mostly due to thick paint on the bearing faces, coupling rods too tight and no nuts on the front crankpins, dur to not following the instructions when building the crossheads

Making a shopping list for Alley Pally next weekend
 

Hayfield1

Active Member
A weekend of two steps forward and one back, I soldered the front and main footplates together, but forgot to turn the temperature down to 300c, nearly melted a hole in the footplate, all sorted and only missing 3 rivet heads under the smokebox.

194.jpeg

Today I stripped the chassis so I could fit the plunger pickups

195.jpeg

And tidy-up the crankpins, trouble was I misplaced the plunger pickups and springs, took me over an hour to see where I had hidden them

196.jpeg

Still in the end the plungers were fitted, wires soldered to them and tested

Wheels were fitted along with the motor and gears, tested the motor and found it worked ok

Temporally fitted the coupling rods and tested the motor again, all OK

197.jpeg

Then wired up one pair of plunger pickups to the motor and tested the chassis first then again with the body on

Now back to the instructions just to see if anything has been missed prior to completing the wiring and fettling the crankpins. A good end to a frustrating at times day
 

simond

Western Thunderer
Apropos your question on Ken’s thread on RMW, these photos may help

Post in thread 'SimonD’s workbench'
SimonD’s workbench

I absolutely would not solder a crankpin bush to the crankpin. That’s a route to buying new wheels.

there is definitely sufficient clearance between the crosshead and the wheels in the kit as built. The issue is having a nut on top of the crankpin bush as Slaters default. Your crankpin bushes need to be marginally longer than the coupling rods are thick, and you need to either tap them, so you can screw them onto a 10BA threaded crankpin glued into the wheel, or countersink the bush and use 12BA csk screws with nuts fitted into the back of the wheels. I prefer the first approach as it’s much easier to assemble. There are also some proprietary solutions you can purchase.

hth
Simon
 

Hayfield1

Active Member
Apropos your question on Ken’s thread on RMW, these photos may help

Post in thread 'SimonD’s workbench'
SimonD’s workbench

I absolutely would not solder a crankpin bush to the crankpin. That’s a route to buying new wheels.

there is definitely sufficient clearance between the crosshead and the wheels in the kit as built. The issue is having a nut on top of the crankpin bush as Slaters default. Your crankpin bushes need to be marginally longer than the coupling rods are thick, and you need to either tap them, so you can screw them onto a 10BA threaded crankpin glued into the wheel, or countersink the bush and use 12BA csk screws with nuts fitted into the back of the wheels. I prefer the first approach as it’s much easier to assemble. There are also some proprietary solutions you can purchase.

hth
Simon


Simon

Thank you very much for the advice, like Jazz you have confirmed my thoughts about the crank pin length

I never ever thought about soldering the crankpins, though on one 7mm model I brought I have come across this. I use when I am happy with the mechanism a liquid thread locker.

At the moment I plan to use 12 ba as they are fitted already, just need to buy some (10 & 12 ba) washers and a few 12ba countersunk bolts

I may try and file down a couple of 12ba nuts though, for clearance behind the crossheads

Thanks again

John
 

simond

Western Thunderer
John,

Re the solder, good to hear, I was surprised by Ken’s suggestion.

re the threadlocker, be careful, it can be just as bad. David LO Smith published an article about repairing threadlocked wheels, he had to re-bore the crankpin holes using a milling machine. Possible, but a load of unnecessary work! I don’t have threadlocker on any of mine, if they’re nipped up, they should stay put. If they don’t, it’s probably worth fixing the source of the problem rather than the symptom.

Your little 0-4-0 is a nice bit of work!

cheers
Simon
 
Top