BrushType4
Western Thunderer
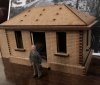
I was recently asked if I could cut out some slates on heavy paper and this got me thinking about the slates I need for my own projects. After a bit of research I've settled on Bangor Countess slates as these were generally the most popular roofing material used up and down the country and used on many railway related buildings.
The size of these are 20in. x 10in. A quick calculation later and at 7mm scale this is 11.66mm x 5.83mm. 5 mins on Qcad produced the attached;
I started to think about how they should be overlapped and a google search told me the lap should be 3in. Or 1.75mm. Great, job done. It was only when I was making a sample that I realised that the look of 11.66mm slates with the 1.75mm overlap didn't look right. Looking at countless pictures of slate roofs just informed me that I had something wrong.
Back to google...
The lap is correct at 3in. but I need to do a further calculation.
11.66mm less 1.75mm lap then divide by 2. The resulting figure of 4.955mm when laid out made much more sense.

So sorted. The positioning of the next row in real modelling terms is 4.955mm, let's call it 5mm.
Using the prototypical information for ordering slates for a project, you should know your headlap ahead of time and order the slates accordingly. For our example, a 20in. x 10in. slate requires 170 slates per square (a “square” is 100 square feet of roof coverage) when installed with a 3in. headlap.
With my drawing an A4 sized sheet of 7mm Bangor Countess slates gives you 650 slates or about 4 squares worth. A square remember is a roof area of 100 square feet or an area 70mm x 70mm.
I've ordered some grey/blue 150 GSM card and will experiment next week. My main concern at the moment is the laser kerf is about 0.2 - 0.4mm (3/8in. - 3/4in.) and I'm not sure yet if this gap will look bit wide when modelled.
Today has been an education for me. Who knew model railways could be so educational.")
The size of these are 20in. x 10in. A quick calculation later and at 7mm scale this is 11.66mm x 5.83mm. 5 mins on Qcad produced the attached;
I started to think about how they should be overlapped and a google search told me the lap should be 3in. Or 1.75mm. Great, job done. It was only when I was making a sample that I realised that the look of 11.66mm slates with the 1.75mm overlap didn't look right. Looking at countless pictures of slate roofs just informed me that I had something wrong.
Back to google...
The lap is correct at 3in. but I need to do a further calculation.
11.66mm less 1.75mm lap then divide by 2. The resulting figure of 4.955mm when laid out made much more sense.
So sorted. The positioning of the next row in real modelling terms is 4.955mm, let's call it 5mm.
Using the prototypical information for ordering slates for a project, you should know your headlap ahead of time and order the slates accordingly. For our example, a 20in. x 10in. slate requires 170 slates per square (a “square” is 100 square feet of roof coverage) when installed with a 3in. headlap.
With my drawing an A4 sized sheet of 7mm Bangor Countess slates gives you 650 slates or about 4 squares worth. A square remember is a roof area of 100 square feet or an area 70mm x 70mm.
I've ordered some grey/blue 150 GSM card and will experiment next week. My main concern at the moment is the laser kerf is about 0.2 - 0.4mm (3/8in. - 3/4in.) and I'm not sure yet if this gap will look bit wide when modelled.
Today has been an education for me. Who knew model railways could be so educational.
Last edited: