Alex W
Western Thunderer
I’m starting a workbench thread in which to describe construction of some of the models for my Diddington/Upwell Drove and Yelverton projects. It will mainly cover locomotives, rolling stock and buildings I expect, but once layout construction is under way other things, like trees, may appear, and I’ll describe my approach to them when they arise.
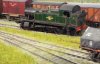
First up is the construction of some locos for the Yelverton project. The first is a class 8750 pannier, which will become 4658 of Laira shed.
I’ve started with the Bachmann rtr model, which is a nice model, and runs well, but is a bit lacking in some details, which I have added.
I studies the model, and photographs of the real thing, and read various accounts of improvements to the model, before deciding on the things I wanted to add/change:
· Add new lamp irons to the front and LH footplate from 1mm wide brass strip.
· Replace the moulded on lamp irons on the bunker back with GWR style cranked brackets from the Mainly Trains/Wizard models etch.
· Replace the partially moulded on smokebox door dart. I used a Markits one, but other makes are available.
· Add the handrail on the footplate above the front steps.
· Add the sandbox operating levers. I used the RT models etch.
· Replace the moulded on grilles over the cab rear widows using the Mainly Trains/Wizard models etch.

The model was them painted and weathered. I am trying to get the look of locomotives that are in use. They aren’t pristine specimins, but neither are they in the terminal state of grubbiness that signifies their declining years. I want them to look like they are being used, and that you would get your hands dirty if you picked them up.
Weathering techniques are quite personal, and there is no single way of doing things. My preferred technique is to use a mix of Airbrush and powder weathering, with some of the powders applied wet. I have seen others use just dry powders, with no airbrushing or liquid, with great effect. I do like reading about how others approach the task, as there is always something to learn.
Once the detailing was done to 4658, I gave the body a light spray of Halford grey primer, to blend the plastic and metal parts together. The body was then sprayed with Games Workshop Chaos Black, which gives a pleasing semi matt dirty black finish. I like to vary the shades of black on a model, so some of the areas are picked out in different shades, an idea I first came across in one of Iain Rice’s books. The cab roof was sprayed with a mix of MIG matt black and Model Air anthracite grey. The footplate was sprayed with a similar mix, with some MIG “dark tracks” colour added to it. The chassis, and the lower part of the body were sprayed with a mixture of MIG matt black and ochre bown– about 40% black and 60% ochre. The top of the chimney was sprayed with pure matt black.
The red buffer beams are painted matt red. Once dry, this is painted with a wash of Humbrol Smoke and Dark Earth weathering powders, mixed with a drop of water and Decalfix. Once dry, most of this is removed with a cotton bud soaked in make up remover, which leaves traces of dirt in crannies and around buffer bases and rivets.
Coupling rods are brush painted with Humbrol enamels, a mix of gloss tan and metalcote gunmetal.
Buffer heads are painted Tamiya Matt brown, with a dab of metalcote gunmetal in the centre to represent dried on grease.
Areas where the paint has worn away, such as handrails and foot steps, ar rubbed with a soft (7B) pencil to leave a slight metallic sheen.
Powders were applied, mainly Humbrol “Smoke” and “Dark Earth”, lightly brushed on. Patches of oil were added to the coupling rods and wheels centres using MIG “Engine Oil” – brushed on.

The model currently awaits transfers and numberplates, and a little more weathering will be applied when these are fitted.
First up is the construction of some locos for the Yelverton project. The first is a class 8750 pannier, which will become 4658 of Laira shed.
I’ve started with the Bachmann rtr model, which is a nice model, and runs well, but is a bit lacking in some details, which I have added.
I studies the model, and photographs of the real thing, and read various accounts of improvements to the model, before deciding on the things I wanted to add/change:
· Add new lamp irons to the front and LH footplate from 1mm wide brass strip.
· Replace the moulded on lamp irons on the bunker back with GWR style cranked brackets from the Mainly Trains/Wizard models etch.
· Replace the partially moulded on smokebox door dart. I used a Markits one, but other makes are available.
· Add the handrail on the footplate above the front steps.
· Add the sandbox operating levers. I used the RT models etch.
· Replace the moulded on grilles over the cab rear widows using the Mainly Trains/Wizard models etch.
The model was them painted and weathered. I am trying to get the look of locomotives that are in use. They aren’t pristine specimins, but neither are they in the terminal state of grubbiness that signifies their declining years. I want them to look like they are being used, and that you would get your hands dirty if you picked them up.
Weathering techniques are quite personal, and there is no single way of doing things. My preferred technique is to use a mix of Airbrush and powder weathering, with some of the powders applied wet. I have seen others use just dry powders, with no airbrushing or liquid, with great effect. I do like reading about how others approach the task, as there is always something to learn.
Once the detailing was done to 4658, I gave the body a light spray of Halford grey primer, to blend the plastic and metal parts together. The body was then sprayed with Games Workshop Chaos Black, which gives a pleasing semi matt dirty black finish. I like to vary the shades of black on a model, so some of the areas are picked out in different shades, an idea I first came across in one of Iain Rice’s books. The cab roof was sprayed with a mix of MIG matt black and Model Air anthracite grey. The footplate was sprayed with a similar mix, with some MIG “dark tracks” colour added to it. The chassis, and the lower part of the body were sprayed with a mixture of MIG matt black and ochre bown– about 40% black and 60% ochre. The top of the chimney was sprayed with pure matt black.
The red buffer beams are painted matt red. Once dry, this is painted with a wash of Humbrol Smoke and Dark Earth weathering powders, mixed with a drop of water and Decalfix. Once dry, most of this is removed with a cotton bud soaked in make up remover, which leaves traces of dirt in crannies and around buffer bases and rivets.
Coupling rods are brush painted with Humbrol enamels, a mix of gloss tan and metalcote gunmetal.
Buffer heads are painted Tamiya Matt brown, with a dab of metalcote gunmetal in the centre to represent dried on grease.
Areas where the paint has worn away, such as handrails and foot steps, ar rubbed with a soft (7B) pencil to leave a slight metallic sheen.
Powders were applied, mainly Humbrol “Smoke” and “Dark Earth”, lightly brushed on. Patches of oil were added to the coupling rods and wheels centres using MIG “Engine Oil” – brushed on.
The model currently awaits transfers and numberplates, and a little more weathering will be applied when these are fitted.
Last edited: