7mm Airfix Land Rover Series 1 107" pickup

Overseer

Western Thunderer
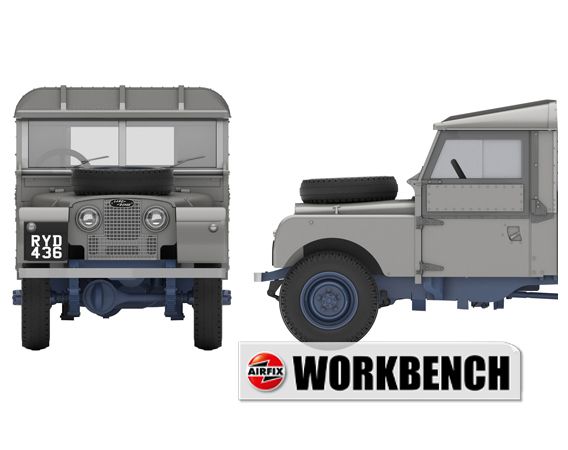
During a quick visit to a local general model shop this morning I spotted an Airfix starter kit for a Landrover Series 1 107" pickup that I hadn't seen before, so I bought one. I didn't even know they were planning a new kit. In traditional Airfix starter kit fashion I started it straight away to see how it looked. I haven't followed the suggested build sequence completely as I want to install glazing later, after spraying the body.

This is the kit partly assembled, the front, bonnet, roof, wheels and rear panel are all still loose and just posed for the pics. I think it is promising and a better starting point for an accurate Series 1 model than the die cast options. I have altered the windscreen by carving away most of the outer verticals to get closer to the prototype so will have to make new windscreens and wipers. The rims look good, although it is a bit unfortunate that the front hubs look like free wheel hubs, as fitted to the example in the Dunsfold Collection scanned for the model, rather than the original type. The tyres look too modern and too wide for an as delivered vehicle, not sure what I will do about them. I also cut off the rather chunky, non original, step off the rear crossmember as it looks better without it.

You could build the kit in under an hour if you want to. The 107" pickups were introduced in 1954 so useful for earlyish BR layouts, if you need an earlier Landrover a conversion to an 80 inch wouldn't be hard to do. I think Airfix should be congratulated for tooling a new kit to this standard.

Airfix LR 107 IMG_4108.jpg
Airfix LR 107 IMG_4109.jpg
Airfix LR 107 IMG_4110.jpg
 

AJC

Western Thunderer
I’m not terribly familiar with Landrover minutiae, but I can readily see what you mean about the tyres, which quite subtlely alter the whole look of the thing. I’m sure someone will do, or does do, a resin set of something more appropriate. In any event, a well-tooled plastic kit with all the details moulded on is usually a step ahead of a die cast: you’re never clear until the paint comes off which details are on the casting…

Adam
 

simond

Western Thunderer
The front end looks very much like my old 80”, as you say, it would be pretty simple to shorten (and lower) the back end to make the smaller vehicle. I’d have one like a shot, but it would look out of place in a 30’s model.

I see it’s got Fairey freewheel hubs too. I’d have thought they were a rarity. The tyres appear a little unusual, particularly the band around the spare.

it’s good to see some new 7mm stuff.
 

Heather Kay

Western Thunderer
I’m led to understand the model is missing the characteristic exhaust pipe run in the front nearside wheel arch. In fact, is there an exhaust pipe at all?
 

Dog Star

Western Thunderer
Fraser, please remember that the LWB LR were built / delivered typically with 7.50 x 16 tyres rather than the 6.00 x 16 (or maybe 6.50 x 16) tyres fitted to the SWB LR. If the 107" was as per the 109" then the rims were wider and with a deeper offset, both factors changing the "look" between any of the Series 1 SWB builds and the LWB vehicles.
 

Overseer

Western Thunderer
In fact, is there an exhaust pipe at all?
No, there is no exhaust pipe included. There is only the sump of the engine so no manifold to connect it to. Seriously though, a little bending of wire will be needed to create an exhaust pipe.

Airfix LR 107 IMG_4112.jpg

@Dog Star Graham, wider 5.5 inch rims were introduced with the Series II 109, and 7.5 x 16 tyres. The 107 had the same 5 inch wide 16 inch wheels as the 80 and 86. The standard original tyres on the 107 were 7.0 x 16. Avon Traction Mileage are the closest in appearance to the most common tyres fitted, and appear to be what the kit wheels are based on. The problem is excess width and the 1:20 draft angle in the tooling has resulted in a balloon like tyre profile.
 

Dog Star

Western Thunderer
Fraser, thank you for explaining the early game - maybe a modeller wants a SI LWB in early 1962 condition in which case the tyres and rims might have been changed (most of my SIII SWB LRs had LWB rims to provide a more suitable base for 7.50 x 16s from BF Goodrich - although the 7.50 Goodyear Super All Traction tyre seemed to sit comfortably on SWB rims).
 

simond

Western Thunderer
I had the bolt-together rims, I can’t remember the sizes, and let a mate have the vehicle some twenty five years ago. I think I had Avon tyres on it, they had noticable lugs on the sides, and some tread / sipes.
 

Pencarrow

Western Thunderer

Definitely 1:43.

This article on the Airfix website gives some insights into design decisions and why some details are moulded on.

So it's a basic starter set. Not unsurprising then that delicate detail, such as the exhaust pipe, is missing and that some details are a bit beefier. A good starting point for detailing up if you're that way inclined and know which bits to add/modify.
 

Overseer

Western Thunderer
I knew I had one somewhere. The Oxford Diecast model of the first Landrover 80" of 1948 for comparison with the kit.

LR S1 IMG_4117.jpg
LR S1 IMG_4118.jpg
LR S1 IMG_4115.jpg

Size wise they compare very favourably. I don't think the Oxford one captures the front end look very well, the curves in the top front of the guards, and the depth, look more like Series II than Series 1. The 107 should be higher than the 80 with larger tyres and heavier springs, a bit of filing of the tyres will bring it down to close to where it should be. The various designs of wire mesh radiator grilles are always going to be a problem area for models, the Oxford one looks better in the photo than it does in reality.

Edit to add a front view taken last year of a 86, I think 1954 or 55, which happened to be on the phone for comparison. Not mine.
21428972-D9FB-4CFA-ABA9-4E19A1072E46.jpeg
 
Last edited:

simond

Western Thunderer
I'm pretty sure my 80 had a starting handle hole in the bumper. It was in the middle, not lined up with the front PTO shaft hole in the chassis as the Oxford one appears to be.

I agree that the gap between the bumper and lower edges of the front wings is better on the Airfix one.


Edit, seeing Fraser's front view of the 86 suggests my memory was wrong, the hole in the chassis rail does line up with the hole in the bumper. I'll have to find some pictures of mine.
 
Last edited:

Eastsidepilot

Western Thunderer
Not wishing to hijack Overseer's thread but I have a Volume (#5) of servicing guides that covers some cars and commercial vehicles etc.
It covers Series 11 diesel Land Rover 88 & 109 models for '58.
There are some useful drg's. that may be of use to modellers upgrading there kits. One drawing shows the exhaust pipe run on diesel engine models.
Below is a sample of two pages from the Land Rover section, there is more to it, I can give a list of what's in this volume and will scan them if you'd like anything from it. I'll do this on the Hairy Bikers and Petrol Heads thread.

Look forward to seeing your finished model Overseer.
Col.

IMG_0548.JPG

IMG_0549.JPG
 
I'm pretty sure my 80 had a starting handle hole in the bumper. It was in the middle, not lined up with the front PTO shaft hole in the chassis as the Oxford one appears to be.

I agree that the gap between the bumper and lower edges of the front wings is better on the Airfix one.


Edit, seeing Fraser's front view of the 86 suggests my memory was wrong, the hole in the chassis rail does line up with the hole in the bumper. I'll have to find some pictures of mine.

All series LR's have holes in the bumper to take a starting handle. My '81 SIII 109SW has it and I have the handle, though as its a diesel, its no use for starting (I'd need arms like Popeye!). But the starting handle is also useful for turning the engine to adjust the tappet clearance. setting the fuel injector pump timing, etc). And you can always use it to belt some one if they start road raging you because you're the slowest thing on the road.......
 

simond

Western Thunderer
Ah,

mine was a Q car.

The previous owner had fitted a Rover P6B high compression 3500 V8. Surprisingly, on flat ground or downhill, you could bump start it by yourself (I needed to when I first got it, the engine installation was not bad at all, but the wiring…).

It was not the slowest thing on the road. Not by quite a long stretch. i was never brave enough to find out, but, ton plus with an inch of accelerator left. There was very little that could get close at a traffic light drag race.

All in all, looking back, mmm, probably not the most sensible vehicle on the road, but we had some wonderful adventures, launched and retrieved boats & dived from some beaches in the far North, and all got home safe. Happy memories!
 

Overseer

Western Thunderer
I think I have a solution for the tyres. I sawed the wheels in half, filed them down and stuck them back together. If you are sensible you will file them before assembling. Then filed the tread flat around the tyre. The width reduction is something over a millimetre, maybe 1.5mm. Only done 2 so far.

A72CDFF7-8CCE-4391-90F9-D38033BFB561.jpeg
A554F7F7-6D88-4771-897E-E1378A1F00C7.jpeg
Once flats are filed on the bottom of the tyres it should sit down better. I will have to remember not to add a load - the springs haven’t sagged enough to be carrying a load.
 

spikey faz

Western Thunderer
I think I have a solution for the tyres. I sawed the wheels in half, filed them down and stuck them back together. If you are sensible you will file them before assembling. Then filed the tread flat around the tyre. The width reduction is something over a millimetre, maybe 1.5mm. Only done 2 so far.

View attachment 202801
View attachment 202802
Once flats are filed on the bottom of the tyres it should sit down better. I will have to remember not to add a load - the springs haven’t sagged enough to be carrying a load.
That's a good result with the wheels/tyres.

I owned a Series One back in the 80s (RPX 787 where are you now?), so am also looking forward to putting one of these kits together.

Mike
 
Top