7mm 19th Century Nswgr Workbench

David Taylor

Western Thunderer
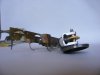
The 4-4-0 has a new cab! I decided the old one wasn't good enough and built the new one from 0.015 NS. Nicer to work with than tinplate and seems to solder about as well. If only you could buy the stuff in Australia rather than importing silly little sheets of it.

The new cab fits the footplate curves a bit better and is obviously stiffer, so that's good. I turned some brass spectacle plate window surrounds and a little pressure gauge.

More fitting of the firebox wrapper, carving out of the splasher tops, and lowering of the smokeox lets the boiler fit. It might still be pointing upwards a bit, but I think the handrails on the side of the cab point down a bit, so it's hard to be sure.

The cab side handrails are interesting. There is a band of metal just under the cut-out which has a handrail running along it. This band extends forward and aft of the cab side and tapered stanchions are located in rolled ends of band. Not done that bit yet obviously.

Unfortunately the firebox doesn't fit exactly to the splashers, and I cut out too much of the splasher tops, but I am hoping I can live with these errors.

I think I'll do the safety and clack valves next, and some extra plates on the drag-beam.

Pictures!

S FP 064.jpgS FP 059.jpgS FP 069.jpg
 

David Taylor

Western Thunderer
The smokebox on this loco has a strip carved out of it on the boiler side which seems a bit unusual. The time to deal with this would have been when I was milling the round top of it, but I didn't hadn't realised it was a feature at that point.

The only way I could think to handle it after the fact was to make a wrapper which was soldered to the front "wing plate" while being clamped around the milled aluminium block, a strip having been filed out beforehand.

It hasn't wrapped tightly enough for my liking but I'm hoping black paint and maybe some filler will help out. The Roscoe lubricators on the sides will help hold the vertical sides in.

I've ordered castings for the lubricators, clacks, safeties, and regulator quadrant/handle from Hobbyhorse Developments which should save some work. I forgot to order injectors while I was there so I'll have to think about whether to do that or get impressionistic behind the cabside steps.

Does anyone paint their smokeboxes with flat, sooty, rough black to represent the heat affected paint, or just use a paint similar to the rest of the loco?

The photos also show how the milled smokebox extends below the footplate between the frames to represent the valve chest and cylinder block. I've not drilled the holes for valve and piston rods yet.

Regards,
David.

DSCF2052.JPGDSCF2050.JPGDSCF2058.JPGDSCF2057.JPGDSCF2051.JPG
 

AJC

Western Thunderer
Does anyone paint their smokeboxes with flat, sooty, rough black to represent the heat affected paint, or just use a paint similar to the rest of the loco?

I guess that it depends what finish you are after. I would usually go for a dull, matt, finish unless modeling a regularly cleaned engine - such as a Victorian 4-4-0 or a well looked-after industrial - where the smokebox would have been cleaned regularly. That said, a completely matt smokebox with a shiny loco looks a bit unnatural so an approach is to paint the smokebox matt and to polish that up later with a polishing mop or a cotton bud

I don't know about the way in which Australian crews looked after their machines, but British locos from the late C19th were often fairly cosseted so a satin finish might be appropriate since the paint was shiny when first applied (a feature of London Midland locos in the '50s and '60s was the regularly repainted smokebox attached to an otherwise grubby engine) and, with work, could be kept that way.

Nice to see work on an unfamiliar prototype.

Adam
 

David Taylor

Western Thunderer
Hi all and merry Christmas!

More progress on the Z-16 - some stanchions, the cab re-aligned, and the smokebox can now be screwed to the frames and running plates.

I've decided to sell this loco when it is finished so I've made a motor mount for it, meaning I can keep the Rolls-Royce ABC motor/gearbox for something else. The new motive power is a Mashima 1833 with Ultrascale 40:1 worm and wheel. The motor mount is milled from a scrap of aluminium and has bronze bushes.

The stanchions are some sort of TIG rod, tapered with a couple of files while it is running in the drill press and finished off with emery paper. I'm not sure if the inconsistent results make this a better method than just using straight rod.

I couldn't shake the feeling the cab was tilting forwards so I took it off and reattached by eye, having to fill about 1mm of gap along most of the bottom of the side-sheets.

There is a lot of solder to clean up all around the cab yet.

The firebox needed more material removed to avoid the too-close-together wheels, and the front of the rear splashers added... if you see what I mean.

The smokebox door has also been made, just awaiting the dart.

Hope you all have an excellent new year,
David.

DSCF2096.JPGDSCF2090.JPGDSCF2091.JPGDSCF2089.JPGDSCF2097.JPGDSCF2092.JPGDSCF2086.JPGDSCF2093.JPGDSCF2095.JPG
 

Attachments

  • DSCF2088.JPG
    DSCF2088.JPG
    401.7 KB · Views: 46

David Taylor

Western Thunderer
Slow progress, but at least there is progress!

A few castings have been added, sandbox lids done, boiler feed pipes and their little footplate flange, cab floor and inside splashers, smokebox door, and boiler rings.

The sandbox lids look big, but photos show they were.

The footplate flanges for the feed pipes were turned, drilled, parted off, filed to size and then the four tiny holes for the "bolts" drilled with a pin vice. Tedious but I'm happy with the result.

The clack valves are castings and fit into holes drilled into the boiler. I have tried to make the holes look like they do on a real loco with a slightly larger hole in the boiler cladding. These don't have to be exactly centered.

The cab floor may sit a bit higher than it should, and I had to mill a relief on the bottom to give room for the spur gear. I don't think this is noticeable.

The rings are made from thin nickel silver strip. I curved them using my fingers, bent one end, wrapped around the boiler to find the approximate place to put the other end, fiddled a lot, and finally got three that fit well enough. The paint would probably hold them as they quite tight but I might give them some superglue to be sure when all else is done.

The strapping on the firebox is made from the same strip just soldered down each side, starting from under the base of the safety valve. Filing the little gaps to allow the straps to fit didn't go as well as I'd hoped but it is good enough.

The handrails are trying my patience badly but I will try to finish them next so I can stop worrying about them.

Regards,
David.

DSCF2254s.jpgDSCF2252s.jpgDSCF2248s.jpgDSCF2251s.jpg
 

David Taylor

Western Thunderer
The Z-16 never got much further but I have nearly finished this. It's not 7mm, but it is 19th C NSW. It's had a test run on the track and it ran well. Put the reversing rod on the other side and it's very similar to a MSWJR loco, which we had a few of and called a 25 class. This is a 24.

IMG_0342.png
 

David Taylor

Western Thunderer
With the mogul essentially finished (now it has numbers, very little left to do) I'm giving myself permission to mess about with other things.

I drew up some NSW freight wagon wheels years ago to Scaleone 32 standards and got as far as milling the spokes and parting off the wheel to be from the stock.

I had the lathe head set up on the Tormach to make some 1 1/8 scale safety valve bodies so decided it was a good time to finish these wheels.

IMG_0504.JPG
 
Top