John Baker
Western Thunderer
I'm relatively new to Fusion 360, and am self taught through various YouTube tutorials. I understand the basics of the 3D design process, but come unstuck when things 'don't work'. Many hours are spent trawling the internet and watching semi-relevant videos, only for me to end up not much further on than when I started. So, I'm turning to the wealth of skill, knowledge and expertise we have here.
I am about to delve into the world of 3D printing and want to create a few things to adorn a Manning Wardle Old Class I. So far, I have knocked up a wheel centre, chimney and the later version of the safety valve cover. Nothing too complex (though the wheel centre took me an age), but I'm happy with them nonetheless.


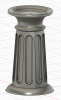
However, it's the older earlier version with the flutings that I'm struggling with. It's meant to look something like this:
 (apologies that's rather small)
It's the flutings that are causing me the problems. I have the basic shape of the cover sorted (I know, I still need to sort the top surface out and the fluting itself is not yet quite the right shape), and I can 'cut' the fluting into the main body of the cover. However, when I try to repeat this by using the 'pattern' feature (to get 12 of them, evenly spaced around the surface), I get an error:


I think it has something to do with the fact the main body of the valve cover is tapered, getting narrower the further up you go. I tried repeating the same process with a parallel sided version and it worked no problem at all. It's driving me slowly mad, so if anyone has any ideas, I'd love to hear them. Just keep any replies in layman's terms, as anything too complex will fly right over my head!
Oh, and once we've found a solution to this, I have another problem too (my wife tells me I have many problems) regarding the smokebox door.......
I am about to delve into the world of 3D printing and want to create a few things to adorn a Manning Wardle Old Class I. So far, I have knocked up a wheel centre, chimney and the later version of the safety valve cover. Nothing too complex (though the wheel centre took me an age), but I'm happy with them nonetheless.
However, it's the older earlier version with the flutings that I'm struggling with. It's meant to look something like this:
It's the flutings that are causing me the problems. I have the basic shape of the cover sorted (I know, I still need to sort the top surface out and the fluting itself is not yet quite the right shape), and I can 'cut' the fluting into the main body of the cover. However, when I try to repeat this by using the 'pattern' feature (to get 12 of them, evenly spaced around the surface), I get an error:
I think it has something to do with the fact the main body of the valve cover is tapered, getting narrower the further up you go. I tried repeating the same process with a parallel sided version and it worked no problem at all. It's driving me slowly mad, so if anyone has any ideas, I'd love to hear them. Just keep any replies in layman's terms, as anything too complex will fly right over my head!
Oh, and once we've found a solution to this, I have another problem too (my wife tells me I have many problems) regarding the smokebox door.......
")


 ).
).

")