Thingiverse 3D print Diesel

Tom Insole

Western Thunderer
Afternoon folks,

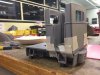
I thought I’d put together some of my new mini project that I thought I’d use to get the hang of my work toys! (Recent new role in a small tools workshop with access to 3D printers and a laser cutter!). Made even better when your team say to you “you can use them for personal projects just if you use materials in stock replace them”.

A few quiet evenings later I come across a little 3D printable 16mm 32/45mm gauge diesel loco on thingiverse! Who could turn down a combination of learning the kit and get a little toy out of the process?C1EAE65A-B865-4CE7-AB03-385003F3C2BC.jpeg

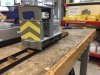
With the files free to download all I am paying for to start with is some ABS material for our ultimaker3 printers and away we go. My first test print would be the name plate. Small but would give an idea of the detail of the prints possible...
F086BA35-8470-4415-BCF0-35AB3D637827.jpeg
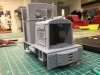
Not too shabby! My 2nd item I printed was the base plate and the steps. Steps turned out well but realised afterwards on the base board that there was a better version to print from someone’s upgrade on the base loco kit. Then my latest print was a set of wheels and chassis but that print wasn’t set up properly so didn’t print as expected.
F1E3C5AD-C16A-458B-A7C3-98A5FA769A60.jpeg
Bolts just to hold bits together for now, but this is the progress so far.. a long way to go but i’ll Keep progress coming as I slowly print more and start proper assembly then work on the best power/control options.
 

Tom Insole

Western Thunderer
Could you persuaded to put up images of the things that didn't work; often they're just as informative as the stuff that did.

Certainly going to be a few of those along the way. I’m rather new to 3D printing so some of it will be trial and error and bound to have the odd bit print wrong or warp, forget support material or be ill fitting. Hopefully with my fathers help I can fettle most bits into a sweet little diesel I can be proud of!
 

Tom Insole

Western Thunderer
Take two on today’s print started with a failed kick off when the prime caught on the nozzle, soon had to abort the print and then start it again after re-arranging the parts on the bed...
56204DD3-E712-4318-80D7-578F834BCFAF.jpeg
Once that dragged the skirt off it pulled the whole corner out of whack!

Left over night running second attempt when I left work so will post a little more tomorrow when I see how they turn out. I left it like this with a more successful first layer
7BB901F9-D613-4BE8-B091-40FB4BFA328E.jpeg
Wheels are more of a mock up as i’ll Be ether building my own chassis or ordering one, that’s a few prints away so just research stages yet!
 

simond

Western Thunderer
Tom,

it may help to make covers for your Ultimaker. We have one at work, and the print quality and reliability are improved by keeping the whole build area warm. I believe it’s possible to buy custom Perspex covers, but I modified a cardboard box, which looks ridiculous, but works...

HNY
Simon
 

Tom Insole

Western Thunderer
Tom,

it may help to make covers for your Ultimaker. We have one at work, and the print quality and reliability are improved by keeping the whole build area warm. I believe it’s possible to buy custom Perspex covers, but I modified a cardboard box, which looks ridiculous, but works...

HNY
Simon
We've got them. the only bit I don't like about the kit we have are the hinges. top hinge held in place by the belt spindle and one of the two we have is now held on by tape >< it's on the engineers list to rebuild the hinges as I don't quite have the skill set for making them myself (as much as I'd love to).
1266EE5F-608B-4947-B7AC-6E3FFF2E6690.jpeg
As you can see nicely enclosed, horribly bodged
7742F3F6-4CC2-4332-AABC-826F16549289.jpeg

They do the jobs quite nicely and I’m slowly learning how to look after them as it’s all part of my role!
 
Last edited:

Tom Insole

Western Thunderer
Last nights print was a glowing success I am happy to report. I’ve mocked a few bits together to see how they fit and I’m pretty happy with the outcome...
C465BC4D-F704-4562-84CE-C4F059A27269.jpeg
I’ve only proved most of it together and the buffer beam is held on with blutack. The last time I attempted this print just before Christmas it failed without telling me and left me with some rather flat sheets as shown here with one wheel vs successful wheel12FEF1EF-8515-48EF-A674-A4AEC5443F79.jpeg

I’ll still keep the flat bits incase I need some shims or want to cut small sections of it for other uses... you never know?
D26C8428-F1B5-4218-9EA2-8A2B756260D6.jpeg
So far not a bad little parts pile. Just got to wait for the next quiet moment and i’ll Print myself some cab sides.
 

Tom Insole

Western Thunderer
Great start to the new year coming in to work first thing and discovering the last print was a really good quality one!
93843F82-AC7E-4724-B87E-71DD61B84139.jpeg
All mocked together with masking tape and blutack briefly just to get a feel for things, it’s a nice bit of progress.
And to add to it lot of little bits to add on once I’ve some roof and front end made
19FA0B97-C051-4836-8437-FFE6BDC6416B.jpeg
Happy New year folks!
 

Attachments

  • 0E6391D9-9B00-4D67-BC77-27F36EF1FA07.jpeg
    0E6391D9-9B00-4D67-BC77-27F36EF1FA07.jpeg
    159.8 KB · Views: 10

Tom Insole

Western Thunderer
05BAC6C6-0CC6-4EFF-8B48-AF2BBF82EA0E.jpeg
Another little mock up but with cab corners glued (not to the base) and it’s actually looking a bit more like a little diesel!
9CFEC5B5-361E-4A3E-A2DF-247B3F619DD5.jpeg
The cab console is quite sweet and will have a panel to hide things behind it once printed.

For now more is on the bed printing as I post this.
773D2FE0-6C78-40A4-A47B-36E438DAE92E.jpeg
Some of the nose is on there so it’ll take more form in the next mock up.
 

Tom Insole

Western Thunderer
Minor little change, printed the modified bottom half to accommodate step and tank. B46606A5-2B62-4EDC-A919-AFA6C4EC5A35.jpeg
With the swap made it gives a lot more room ether side for the steps so they don’t overhang and the tank also doesn’t sick out.

33C43072-50DC-4DF0-A050-3E1A11F7190B.jpeg
I did also print the front grill but it was only just done before I left to go home for the weekend so I just popped it in for a photo hence the very little else on the loco for the last snap. The grill bars are an option but I’m still undecided if I want to fit them or not...
FE97C6BC-10BA-47F7-9300-2AB00D7F6211.jpeg
I did also quickly make some laser cut track to sit it on for now until I can get a few lengths of “proper” track. For now this will do until I get a metal bottom half attached to a motor!
 

Attachments

  • CEE25E79-0C7D-439B-8879-3D191DA3C162.jpeg
    CEE25E79-0C7D-439B-8879-3D191DA3C162.jpeg
    180.2 KB · Views: 8

Tom Insole

Western Thunderer
A little more progress made with a few of the really jagged edges filled with some plastic filler and then flashed with a coat of plastic primer...
E1600A4C-40BF-4043-805C-D423BDE4A912.jpeg
After which I had a little play again and mocked together again and tried some yellow tape to see if chevrons work
503BECC6-316A-4A6A-BCA7-ED1BD947835D.jpeg
Happy that I think they will maybe scaled down a tad more I sat it on my make shift laser cut track! I know it’s not great but makes it look a bit more like it’s on rails
7809E61C-D009-4CE0-B074-CD065CD18C78.jpeg
 
Last edited:

Tom Insole

Western Thunderer
5CEE4013-E449-40B8-B9F9-3B250E02512E.jpeg
5CF5F7E3-6354-4760-982C-98B3621196E8.jpeg
Final print done... now to fiddle, prime, paint and construct... next thing I need to do now is start researching a chassis and motor combo!
07327F46-3A46-40ED-9E3F-D627A4DB2C2D.jpeg
Just for fun I found a little “Toby” face as it was listed on a tram parts... fits perfectly in the grill recess (protruding because I used faithful blutack again!) looking forward to painting up the little face
 

simond

Western Thunderer
Well, this morning it failed about 90 minutes into a 4 hour job. I restarted it and left it to its own devices for the weekend, so it’ll be a Monday morning surprise!

the Ultimaker 3’s do have a webcam inside, so you can have a window open on your ‘puter to watch progress. Truth be told, it’s very boring and by the time you’ve realised there’s a problem, it’s too late to do anything anyway, so I don’t bother.

and the cardboard box was a whole lot cheaper than the Ultimaker greenhouse :)

Atb
Simon
 

Tom Insole

Western Thunderer
I find the camera useful about half way through or right at the beginning to ensure the first layer goes down okay.

I’ve neglected my little diesel until today when I got some little pots of enamel paint out to give the cab and buffers a quick coat or two... still needs a few tomorrow. I did however have a go at printing a little tipper wagon... I’m not 100% on it as it looks tiny against my tiny diesel!
445E8F3E-8BA9-45E6-BB71-C1972C95AF76.jpeg

Now for the painted first layers...
285066A3-F030-46A5-823F-73A6FADB5AA1.jpeg
CCD0DCC5-AF34-4BB5-9E71-140D65C5127E.jpeg
Place together once tacky to see how it looks....
232A4A3D-7C5D-4F0E-8E9E-37857F484C76.jpeg
68151A93-5A6E-4DEF-AB10-AA1D7B52E8AF.jpeg
 

Tom Insole

Western Thunderer
Well... today I remembered to bring my little bag of acrylic paints with me to work and when I got some quiet time I took to the brush and went wild.
23464940-CAEC-4CDA-AC6E-7C7D2D9D8EEE.jpeg 152EFEC7-CA25-4A19-9137-0944181DEF59.jpeg
There is good reason why i’ve Two bonnet’s... one will go on temporarily whilst it’s controlled by a basic wire loom and speed control potentiometer (using some basic dowel as both a dummy exhaust and speed control knob) and then once I’ve bought and made a radio gear loom it’ll get the proper bonnet without a whacking great hole in it!

105B8C91-FE55-46CF-B29D-93160A7827F6.jpeg
D728C346-46F3-46C2-A6F1-54AE6327DA0C.jpeg
I’m not too phased by perfect detail so it’s all a bit sloppy as it’ll get some weathering to cover up some of my shaky handy work ;)
 
Top