S Scale Wagon Wheels on Axles

JimG

Western Thunderer
This all started about five years ago when I was Parts Officer for the S Scale Model Railway Society. There was a possibility of some Grouping era cast resin wagon bodies appearing on the Parts shelves and I had no solid spoked wheels to go with them due to difficulty in getting the wheels from our normal suppliers. So I opted to DIY using 3D printed centres, turned steel tyres and parallel journal axles. I was able to get tyres and axles from another of our suppliers and I had my own 3D printer. Things went quite well and I produced almost one hundred axles. But there was a fair bit of wastage since I tried to keep the TIR of the wheels to a maximum of 0.003" and anything outside this parameter was junked. (Well not completely junked since the 3D printed centre could be knocked out of the defective wheel, and the tyre re-used). I stood down as Parts Officer and my successor finally got a large supply of wheels with pin-point axles from one of our suppliers so my efforts are stored away for anyone wanting parallel journal axles - pin point axles are the SSMRS standard. My reasons for using parallel journal axles were twofold - the main one being that I couldn't get a small enough minimum order for pinpoints and the selfish one being that I wanted parallel journals for springing. :)

So move forward to last year and I had started work on my sprung S scale wagons again and I needed some wheels on axles, and I had a load of tyres and axles lying around. :) I also wanted to see if I could get a better success rate in getting the wheels running to 0.003" TIR or better. In the previous exercise I had printed the axle hole in the centres and finished it off with a reamer. So the problem could have been with this method and I wanted to investigate mounting the wheel centre, with no axle hole printed, and tyre in a collet on the lathe and drilling the axle hole. I had several goes at making split step collets in steel but couldn't achieve repeatable accuracy when using them. Then I saw @Giles 3D printed split collets and tried some myself and got excellent results with very low runout.

WheelCollet-04.jpg

...but I ran into problems when I started putting it to fairly intensive use when the collet started to lose its accuracy. I tried beefing up my design but I suspect that the short 0 MT taper in the Cowells headstock was probably the main problem since it didn't allow much meat around the base of the collet jaws which was allowing them to flex a bit more that I had hoped.

So I started thinking about another wheel holder which didn't involve splitting it. and thought about building a form of magnetic chuck. First I would need a bit of non-ferrous metal of reasonable diameter. I had a dig around in the outside workshop and found a five inch bar of 1 1/2" diameter brass bar!!! I think this was purchased many years ago to use for centres for Scale 7 driving wheels. :)

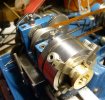
So I hacksawed about 20mm off the end and chucked it up in the Cowells, which the three jaw just about coped with. :) And backgear was needed as well. :)

WheelCollet-06.jpg

...then took what would become the back of the holder down to 24mm diameter.

I then turned the piece around and took the front down to 28mm diameter.

WheelCollet-07.jpg

You can see where most of the bar has gone. :) The piece has also gained a 6mm central hole, this to give, initially, a line up provision for the following CNC operation, and then later, a start for the internal boring operation

The piece was then set up on the CNC mill to machine the two holes for the magnets

WheelCollet-08.jpg

The piece then went back onto the lathe and the opening was bored to take the tyre.

WheelCollet-09.jpg

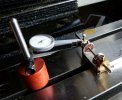
The hole was bored until the holes for the magnets just appeared. The inner diameter of the bore cleared the tyre of the wheel. But this was opened out to just clear the flange for 1mm depth at the outer end so that the flange would sit against the small lip. You can just see this lip in the picture. The outer diameter for the holder was also skimmed at the same time to ensure it was concertric with the bore for the tyre - this to allow provision for checking accuracy in later setups.

WheelCollet-10.jpg

A bit of thin sheet brass was set up in the CNC mill to machine a cover for the rear of the holder.

WheelCollet-17.jpg

The magnets to be used were a couple of 4mm diameter x 8mm neodymium ones.

WheelCollet-11.jpg

Here are all the bits before assembly.

WheelCollet-20.jpg

The magnets are just showing in the holes.

WheelCollet-13.jpg

The cover is screwed on the rear - and this is really necessary. If these magnets get within an inch or two of anything ferrous, they are off. :) I actually lost two during the process and found them stuck to the blade in the Junior hacksaw a while later. :) This also gives me a chance to use a couple of 12BA screws which I got in a packet of 100 from Whistons about fifty years ago. Members of a certain era may remember Whiston's catalogue. :)

WheelCollet-12.jpg

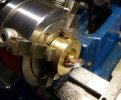
A wheel is inserted in the holder and held by the magnets. There's minimum clearance to allow easy insertion and removal of the tyre, so maybe allowing not more than 0.001" TIR. There is sufficient friction to allow drilling and reaming of the axle hole even with leaving a small air gap between the tyre and the magnets. I think I would get a lot more friction (stiction?) if I let the tyre touch the magnets, but I think getting the tyre back out could be a major problem. :)

Jim.
 
Last edited:

Dog Star

Western Thunderer
My reasons for using parallel journal axles were twofold - the main one being that I couldn't get a small enough minimum order for pinpoints and the selfish one being that I wanted parallel journals for springing.
Jim (@JimG),

Two questions please.

1/ minimum order for pinpoints... bearings or axles?
2/ why do want parallel journals for wagons with springing?

thank you, Graham
 

JimG

Western Thunderer
Two questions please.

1/ minimum order for pinpoints... bearings or axles?
2/ why do want parallel journals for wagons with springing?

Feedback I had got from various sources had told me that production of pin-point axles is not quite straightforward and large minimum numbers are usually quoted to account for setting up and to keep the unit price at a reasonable level. Minimums being quoted were several thousand and that is complete overkill for the S Scale Society with around 100 members. I was in contact with another society with a much larger membership and they ordered their pin-point axles by five thousand at a time.

Pin-point bearings are not normally a problem to source and I could order them by the thousand and I might have got a lower order quantity, but never tried. We normally use 4mm bearings in any case so can purchase smaller quantities from retailers if we want, but members can get their own in any case.

I prefer parallel journal axles for springing since there is no lateral force on the axle if there is a running clearance between the axle bearings and the shoulders of the journals on the axle. I use bearing holders which are placed on the inside of the "W" irons and rely on the minimum lateral pressure on them to act freely. Pin-point axles should always have a certain amount of lateral force on them so that the pin-point end locates properly in the bearing. This force could increase the friction between the bearing holders and the "W" irons and limit the movement of a sprung axle. I suspect that the same might apply if the pin-point axles are a sloppy fit since I think the pin-ponts will still tend to push the bearings out.

I remember having a discussion about pin-points versus parallel journals with Justin Newitt a few years ago since Justin's underframes are sprung, and designed to use pinpoint axles. I think we agreed to disagree - very amicably. :)

Jim.
 

JimG

Western Thunderer
Now to the operation.

Firstly, I had marked up the chuck so that I could replace it in the three jaw chuck and retain concentricity. But on setting it up on thethree jaw and clocking it, I found about 0.006" runout. So it was set up in the four jaw to be spot on using the outer surface of the holder.

WheelCollet-16.jpg

One thing I found out very quickly is that I could swap wheels in an out of the chuck while the lathe was running. My late father was an electrician whose speciality was electric motors of all sizes - he served his time at an armature winding firm in Dobbies Loan in Glasgow so that might be a pointer as to why. :) But he always told me to minimise switching AC motors on and off if possible. But the Cowells doesn't have a clutch on the drive to allow the motor to run continuously, so stopping the spindle can only be done under power by the slightly clumsy method of slackening off the drive belt which does work but it's not fast.

However I found that I could insert a wheel in the chuck while the lathe was running, basically holding a wheel on my thumb close to the opening, and the magnets did the rest, pulling the wheel tyre onto its mounting rim. :) As for getting the wheel out, a bit of brass rod through the bore of the spindle did the trick.

WheelCollet-15.jpg

Here's the bar in position...

WheelCollet-14.jpg

...and here's it pushing the wheel out, with the magnets keeping the wheel close to the chuck. This is stationary, but when the chuck is rotating, it's easy to pick the wheel off the chuck. I must have put about about thirty wheels, three times each, on and off the chuck while running so far with no problems. In between changing wheels, I apply a soft brush to clean out any resin swarf in case it affects the seating of the next wheel.

WheelCollet-26.jpg

The first operation on the wheel is to use a centre drill to start the axle hole. The brass collar allows the drill to enter such that its angled section creates a chamfer just slightly larger that the axle diameter to allow the axle to be eased into the hole.

WheelCollet-27.jpg

...and this is it doing the operation.

WheelCollet-28.jpg

The next operation is to follow through with a 1.8mm drill...

WheelCollet-29.jpg

...then follow that with the taper end of a 2mm hand reamer, the brass collar setting the require depth of the taper to give a firm hold on the axle.

When doing a batch of wheels, the first operation is done on every wheel, then the tool is changed in the tailstock and the next operation is carried out on all the wheels, then the third operation is applied to every wheel. So being able to change wheels while the lathe is turning speeds up the operation.

WheelCollet-22.jpg

The three jaw chuck is then fitted with one of my previous steel split collets. Inside the collet is added a brass bush which will provide a rest for the centre of the wheel when the axle is being press fitted. I found that on occasion the forces of the press fitting would distort and shatter the 3D printed split spoke wheels so this prevents this happening. This brass bush is loose fitting and will settle back agains a back stop at the correct depth. In the centre of the brass bush us a 6BA screw which can be adjusted to limit the amout the axle is pushed through the wheel to give the correct back-to-back. This is not completely accurate since the flexibity of the resin can be a bit variable, but it gets a finished wheel set very close to the correct measurent which only needs slight adjustment.

WheelCollet-24.jpg

First wheel being pressed onto an axle...

WheelCollet-25.jpg

...and the second one to complete. The tool in the tailstock chuck is just a small bit of brass bar with a 1mm diameter hole to accept the axle journal.

The results are quite good but I'm still getting the occasional wheel out of tolerace, usually around 0.006" TIR. So I'm now doing runs to follow up on areas which I think might be causing the problems. One thing I thought might be causing a problem was the very sharp corner on the shoulders of the axles which might be tending to cut their own holes in the wheels...

WheelCollet-23.jpg

...so I've started taking the edge of the shoulders with the axles held in the DA collet. I now have to resort to slackening off the drive belt to stop things when I change the axle. :)

Getting there. :)

Jim.
 

Attachments

  • WheelCollet-31.jpg
    WheelCollet-31.jpg
    152.8 KB · Views: 5
  • WheelCollet-30.jpg
    WheelCollet-30.jpg
    137.5 KB · Views: 7
  • WheelCollet-21.jpg
    WheelCollet-21.jpg
    161.7 KB · Views: 7
Last edited:

JimG

Western Thunderer
What resin are you using for the centres?

Rob,

Phrozen Aqua Grey 4K. It's one of the latest resins Phrozen brought out with their higher resolution mono LCD machines. A bottle came with my Sonic Mini 4K a year ago and I've been using it for everything since then. It is fairly flexible, which I can see when the axles are being pushed into the wheels. The wheel centres are painted with Vallejo German Red Brown surface primer, being almost dry brushed with a stiffish flat brush before being mounted in the tyres. The wheels I made some years ago used Phrozen Rock Hard Black. I still have one or two wheels around from that operation and that resin seems to be a bit more brittle.

The split spoke centres are filling in at the back due to elephant's foot and I opted to leave things this way since I thought it might provide a stronger option for machining and press fitting operations. But I might have a go with further tweeks to see if I can get see-through split spokes.

Jim.
 

Dog Star

Western Thunderer
Feedback I had got from various sources had told me that production of pin-point axles is not quite straightforward and large minimum numbers are usually quoted to account for setting up and to keep the unit price at a reasonable level. Minimums being quoted were several thousand.....
Jim (@JimG),

I approached Slaters to produce a variant of their 7mm pinpoint axles - the minimum order was 200 units and the price was somewhere less than £1.00 per axle (at 2019 prices). The quantity and price may have been influenced by an understanding that my axles would be produced at the end of a 0-FS production run as such required just a change in the CAM parameters.

regards, Graham
 

Rob R

Western Thunderer
Rob,

Phrozen Aqua Grey 4K. It's one of the latest resins Phrozen brought out with their higher resolution mono LCD machines. A bottle came with my Sonic Mini 4K a year ago and I've been using it for everything since then. It is fairly flexible, which I can see when the axles are being pushed into the wheels. The wheel centres are painted with Vallejo German Red Brown surface primer, being almost dry brushed with a stiffish flat brush before being mounted in the tyres. The wheels I made some years ago used Phrozen Rock Hard Black. I still have one or two wheels around from that operation and that resin seems to be a bit more brittle.

The split spoke centres are filling in at the back due to elephant's foot and I opted to leave things this way since I thought it might provide a stronger option for machining and press fitting operations. But I might have a go with further tweeks to see if I can get see-through split spokes.

Jim.
Thank you Jim.
It was the paint that confused me.....
 

JimG

Western Thunderer
Thank you Jim.
It was the paint that confused me.....

I thought that might be the case. :) I think the Vallejo primer is still a bit too light a brown so the next batch of centres will probably get a bit of black mixed in to tone it down a bit. I think the brown colouring is a bit better than the normal shiny black plastic. :)

Jim.
 

JimG

Western Thunderer
I approached Slaters to produce a variant of their 7mm pinpoint axles - the minimum order was 200 units and the price was somewhere less than £1.00 per axle (at 2019 prices). The quantity and price may have been influenced by an understanding that my axles would be produced at the end of a 0-FS production run as such required just a change in the CAM parameters.

Graham,

It was about five years ago when I started the DIY project for wagon wheels so the memory is a bit dodgy on details. But I remember that I was trying to get close to the price of a set of wheels on an axle which was being charged for existing stock in the SSMRS, and that was £1 per set. So, basically, I was looking to pay pennies for the axle alone. :) I've just located the invoice for the parts and the axles were 9p + VAT each; the steel tyres to SSMRS profile were 12p + VAT each. Since not many members would have parallel journal bearings, I got brass bearings supplied as well and they were 8p + VAT each. So the cost of these parts for an axle with bearings was 49p + VAT, or 54p. To this would be added the costs of the 3D printing which would have got the price up to about 60p, so well within my price point and giving the SSMRS the option of creating a markup to add something to the society bank balance. :) The order numbers were 500 axles, 1000 tyres and 1000 bearings.

So a price similar to Slater's price for the axle alone would have been over my price point and it could have been higher if the job was a new one requiring its own setup.

I haven't been involved in parts supply for about four years now so I'm not aware of any recent developments. A lot of production engineering seems to be done with CNC these days and the supplier who supplied my parts above was, I think, using more traditional production equipment. They were taken over about three years ago and the company taking them over no longer supplies the products that the original company were making for us.

Jim.
 

JimG

Western Thunderer
The results are quite good but I'm still getting the occasional wheel out of tolerance, usually around 0.006" TIR. So I'm now doing runs to follow up on areas which I think might be causing the problems. One thing I thought might be causing a problem was the very sharp corner on the shoulders of the axles which might be tending to cut their own holes in the wheels...

I think I've found the culprit. I decided to do another run of taking the edge off the corners on the axles when I discovered a couple of axles where the journal was not concentric with the axle body. I haven't got a fitting to use my dial indicator on such small details but on a couple of axle ends, the naked eye helped by my Optiviser was enough to see the problem. So two obvious out of a sample of eight and some others looked distinctly dodgy, but I would need a dial gauge to confirm.

So I either have to find a way of going through the axles to check which journals are in tolerance or make some new axles. I've just ordered up some 2mm diameter stainless steel rod in case making new axles is required. And I've just thought up a wee tool to check out the existing axles using the dial gauge I have to hand.

But it's good that I probably have found the cause of my random inaccuracies which have been plaguing me for several years. :)

Jim.
 

JimG

Western Thunderer
So I either have to find a way of going through the axles to check which journals are in tolerance or make some new axles. I've just ordered up some 2mm diameter stainless steel rod in case making new axles is required. And I've just thought up a wee tool to check out the existing axles using the dial gauge I have to hand.

I forgot I had a suitable tool already. :)

WheelCollet-32.jpg

Here, the axle is being checked for concentricity. I checked eighteen axles/thirty-six journals and most were giving between 0.002" and 0.003" TIR, four were giving between 0.001" and 0.002" TIR, and one gave 0.009" TIR. There were none with less than 0.001" TIR.

So I could assume when I was getting my required <0.003" TIR on a made up axle with wheels, that the wheels themselves were probably pretty well concentric and the axles were causing what eccentricity there was. I know that's a dangerous assumption. :) But I should get the 2mm stainless steel rod tomorrow and I could start making some axles amd hopefully get the journals concentric with the axle bodies and then see how well the made up axles with wheels turn out.

Jim.
 

Brian McKenzie

Western Thunderer
Firstly, I had marked up the chuck so that I could replace it in the three jaw chuck and retain concentricity. But on setting it up on the three jaw and clocking it, I found about 0.006" runout. So it was set up in the four jaw to be spot on using the outer surface of the holder.
Jim,

Did you tighten the chuck using the same chuck key position as for when clamping the brass originally? This is worth noting when turning parts that need to be refitted later. Chuck scroll plates shift around slightly when using other key positions (a test of runout at each key position might be interesting/revealing).

Axles are best turned commercially using sliding-head lathes (so called Swiss type). The production method ensures pin-points or shouldered ends are truly concentric - and tapers between ends can be provided for little extra cost. I used a pencil sharpener type tool to make pin-points on 1/16" diameter stainless steel welding wire, but intend to revert to shouldered axles, as the wagons skate about like marbles on lino.

Brian McK.
 

JimG

Western Thunderer
Did you tighten the chuck using the same chuck key position as for when clamping the brass originally? This is worth noting when turning parts that need to be refitted later. Chuck scroll plates shift around slightly when using other key positions (a test of runout at each key position might be interesting/revealing).

Brian,

The three jaw's chuck key has the bevel gear on it which acts directly on the bevel gear on the back of the scroll plate, and doesn't have the constant mesh key sockets. So I'm not sure if using the same position with this chuck would apply. The chuck is a 2 1/2" Bison with reversible jaws and I can't find mention of it anywhere on the Internet, so maybe a special for small lathes like the Cowells.

Bison-01.jpg

Bison-02.jpg

Here's a couple of shots of the chuck showing front and back and the chuck key and scroll gear. The scroll is held in by the spring clip and a spring washer. When I got the new chuck with the lathe, the scroll was very tight with no feel at all and I had several goes at flattening the spring washer until I got some feel into the operation, but there's nowhere like the feel I get on my 50 year old Burnerd on my ML10. I am no lover of this chuck. :)

Jim.
 

Brian McKenzie

Western Thunderer
Thanks Jim. I wonder if the large bevel disc gets pushed aside slightly when under pressure from the key as it tightens, thus affecting the concentricity of the jaws? A test of runout separately of each key position would be of interest - if you thought it worth doing.

Just found my axle pointing tool from years ago. Copied from Colin Binnie.

Axle pointing tool_2077.jpg

 
Last edited:

JimG

Western Thunderer
Brian,

I'm so fed up with this chuck that I now accept that it chucks material up somewhere close to concentricity and I go from their. :) I use the four-jaw to get something really spot on. I have no worries with that. One of my early lathes in the 60s was a second hand Super Adept and that came only with a four-jaw chuck so I got plenty of experience of truing things up in a four-jaw.

Thinking back to what I wrote earlier about freeing up the new chuck by reducing the action of the spring washer clamping the scroll in place, I wonder if that might have messed things up and reduced the repeatability of the chuck.

I also note that this chuck design has been around for some time since it features on a Perris lathe back before the mid 1970s as shown in a picture on the www.lathes.co.uk web site. The Perris became the Cowells and it looks as though the chuck followed on. I've searched the Internet and I can find no mention of it other than on the Cowells web site.

Jim.
 

Susie

Western Thunderer
Hi Jim,

Unless you have a super precision chuck or a Griptru you won't get very good concentricity: three thou would be good.

I don't know if this will help with your step-chuck problems. On my Lorch the step chucks are quite large in diameter (the standard collet size is 10mm) and so they use a separate closer which slides onto the spindle nose, and locates on the parallel section.

L1000027.JPG


L1000028.JPG


L1000029.JPG


The whole set up looks like this:

L1000030.JPG


The gizmo on the left hand end of the headstock is a rapid closer, and can take the place of the standard draw-tube. It enables the collet to be opened and closed whilst the lathe is still running. The collets can also be fitted with a depth-stop. When I machined some split axles recently I used the system so I could pop them in one at a time with the lathe running, and face them off to the same length easily. The depth-stop was then re-set and one shoulder turned, and then re-set again and the other shoulder turned: the distance between them setting the back-to-back. It sounds long-winded, but takes only a minute to do, and they all end up the same length.

Coming back to the large step-chuck closer, you could probably 3D print something similar. The advantage is the the pressure is applied to the wide section near the rim of the collet. Your 3D printed collect could have a threaded hole in the end to take a drawbar.

All the best.
 
Last edited:

JimG

Western Thunderer
Hi Jim,

Unless you have a super precision chuck or a Griptru you won't get very good concentricity: three thou would be good.

I don't know if this will help with your step-chuck problems. On my Lorch the step chucks are quite large in diameter (the standard collet size is 10mm) and so they use a separate closer which slides onto the spindle nose, and locates on the parallel section.

Coming back to the large step-chuck closer, you could probably 3D print something similar. The advantage is the the pressure is applied to the wide section near the rim of the collet. Your 3D printed collect could have a threaded hole in the end to take a drawbar.

Susie,

That separate closer idea might be worth trying and it might also be a good exercise in 3D printing to draw and print the thread and register to fit the Cowells' spindle. It should overcome the flexibity of the 3D resin which was causing the inaccuracies on my other attempts at printed collets.

I've searched for step collets for years off and on but what ones I find are often for exotic (to me) European lathes like the Lorch. :) I do remember years ago, when I was on the road, visiting a tool store at the north end of Aberdeen. I visited this shop whenever I was in Aberdeen and my M&W 0 - 1" micrometer was one item bought from there. But this day there was a watchmaker's lathe in the window in its wooden box complete with a large range of collets, including step collets. It was priced at something like £15 (this was mid 70s). I was tempted but decided not to go for it. On the way home to Glasgow I thought more about it and decided I should have got it, so phoned the shop from Perth, but it had gone. I still curse the day I missed it. :)

Jim.
 

Susie

Western Thunderer
Just to clarify, the closing collar does not screw onto the nose - it just slips on and seats on the plain register. Perhhaps rather than 3D printing the collar, you could turn one from alloy, which would be better. The smaller step chucks (8mm and 6mm) use the normal 60 degree bevel to close them - the same as the standard chucks/collets.
 

JimG

Western Thunderer
Just to clarify, the closing collar does not screw onto the nose - it just slips on and seats on the plain register. Perhhaps rather than 3D printing the collar, you could turn one from alloy, which would be better. The smaller step chucks (8mm and 6mm) use the normal 60 degree bevel to close them - the same as the standard chucks/collets.

Susie,

I might have a go with 3D printing the lot to see how it turns out. The only bit of metal I have to hand to make the closer is the 1 1/2" brass bar which was used for the magnetic chuck and I don't really want to bury the Cowells in brass swarf again. :) If it doesn't work it will be on to Ebay to source something suitable.

At the moment the 2mm diameter stainless steel rods for axles have arrived so I hope to be knocking out some new, true axles and I have to make a collet to hold them to machine them to the correct length and cut the journals.

Jim.
 
Top