Resin printer heated enclosure

Big Train James

Western Thunderer
I know that this topic has been discussed within other threads, but I have some specific questions about the wiring connections.

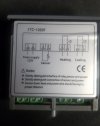
A) The temperature controller has a set of terminals for "Cooling". Does anybody use this in this application. I wondered if it was simply running the fan without the heater coil. Do I need to wire something to it, or can I just ignore it.

B) Do I need to connect the hot and neutral wires to the controller twice, once to the power supply terminals and the other to the Heating terminals. If I'm understanding correctly, the Power supply terminals supply power to the controller, but it isn't passed through the board to the Heating terminals. I need a second set of hot and neutral wires to the Heating terminals, and the controller just acts as the switch and nothing else. Is this correct?

C) I have the typical heating fan as found on Amazon. Does the housing get hot enough that I should be concerned about it's proximity to the enclosure material? One of the resins I need to print specifies a temperature of 96ºF for optimal printing. I could see the fan needing to run quite a bit to achieve that, and I worry that something close by may be affected.

I think I have a handle on it, but I want to make sure. I'd prefer to not make any foolish errors, or worse yet do something dangerous. Not interested in starting any fires. :eek:

Thanks for any tips.

Jim

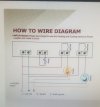
Editted to add diagrams. One is from the back of the controller, the other is from the Amazon listing for the same unit.controller diagram.jpgcontroller diagram online.jpg
 

simond

Western Thunderer
Jim,

your device appears to be 12V so whatever you do, don’t connect 110/220 (240) V AC “line” and “neutral” to it as shown in the diagram.

dependent on the specifications of the relay contacts, you may be ok to connect a mains heater (10A at whatever voltage - not sure where you are) in series with the heater contacts. I think you can ignore the cooler contacts.

I think I’d be more confident in replying if I had one in front of me and could check it over with a multi meter.

be careful!
Simon
 

Big Train James

Western Thunderer
Simon, I do have a 12v power supply. So I wont be going straight in with house voltage. The fan is also a 12v unit.

I found this diagram on the Veg Oil Guy youtube channel. He is using a bulb for the heat source, while I have a combined fan and heater unit. He is also using mains power. The fan/heater has two sets of wires, one for the fan and one for the heater, so those are really not that different than the diagram. And my power supply will be a 12v unit replacing his mains supply.

I agree that I won't bother with the cooling aspect.
 
Last edited:

mickoo

Western Thunderer
In basic terms, this'd be so much easier on a beer mat in the pub!

Terminology is important.

AC supply is L & N (Live and Neutral)
DC supply is Positive and Negative (+ & -)

The only critical factor here is to match the supply to the unit (AC or DC) and all other components must be the same, do not mix AC/DC, much smoke and elevated heart rate will ensue....guaranteed!

Live supply L (AC110/240) or Positive + (DC12v) to terminal 1
Neutral supply N (AC110/240) or negative - (DC12V) to terminal 2

Link wire from terminal 1 to terminal 5.
Wire from terminal 6 to Positive (L) on heater.
Wire from Negative (N) on heater to terminal 2.

Sensor, either wire can go in either terminal 3 or 4, it's a switch and makes no difference nor is it supply critical (AC/DC) the unit will supply what it needs, the sensor will switch, the unit will say thank you and turn on/off heater.

The only thing you need to really check closely is the heater current, it'll be on a label somewhere, so long as it does not exceed 10A (Amps) you'll be fine.

Rule of thumb, the higher the voltage, the lower the current, there is much math involved in calculating AC to DC conversion blah blah blah but in simple terms 12V at 10A becomes 24V at 5A or 6V at 20A. Hence the more common use of AC (it's normally shipped at a higher voltage to your house) to reduce current and why railways are 25Kv to reduce current loading.

Current = hot, more current the hotter stuff gets, so a 10A 12V heater is going to need quite thick cables (relative to hobbyists). If your cable gets warm or hot....it's too small....if it smokes, it's really too small. People laugh but you can burn a house down with a 9V battery, some thin wire and waste paper bin, a trick the Port fire brigade used to show on safety induction courses.
 

Big Train James

Western Thunderer
Thanks for all that Mick. :thumbs:

They don't state amps on the fan anywhere that I can find, but they do state 100w and 12v. So that should mean 8.3 amps.

I picked up a terminal strip today that should simplify the connections. Now I just need to figure out the best solution for the enclosure and how to mount the fan within it. I had been working on fabricating the enclosure out of foamcore, but I have concerns about it getting too hot. So I'm still considering other options.

Jim
 

simond

Western Thunderer
Is the heater one of these?


and the controller one of these?


if so, connect to a 12V supply per their wiring diagram, using L for + and N for - as Mick said, and check that the heater comes on when the sensor is colder than the set point, and goes off when warmer. You can do that before installing it on the printer, at the same time you can assess whether the hot air is likely to melt the enclosure and perhaps arrange a diffuser.

and yes, 100W will be 8 and a bit Amps, so within the capability of the controller.

And do please post some photos!

cheers
Simon
 

JimG

Western Thunderer
Here's my way of providing an heated enclosure for my Phrozen Sonic Mini :-

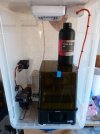
SonicMini-02.jpg

The enclosure is a Really Useful box available from a large range in the UK. The heater on the left side is a 12V 100W version from Amazon and it's clipped to the side with cable ties. The temperature controller is bottom left and the 12V power supply is behind it.

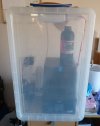
SonicMini-01.jpg

...and here in operation with the box lid on. The Really Useful box has worked very well and cost about £20 from memory, which is probably a bit cheaper than buying wood to make an enclosure.

The extractor fan in the top was fitted to extract fumes to the exterior out of the room window, but I've never found the fumes from the Phrozen resin to be objectionable so it has never been used.

The 100w heater has worked very well with no heat damage to the side of the enclosure that it is clamped to.

Jim.
 
Last edited:

Rob R

Western Thunderer
Hmm. I have my Mars 2 pro in the spare bedroom next to the radiator so it is usually fairly warm to start with. I find that after a few minutes printing, the whole machine warms up nicely just from the uv light.
When I top up the resin I just leave the bottle on the radiator for 5 mins to warm it through.
Using Elegoo water washable transclucent resin (red/green mix) at the moment so no real smell (no complaints from swmbo).
 

Big Train James

Western Thunderer
Simon,
Yes, those are the same products I have. Mine have different branding, but the specs are all the same. And my power supply is a 12v 10amp unit.

I was planning to hook everything up on the bench first, to test how hot the fan unit would get, but also which direction it spun. Jim G's comment about the lack of heat damage to his enclosure is reassuring, but I will check anyway.

By the way, here is a bit of the reference material offered in the Amazon listing for my fan unit:

fan heat by distance.JPG

I believe it applies to the temperature of the air as it exits the fan/heater, in the direction of flow. It's another thing to consider when placing and orienting the fan.

Jim
 

Big Train James

Western Thunderer
Jim,
I've been using your photos posted to the big 3d printing thread as reference, along with those posted by John Baker. In both cases I could see most of what was going on but not quite all. Thanks for posting again, and also for the comment addressing my concern about the temperature of the fan/heater unit itself when in use. :thumbs:

Jim (the other one)
 

Big Train James

Western Thunderer
Rob,
I've read elsewhere that using only the heat from the base unit to heat the enclosure is effective to a degree, but probably not to the temperature I need to reach. The resin in question is specified to be printed at 96ºF. I'm not sure the ambient heat from the UV light and resin curing will attain or maintain that temperature. And this resin is quite expensive compared to what we are typically using, so I want to do everything I can to ensure success.

Plus I already bought all the parts. :oops::rolleyes::D

Jim
 

JimG

Western Thunderer
and also for the comment addressing my concern about the temperature of the fan/heater unit itself when in use. :thumbs:
Jim,

I should have maybe pointed out that the temperature was OK with the fan running. I think that if the fan stopped and the heating element was still powered, then there would be a problem. :)

Jim.
 

simond

Western Thunderer
Jim,

I looked at that fan unit, it’s quite small, so I wonder if it would fit inside my Saturn pointing upwards. Maybe some foil or something to prevent the plastic getting too hot in line with the outlet. The temperature sensor fairly high up on the other side, should be ok, and by leaving the fan on, and only switching the heat, the effect would be to mix the air around.

I’d thought about this a bit (excuse for googling lots, not making a decision, thus making no progress, AKA kicking the can down the road) but I’ve not resolved in my mind how to move the cover with wires attached. Perhaps a hanger on the wall behind the printer would be convenient.

Thanks for the prompt, I’m optimistic that a bit of thought and experimentation might lead to something useful.

cheers
Simon
 

Big Train James

Western Thunderer
Simon,
My personal philosophy mirrors the method that Jim G utilized, which is to heat the environment around the printer rather than the environment in the printer. Back in the "Everything about 3D Printing" thread, there was a discussion about whether the air movement inside the printer would affect the resin or the print in any way. It seems safer to me to move the heating and circulating part of the equation outside.

There is at least one other factor, which you've already alluded to. Having everything attached to the printer lid makes handling it more cumbersome. My goal is to have an enclosure base that has everything attached to it, so that it never needs to move to place or remove the printer lid or close or open the heated enclosure. For all intents and purposes, I'm going to end up with two lids and two bases.

I've got no theoretical or empirical data to support my next assertion, just intuition, but I'm of the mind that the temperature sensor should be at the level of the resin. That's what we are ultimately trying to heat up after all. Yes, the elevated air temperature is good for the print overall, less cooling of already cured layers means more consistent temperature top to bottom of the print, thus lessening the stresses incurred as material contracts while other material does not. But the first task is making sure the resin behaves properly as it prints.

One other thing that I'm concerned about, which I'm probably overthinking, is that using an enclosure that includes the base of the printer might not be ideal. Theoretically cooling the light source or screen will extend their lives, and there are obviously cooling fans in place to handle that task. It seems counter intuitive to negate the benefit of the cooling fans by heating the air that will be passing through them.

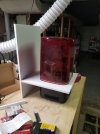
To that end, I'm working on an enclosure that leaves the volume around the base open. There will be a platform just below the screen level, with legs underneath. The back will extend full height to a point with clearance above the top of the lid. Currently it's at 20" high, as that's one of the dimensions of the foam core sheet I'm using. I may redo the back taking advantage of the other dimension of the board, which is 30", to make a bit more space above the printer. The goal would be safer clearance of the heating element from anything critical. To be determined if I'll bother. Lastly, there would be a four sided lid (three sides and a top) that would slide over the base platform and around the edges of the back piece. There will be stops added so the lid is properly positioned by default, and those strips will also act to a degree to block air leakage around the edges.

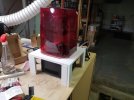
First photo is my first false start. I made the platform square, and centered it on the the printer base. It does illustrate the idea of keeping the the cooling fan vents clear to do their job.

enclosure 1.jpg


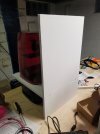
I've since started over, extending the rear of the platform further back, but also offsetting the platform back and to one side to increase the area behind and make the printer screen easier to see. I still need to add legs and glue it all up.

enclosure 2.jpg


A shot of the back side. I've gone tab and slot to join the platform to the rear face.

enclosure 3.jpg

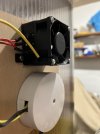
I will do one of two things if I continue down this path. I will likely extend the height of the rear sheet, so that I can attach the fan in some way fully above the top of the printer lid. If so, the fan unit will attach directly to the rear sheet on the printer side. If I don't increase the height of the rear sheet, I plan to create a duct of sorts behind it with the fan located inside it. The idea would be to diffuse the air flow somewhat. Now that I think of it, that's not much of a concern if I have the lid on the printer. :oops::rolleyes:

Of course I'm also tempted to just say screw it and go the large storage tub route as Jim G has done. My issue with that solution is you can't operate the printer with the lid on. There's only a certain amount of time to start the print and get the lid on before the first layer prints. I'm loathe to make any contact with the printer or jostle it in any way while prints are running, and I can just see a time when I get klutzy and don't manage the lid properly in time. The other issue is back to the idea of the base being heated rather than cooled, the tub solution means the whole printer is inside the enclosure.

Maybe I'm being daft about the cooling, and I'll cop to doing some dysfunctional stuff sometimes. But I like to think I'm not being totally foolish when I pursue some of these things. I'd generally rather overthink something than the opposite. :cool:

Jim
 

Big Train James

Western Thunderer
If I don't increase the height of the rear sheet, I plan to create a duct of sorts behind it with the fan located inside it. The idea would be to diffuse the air flow somewhat. Now that I think of it, that's not much of a concern if I have the lid on the printer. :oops::rolleyes:
Maybe not such a bad idea, in retrospect. This method would allow control of what air is heated, as in pulling from the lower cooler air at the bottom of the print volume.

here's only a certain amount of time to start the print and get the lid on before the first layer prints. I'm loathe to make any contact with the printer or jostle it in any way while prints are running, and I can just see a time when I get klutzy and don't manage the lid properly in time.
Now that I think of it, the first layers are only support, so this may not be an issue after all. But it doesn't address the cooling fan question.
 

Boyblunder

Western Thunderer
James,
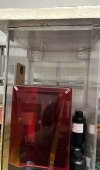
I made my enclosure out of twin-wall polycarbonate sheet for insulation and it has worked very well. My printer is in the garage which gets quite cold so chose the 300w mains powered version of the same heater and mounted it above the printer because I was afraid of toasting the printer if it was below or blowing directly on it. More recently I laid a chunk of 50mm insulation on top. I keep the resin in the cabinet and run the heater for 30 minutes before printing which warms up the resin. The heater was temporarily mounted on plywood to see if it worked before switching to something more fire resistant, the wood doesn't get hot so of course I never got round to changing it. The thermostat sensor is mounted 1/3 of the height at the back and is set to 24c. It works fine with room temperatures down to 8C (46F) and I have used it down to 5c (below freezing outside air temp) but it looses masses of heat when the front is opened and then takes time to recover so I have stopped using it below 7-8c.
Cheers, Robin
300w 230v heater.jpg
heater cabinet.jpg
 

simond

Western Thunderer
Thanks Jim,

putting the whole thing in a container seems to defeat the cooling in the base, so I don’t like that idea, coupled with the inconvenience of working in a confined space.

Having the resin warm before pouring it into the tray sounds like a very good start, per Rob’s suggestion, though I’d expect it takes rather more than a few minutes. I have a USB powered reptile heating pad which would be ideal.

Then I’d suggest that it’s relatively easy to maintain eg 10 degrees differential between the inside of the chamber and the outside, which in my case is a pretty constant 19C. Surface area of Saturn enclosure is about half a square metre. Thickness is about 3mm, assume material is Acrylic, thermal resistance 0.2W/m/K. Quick sums suggest the heat transfer would be about 40W, which is higher than I expected.

I'd be tempted to put a couple of Stop-and-Tail light bulbs in a metal enclosure, and control them with the thermostat thing you already have. Maybe fix a heat sink on top of the box to improve the transfer from the bulbs to the air in the enclosure.

atb
Simon
 
Top