Neil
Western Thunderer
White heat of technology, 3-D printing - watching paint dry
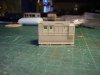
The roaring of the diesel and an impatient tooting on Thursday afternoon heralded the arrival of the UPS van down the drive. This could only mean one thing.
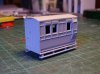
[attachimg=1]
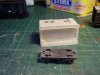
It's a 3-D print from Shapeways, this time in frosted ultra detail. First impressions are that it's a step forward from the gunpowder van I tackled a couple of months ago.
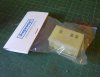
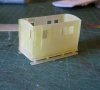
[attachimg=2]
[attachimg=3]
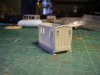
As it's semi transparent it's difficult to fully assess the finish, but in handling the surface felt noticeably smoother though there were signs of some ridging in curved areas. By this stage I'd already given it a swift clean with a cream cleaner followed by a rinse under the tap. Once it's dried I misted a coat of primer over it pronto to see how the new material shaped up.
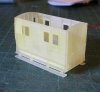
Primer applied late last night, photos taken this morning.
[attachimg=4]
[attachimg=5]
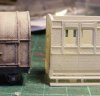
Here's a cruel close up of the passenger brake alongside the gunpowder van I had printed earlier.
[attachimg=6]
Now while the photo implies that the surface of the brake is almost as rough as the gunpowder van, in reality this isn't so. The GPV has had a good amount of work put into it to ameliorate the deficiencies of the material finish followed by a few coats of paint and some disguise weathering, the passenger brake has just had a light blast of primer over it.
[attachimg=7]
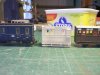
Here I've done a bit of work to the sides; the plain area below the panelling had some slight but noticeable ridges running horizontally. I've taken out the worst of these with home made sanding sticks.The frosted ultra detail responds to sanding a whole lot better than the white strong. unfortunately the downside is that it's more brittle. With the gunpowder vans it was possible just to pop in a pair of Peco wheelsets and my favoured Bachmann metal jobbies only needed the bearing holes deepened to allow them to be sprung in. Trying to do this with the brake snapped off one of the axleguards. Criticism can't be levelled at the design here, they were originally produced with the shorter axle Peco wheelsets in mind and for the more flexible and forgiving white strong. However the design is such that the underframe could be milled out to take a Peco chassis unit without the running boards losing any of their structural integrity. In fact the whole item feels delicate but robust.
[attachimg=8]
We're still not quite at the paint and plonk stage, but hell we're close.
I should stress that the design isn't mine, full credit for coming up with such a pleasing piece of stock goes to Tom (Tebee) on the narrow gauge forum NGRM-online and RMweb. He's lodged lots of 3-D models of narrow gauge stock with Shapeways, making them available for anyone to order. I certainly wouldn't have the skills to draft such lovely pieces, and it's to Tom's huge credit that he willingly puts his labours out there for the rest of us to use.
The roaring of the diesel and an impatient tooting on Thursday afternoon heralded the arrival of the UPS van down the drive. This could only mean one thing.
[attachimg=1]
It's a 3-D print from Shapeways, this time in frosted ultra detail. First impressions are that it's a step forward from the gunpowder van I tackled a couple of months ago.
[attachimg=2]
[attachimg=3]
As it's semi transparent it's difficult to fully assess the finish, but in handling the surface felt noticeably smoother though there were signs of some ridging in curved areas. By this stage I'd already given it a swift clean with a cream cleaner followed by a rinse under the tap. Once it's dried I misted a coat of primer over it pronto to see how the new material shaped up.
Primer applied late last night, photos taken this morning.
[attachimg=4]
[attachimg=5]
Here's a cruel close up of the passenger brake alongside the gunpowder van I had printed earlier.
[attachimg=6]
Now while the photo implies that the surface of the brake is almost as rough as the gunpowder van, in reality this isn't so. The GPV has had a good amount of work put into it to ameliorate the deficiencies of the material finish followed by a few coats of paint and some disguise weathering, the passenger brake has just had a light blast of primer over it.
[attachimg=7]
Here I've done a bit of work to the sides; the plain area below the panelling had some slight but noticeable ridges running horizontally. I've taken out the worst of these with home made sanding sticks.The frosted ultra detail responds to sanding a whole lot better than the white strong. unfortunately the downside is that it's more brittle. With the gunpowder vans it was possible just to pop in a pair of Peco wheelsets and my favoured Bachmann metal jobbies only needed the bearing holes deepened to allow them to be sprung in. Trying to do this with the brake snapped off one of the axleguards. Criticism can't be levelled at the design here, they were originally produced with the shorter axle Peco wheelsets in mind and for the more flexible and forgiving white strong. However the design is such that the underframe could be milled out to take a Peco chassis unit without the running boards losing any of their structural integrity. In fact the whole item feels delicate but robust.
[attachimg=8]
We're still not quite at the paint and plonk stage, but hell we're close.
I should stress that the design isn't mine, full credit for coming up with such a pleasing piece of stock goes to Tom (Tebee) on the narrow gauge forum NGRM-online and RMweb. He's lodged lots of 3-D models of narrow gauge stock with Shapeways, making them available for anyone to order. I certainly wouldn't have the skills to draft such lovely pieces, and it's to Tom's huge credit that he willingly puts his labours out there for the rest of us to use.
Attachments
-
 white heat 001.jpg44.5 KB · Views: 161
 -
 white heat 002.jpg43.4 KB · Views: 160
 -
 white heat 003.jpg42.8 KB · Views: 163
 -
 3D printing 001.jpg35.6 KB · Views: 161
 -
 3D printing 002.jpg34.9 KB · Views: 162
 -
 3D printing 003.jpg38.9 KB · Views: 164
 -
 3D printing 004.jpg40.1 KB · Views: 160
 -
 3D printing 005.jpg47.5 KB · Views: 161