You are using an out of date browser. It may not display this or other websites correctly.
You should upgrade or use an alternative browser.
You should upgrade or use an alternative browser.
Nick Dunhill's workbench - Scratchbuilding a Reid NBR Atlantic from an ACE Kit.
- Thread starter Nick Dunhill
- Start date
Nick Dunhill
Western Thunderer
It is my understanding that his range is a mixture of stuff designed in house and stuff bought in from other ranges.
It is easy to identify (some of?) the stuff that William Aiscough has designed himself as they have a logo and annotation on the fret such:

All the kits I have had with the above notation are un-bargepoleable. I couldn't tell you about the rest.
It is easy to identify (some of?) the stuff that William Aiscough has designed himself as they have a logo and annotation on the fret such:

All the kits I have had with the above notation are un-bargepoleable. I couldn't tell you about the rest.
Owen English
Member
Good Grief! He's not going get any kits made this week , he'll be too busy issuing writs to one and all ! but I can only agree.It is my understanding that his range is a mixture of stuff designed in house and stuff bought in from other ranges.
It is easy to identify (some of?) the stuff that William Aiscough has designed himself as they have a logo and annotation on the fret such:

All the kits I have had with the above notation are un-bargepoleable. I couldn't tell you about the rest.
Owen.
OzzyO
Western Thunderer
Good Grief! He's not going get any kits made this week , he'll be too busy issuing writs to one and all ! but I can only agree.
Owen.
Did he build any of his own kit line?????????????????????
OzzyO.
Overseer
Western Thunderer
Maybe not but the photographs on the website show that someone very skilled has built them and painted them, or more than one someone. Whether they are accurate representations of the prototypes is a different question.Did he build any of his own kit line?????????????????????
OzzyO.
... including one by a WT member?
 www.aceproducts.org
G.10 GNSR 0-4-4t
 www.aceproducts.org
oldravendale
Western Thunderer
Ah, yes, but in small print at the bottom of the page is "ex S. M. Kit", so not an Ace original.... including one by a WT member?
G.10 GNSR 0-4-4t
www.aceproducts.org
We should be grateful to William for sweeping up some of the kits he has in his range or they would have been lost. For those in the know it's always worth checking any information on the etches which should give a good indication of the origin.
Brian
Richard Gawler
Western Thunderer
There is a J69 up on eBay at the moment with plenty of photos:
Ace Products 0 gauge J67/69 Loco Etched Kit - body and chassis | eBay
The etches include the "three diamonds" logo. There are detailed photos including alternative tank sides. To be honest, if my received advice was limited to the R1 I mentioned earlier, I'd probably put in a bid; it may be a fairly simple kit but what is there looks ok.
Hmm. It looks like it tries to do (1) original narrow tanks (R24), (2) widened tanks (R24R), and (3) built-with-wide tanks (S56), yet with only the correct cab door aperture for the last of these three. There seem to be guide lines to hack a bit off the cab front and rear width, but using them would result in cab sides of the wrong height. There also seems to be only one roof, which, if you wanted to build a narrow-cab version, would result in rain strips in the wrong place. So I'd say it might build variant (3), but you'd be scratchbuilding/hacking about a lot for versions (1) and (2).There is a J69 up on eBay at the moment with plenty of photos:
Ace Products 0 gauge J67/69 Loco Etched Kit - body and chassis | eBay
The etches include the "three diamonds" logo. There are detailed photos including alternative tank sides. To be honest, if my received advice was limited to the R1 I mentioned earlier, I'd probably put in a bid; it may be a fairly simple kit but what is there looks ok.
Last edited:
Richard Gawler
Western Thunderer
But if I subtract the cost of the wheels 3 x £25.50 then the budget looks good for a starting point. The points raised by @Daddyman are important, but as I get older I am realising many kits for pre-grouping locomotives are designed to make a loco as it was in its Big Four or BR days. Which is fair enough, because most modellers want these later periods; and so I must expect to do some alterations to make a Victorian loco.And it is a pound more than the list price..........
Well, the S56s (version (3) above) were built from 1904, so the Victorian period wasn't long over, and it's within your 1889-1913 time frame.I must expect to do some alterations to make a Victorian loco.
Nick Dunhill
Western Thunderer
Here's 3 little jobs that I chugged through whilst waiting for parts for the Atlantic to appear.
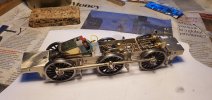
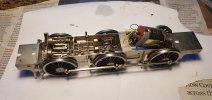
This is a Connoisseur J39 chassis that has had inside motion retro fitted and has passed through a few hands. The fella who was fitting the motion up to the chassis unfortunately died and I was tasked with finishing the job. The original kit laminated rods had been replaced with Premier Component rods. I think that someone had made the assumption that they would be a straight swap, but I had to take the horn guides off the frames and reset the axle centres using my jury axles and the new rods as a jig. It worked very well after that. The loco is fitted with AGH wheel sets and the insulated wheels had crept on their axles and the quartering was out on a couple of wheels. In my experience this is a common fault on this type of wheel, especially if the axle centres don't match those of the rods. Any consiquent binding can often force the wheels to creep on the axles making the matter worse. If your chassis is binding not at 3 or 9 o'clock that's a sign that the quartering is out or you have a crankpin issue. Check your AHG wheels all have the same quartering.
Someone had designed some nice inside motion parts and had them 3D printed and cast at Shapeways. They had been assembled with lots of machine screws, but the screws couldn't be tightened up on the rod joints as they would prevent free movement. This meant they had a tendancy to unwind themselves and crash into the screw head next door that had become loose too. I soldered the screws in place and ground all the adjacent surfaces flat. A couple of other joints needed a bit of relieving to prevent binding and off it went.
The next job was a loco bought off Ebay (I think?) by a client who wanted it converting to S7 and giving a bit of an upgrade. It has all the hallmarks of a Geoff Holt built loco but had been repainted quite badly. I stripped the paint and moved the large splashers outboard a bit to accomodate a S7 wheel set. Colin Dowling reprofiled the Walsall Industry wheels for me with S7 Soc form tool and added some S7 axles. They all dropped nicely back into the chassis and I had to rebuild the brake rigging. I added some new clacks and a new boiler handrail and it went off to Warren Haywood for a lick or two of paint. It came back to me last week and I have reassembled it and popped some coal in the tender. I think it looks rather resplendent in it's new livery.
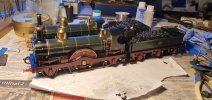
The third job was the reassembly of a GWR Broad Gauge Armstrong convertible I made a couple of years ago. It had been opened and inspected by customs agents on it's way to Australia. I suspect that customs had dropped it and it arrived in Melbourne in a very sorry state.
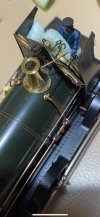
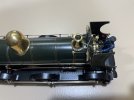
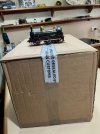
Jeff Ennis of Scorpio kindly provided some etches for a new cab and I was able to make the loco as good as new with some new whistle turrets. The courier's insurance scheme did pay out to cover the cost (I would suggest that insurance is essential on all models sent by post.) Warren has made a fabulous remedial paint job on the loco.
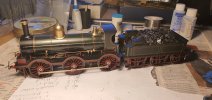
3 happy customers I hope.


This is a Connoisseur J39 chassis that has had inside motion retro fitted and has passed through a few hands. The fella who was fitting the motion up to the chassis unfortunately died and I was tasked with finishing the job. The original kit laminated rods had been replaced with Premier Component rods. I think that someone had made the assumption that they would be a straight swap, but I had to take the horn guides off the frames and reset the axle centres using my jury axles and the new rods as a jig. It worked very well after that. The loco is fitted with AGH wheel sets and the insulated wheels had crept on their axles and the quartering was out on a couple of wheels. In my experience this is a common fault on this type of wheel, especially if the axle centres don't match those of the rods. Any consiquent binding can often force the wheels to creep on the axles making the matter worse. If your chassis is binding not at 3 or 9 o'clock that's a sign that the quartering is out or you have a crankpin issue. Check your AHG wheels all have the same quartering.
Someone had designed some nice inside motion parts and had them 3D printed and cast at Shapeways. They had been assembled with lots of machine screws, but the screws couldn't be tightened up on the rod joints as they would prevent free movement. This meant they had a tendancy to unwind themselves and crash into the screw head next door that had become loose too. I soldered the screws in place and ground all the adjacent surfaces flat. A couple of other joints needed a bit of relieving to prevent binding and off it went.
The next job was a loco bought off Ebay (I think?) by a client who wanted it converting to S7 and giving a bit of an upgrade. It has all the hallmarks of a Geoff Holt built loco but had been repainted quite badly. I stripped the paint and moved the large splashers outboard a bit to accomodate a S7 wheel set. Colin Dowling reprofiled the Walsall Industry wheels for me with S7 Soc form tool and added some S7 axles. They all dropped nicely back into the chassis and I had to rebuild the brake rigging. I added some new clacks and a new boiler handrail and it went off to Warren Haywood for a lick or two of paint. It came back to me last week and I have reassembled it and popped some coal in the tender. I think it looks rather resplendent in it's new livery.

The third job was the reassembly of a GWR Broad Gauge Armstrong convertible I made a couple of years ago. It had been opened and inspected by customs agents on it's way to Australia. I suspect that customs had dropped it and it arrived in Melbourne in a very sorry state.


Jeff Ennis of Scorpio kindly provided some etches for a new cab and I was able to make the loco as good as new with some new whistle turrets. The courier's insurance scheme did pay out to cover the cost (I would suggest that insurance is essential on all models sent by post.) Warren has made a fabulous remedial paint job on the loco.

3 happy customers I hope.
Eastsidepilot
Western Thunderer
I have found, in my experience, some AGH and other makes of wheels that have already been fitted are easily pulled from the axles. Thus you get the problems that Nick suggests.............The loco is fitted with AGH wheel sets and the insulated wheels had crept on their axles and the quartering was out on a couple of wheels. In my experience this is a common fault on this type of wheel, especially if the axle centres don't match those of the rods. Any consequent binding can often force the wheels to creep on the axles making the matter worse. If your chassis is binding not at 3 or 9 o'clock that's a sign that the quartering is out or you have a crankpin issue. Check your AHG wheels all have the same quartering...............
I always us a Loctite type adhesive, stud lock 270 ( red ) for the insulation bush into the wheel and a nut lock 243 ( blue ) for the axle.
This allows the wheel to be pulled from the axle with the help of a little heat "if ever necessary" but will stop any creep on the axle in general use.
This applies to bushes made from Tufnol, if you are making your bushes from Acetal or other engineering plastics I'm in some doubt as to whether Loctite works on these materials.
Any problems with co-ordination between rod and horn block centres is down to the accuracy of the kit or builder.
Col.
Last edited:
Nick Dunhill
Western Thunderer
I always used a good quality superglue or cyano acrylate on the Tufnol bush/axle join on AGH wheels. Will try your stud lock.
And yes you need to be surprisingly accurate when fitting axleboxes to a chassis. I always use jury axles thus;

And I have also repurposed a Poppy's Woodtech loco box to help with the setting up of chassis thus;
Always proceed with the bare minimum of tolerance, you can always introduce a very small amount later to the crank pins although you should never make the axles a sloppy fit in their bearings. Introducing tolerance in the crankpins is just compensation for something else that is out that you need to attend to. If the rods are jointed never make the joint sloppy, you just end up with a coupling rod that has variable centres.
Sorry to preach! I have bushed out a lot of rods though.
And yes you need to be surprisingly accurate when fitting axleboxes to a chassis. I always use jury axles thus;

And I have also repurposed a Poppy's Woodtech loco box to help with the setting up of chassis thus;
Always proceed with the bare minimum of tolerance, you can always introduce a very small amount later to the crank pins although you should never make the axles a sloppy fit in their bearings. Introducing tolerance in the crankpins is just compensation for something else that is out that you need to attend to. If the rods are jointed never make the joint sloppy, you just end up with a coupling rod that has variable centres.
Sorry to preach! I have bushed out a lot of rods though.
Eastsidepilot
Western Thunderer
I should add that 6-10 hours required with Loctite until full strength is achieved but light handling after 15mins is fine.I always used a good quality superglue or cyano acrylate on the Tufnol bush/axle join on AGH wheels. Will try your stud lock.

