Mike Garwood
Western Thunderer
Another piece of the jigsaw, another jig. Still haven't found the jig box, but then I have not really been looking that hard...
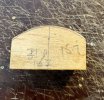

This time for the cab roof, I could have put this thru the rolling bars, but, I wanted to see if this method could be successfully scaled up to take larger pieces. Truthfully, the answer is no. I reckon I've got the start of the curve right on either side (starting from the middle), but, it does not appear to have produced the right curve down to the cab sides. Now this may be of my own manipulation or I didn't get the ends hot enough when the etch went over the gas cooker. It's not the end of the world, as they can be 'persuaded' to take the correct arc. There's a lot of bracing to be soldered on the roof, on the ends and underneath.
I've also taken the plunge with the cab sides and front and also added the boiler mount, which was a real PIA...hence the filler to hide my inadequate soldering skills.

The firebox is just balancing for effect. However, there does appear to be a problem with this sitting properly against the the wheel splashers. I think the remedy will be in the form of a P4 modeling file. When I squeeze it in, the firebox does sit flush with the cab.
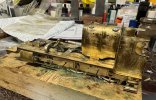
Tomorrow will see the rest of the cab fitted out, but the backhead will be bare bones only, enough to make it busy but certainly not fully kitted out.
I do now have a time table to complete the engine and tender as Mrs G is off to the smoke for 2 nights in August, so that'll be 3 days to get the painting done and get rid of the fumes. This particular engine was in BR green and fully lined. When I first found the photo of this engine, it looked as though it was your usual black mogul, which would have been nice and easy.
Still happy with the way it's going.
Stay safe
Mike.
This time for the cab roof, I could have put this thru the rolling bars, but, I wanted to see if this method could be successfully scaled up to take larger pieces. Truthfully, the answer is no. I reckon I've got the start of the curve right on either side (starting from the middle), but, it does not appear to have produced the right curve down to the cab sides. Now this may be of my own manipulation or I didn't get the ends hot enough when the etch went over the gas cooker. It's not the end of the world, as they can be 'persuaded' to take the correct arc. There's a lot of bracing to be soldered on the roof, on the ends and underneath.
I've also taken the plunge with the cab sides and front and also added the boiler mount, which was a real PIA...hence the filler to hide my inadequate soldering skills.
The firebox is just balancing for effect. However, there does appear to be a problem with this sitting properly against the the wheel splashers. I think the remedy will be in the form of a P4 modeling file. When I squeeze it in, the firebox does sit flush with the cab.
Tomorrow will see the rest of the cab fitted out, but the backhead will be bare bones only, enough to make it busy but certainly not fully kitted out.
I do now have a time table to complete the engine and tender as Mrs G is off to the smoke for 2 nights in August, so that'll be 3 days to get the painting done and get rid of the fumes. This particular engine was in BR green and fully lined. When I first found the photo of this engine, it looked as though it was your usual black mogul, which would have been nice and easy.
Still happy with the way it's going.
Stay safe
Mike.