Kev's Beattie Well Tank Thread

Kev T

Western Thunderer
I've started a Roxey kit that I bought at Guilford so it hasn't had long on the shelf of shame.
First thoughts were that it is OK, but the more I get into the build the more problems there are. I'll post a more detailed report with photos later.

The biggest visual problem I can see is the chronic lack of detail, particularly very few rivets, so this will be a challenge as the body is predominantly white metal.
I've found a place where I can get some stick on rivets, Archers in the States, but I was wondering if there are any UK suppliers.

Kev
 

Kev T

Western Thunderer
I have a soft spot for Victorian era locos, including this loco. When I saw it at Guilford show on the Roxey stand for less than £200 I thought "why not", "that looks good value for money", I could have thought "inexpensive" or "cheap". Cheap is what it is. It's nowhere near the quality of ABS wagons or even DJH locos, both of which I've built.

The kit is mostly white metal with a NS chassis. I followed the instructions and started with the cab. The footplate was flimsy and bendy at the splasher with the white metal thin on one splasher, so care was needed. I cleaned up and tack soldered the pieces together. Not square nor true. I won't bore you with the details, but the footplate turned out to be askew in the horizontal plane. So very carefully I laid it on a flat plate and pushed it true. The cab was again tacked together and was OK, apart from the spectacle plates wrong. With the footplate being so flimsy I decided to build the chassis and mount the part built body to give it support.
The chassis consists of four parts, the two side frames and two small top plates to hold the frames apart. Stiff it isn't, square it wasn't. After tweaking it square and true I put the body on, then the problems really started. Again I won't bore you but the problem was that the white metal has a lot of give in it and the cab didn't fit vertical due to the body mounts bending, then the flimsy splasher base broke :mad::rant:. Fortunately there wasn't a window close or that might have been the end of this build.
I persevered, mounted the smoke box, again not square, 0.5mm wider on the right than the left and a gap at the back when it was vertical. Got the boiler on and after a lot of fiddling tacked everything nice and square. Fitted the splasher tops and filled in the inevitable holes. I ended up using 144C and 100C solder to get the solder to properly adhere to the brass boiler and the white metal. This has taken a couple of minutes to write, it took about 3 days and high blood pressure to get to this point. Any how, the build is now square and true in all directions, just not very pretty yet.

In my defence, when you look at the photos please note that I can build locos. I documented my build of an MOK 9f, there are photos online of a Roxey GWR MMT in Dean livery that I built. I'm not in the same league as Mickoo or Nick Dunhill, but this build shows my laughable skills in a very poor light.


IMG_2711.jpeg

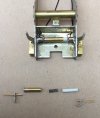
I was going to compensate the chassis but there is precious little clearance between the splashers and the wheels so I've decided to have the driving wheels fixed. If you look you'll note the coupling rods are in the correct position ref the body. This is because I've lifted the body 38thou with shims at the mounting points

IMG_2713.jpeg

I don't have access to all my kit, so more cleaning up will have to wait until I get home.
Next I shall continue to battle with the body.

Kev
 

Hayfield1

Western Thunderer
With the exception of getting it painted I have just about finished building my Well Tank kit. Other than having an issue with the motion (mostly due to my lack of skill) Its gone together quite well. I started it probably 5 years ago and it just stagnated on a shelf until a few weeks ago

I brought Sprung buffers for it and they just seem to add to the quality, I have since brought a Radial tank & P class kits, so I will contact Dave and buy some sprung buffers for them.

The Radial will get sprung pickups, as I brought a part built Roxey Terrier with them and also have a couple of Springside locos with sprung pickups (and buffers) they do work very well

Thanks for showing the build and I hope you get as much enjoyment building it as I did

John
 

Kev T

Western Thunderer
I'll be buying sprung buffers and raiding LG for his motion gear castings. Ii don't like the idea of white metal piston rods and crossheads. The detail isn't good enough. I'll have to do something with the con rods, they don't look thick enough and detailed enough. I'll also be attempting to replace most of the castings with 3d printed ones if I'm able to get my head around some of the more intricate parts. The sandboxes don't line up correctly and look to be difficult to get bolt details on them, so these will definitely be printed.

How did you go on with putting on the rivets John?

Kev
 

Hayfield1

Western Thunderer
I'll be buying sprung buffers and raiding LG for his motion gear castings. Ii don't like the idea of white metal piston rods and crossheads. The detail isn't good enough. I'll have to do something with the con rods, they don't look thick enough and detailed enough. I'll also be attempting to replace most of the castings with 3d printed ones if I'm able to get my head around some of the more intricate parts. The sandboxes don't line up correctly and look to be difficult to get bolt details on them, so these will definitely be printed.

How did you go on with putting on the rivets John?

Kev

Kev

I am not a rivet counter, nor do I know the loco that well. So I must hang my head in shame. I just like the act of model making. And quite happy to build them as designed. In hind sight I would use sprung pick ups, but there is acres of room for wiper blades

I am fearing I may have to replace the crossheads and piston rods. I replaced the coupling rods for Premier Components ones (I think)

John
 

Kev T

Western Thunderer
John

I've got a lot of photos on my computer that I can refer to, including quite a few from here. This phot shows just how many rivets there are on the coal bunker alone, and no I haven't counted them!!

2560px-LSWR_0298_Class_Beattie_Well_Tank_5.jpg
(unknown copyright, shown for illustrative purposes only)

I'll try my best to model it if I can see it, otherwise I'm not too fussed. In this case the rivets are too obvious for me to ignore, however I would never criticise anyone for doing what they feel is right. Rule 1 applies just as much to building models as to model railways.

I'll put sprung pickups on the driving wheels and wipers on the front wheels. I hate poor running/ hand of god, so on a short wheelbase loco I do what I can to get good pickup.

Kev
 

simond

Western Thunderer
Kev,

you might want to have a look at these pickups:

Post in thread 'SimonD’s workbench'
SimonD’s workbench

the bushes in the frames and between the pickup pins and the springs are 3DP but could just as easily be turned, even with a drill if no lathe. The springs are Premier coupling springs. The actual plungers are lengths of 2mm brass rod. The advantage is that they float from side to side so the drag is always the same, minimal, and they don’t bind if there’s any sideplay. You can also take them out without taking the wheels off.

Credit to David LO Smith from whom I got my original drawings, though he said it wasn’t his idea originally.

hth
Simon
 
Last edited:

paulc

Western Thunderer
Kev,

you might want to have a look at these pickups:

Post in thread 'SimonD’s workbench'
SimonD’s workbench

the bushes in the frames and between the pickup pins and the springs are 3DP but could just as easily be turned, even with a drill if no lathe. The springs are Premier coupling springs. The actual plungers are lengths of 2mm brass rod. The advantage is that they float from side to side so the drag is always the same, minimal, and they don’t bind if there’s any sideplay. You can also take them out without taking the wheels off.

Credit to David LO Smith from whom I got my original drawings, though he said it wasn’t his idea originally.

hth
Simon
They are the dogs doodads of sprung pick ups . I use old plastic knitting needles to turn them up from , its like turning cheese .
 

simond

Western Thunderer
Yes, strange material. I suspect it’s key selection criterion was “very, very cheap” and it’s mostly recycled, hence the typical pale grey colour.

it does machine ok, very sharp tools, fine cuts and don’t get it hot.
 
Hello Kev T
I thought about purchasing a Roxey Beatie Well Tank kit but opted for the Laurie Griffin kit instead have had it on the self for around two too three years it is a brass kit with Lauries very nice castings although after briefly reading the instructions it mentions about the kit lacking the internal cab splashers and I think the floor needs scratch building, yes I have a soft spot for this class being a Southern fan, Youchoos does genuine DCC sound recordings from the preserved loco so that will be included in my build.
 

Ian@StEnochs

Western Thunderer
They are the dogs doodads of sprung pick ups . I use old plastic knitting needles to turn them up from , its like turning cheese .

I have used them for years but fabricated out of stock brass & plastic tube, brass wire, etch waste and Slaters buffer springs so no machine tools required.

Ian.
 

Attachments

  • DE2FAE82-E702-4682-9157-43D35A78C610.jpeg
    DE2FAE82-E702-4682-9157-43D35A78C610.jpeg
    127 KB · Views: 13

Hayfield1

Western Thunderer
John

I've got a lot of photos on my computer that I can refer to, including quite a few from here. This phot shows just how many rivets there are on the coal bunker alone, and no I haven't counted them!!

View attachment 233107
(unknown copyright, shown for illustrative purposes only)

I'll try my best to model it if I can see it, otherwise I'm not too fussed. In this case the rivets are too obvious for me to ignore, however I would never criticise anyone for doing what they feel is right. Rule 1 applies just as much to building models as to model railways.

I'll put sprung pickups on the driving wheels and wipers on the front wheels. I hate poor running/ hand of god, so on a short wheelbase loco I do what I can to get good pickup.

Kev

Kev

I see what you say and I am in a position where I can still add these, however I am at a bit of a loss of what to use, where to get them and how to fit them. I seem to think Archers should be applied after priming the loco, is this correct?
 

Kev T

Western Thunderer
Kev

I see what you say and I am in a position where I can still add these, however I am at a bit of a loss of what to use, where to get them and how to fit them. I seem to think Archers should be applied after priming the loco, is this correct?
Don't know how to fix them. I've been pointed to a UK supplier of water transfer rivets, Railtec, so I was going to order them and if needed I'd ask the question. My guess would be after priming but that's only a guess.
 

timbowales

Western Thunderer
Don't know how to fix them. I've been pointed to a UK supplier of water transfer rivets, Railtec, so I was going to order them and if needed I'd ask the question. My guess would be after priming but that's only a guess.
Railtec come with comprehensive instructions so no need to ask :)
 
Top