You are using an out of date browser. It may not display this or other websites correctly.
You should upgrade or use an alternative browser.
You should upgrade or use an alternative browser.
Finescale - of a sort?!
- Thread starter Peter Insole
- Start date
Peter Insole
Western Thunderer
Thank you so much Tim, Richard and Giles. I do have (plenty) of aluminium, and more than enough steel sheet ideal for such a job, but for some reason I cowardly chickened out of attempting to roll either type into an accurately tapered tube!
In retrospect, it might have been a whole heap easier to try either, but had completely convinced myself that sticking ply together with offset joints to make what is in effect a continuous tube was preferable!
It was a monster to do, but I will say that the finished chimney is incredibly strong, and indeed may well survive some quite severe impacts in future? As to longevity, both ally and steel can corrode, the former sometimes very aggressively, while wood on the other hand has the potential to remain good for centuries - but with ply, it is usually the glue in between the veneers that fails!!
Some items of 16mm scale rolling stock in my small collection are quietly dismantling themselves after only (!) twenty - odd years!
Pete.
Tim Watson
Western Thunderer
An amazing use of materials. People often say you must have patience to make models, but it is perseverance to see the job finished.
Tim
Tim
Peter Insole
Western Thunderer
Ah, small world innit? So you knew old uncle Percy as well?!
Sorry Tim, I couldn't resist that! I am sure you are right, but I have just thought of adding "panic" to the list of appropriately descriptive words beginning with "P"!
Pete.
Sorry Tim, I couldn't resist that! I am sure you are right, but I have just thought of adding "panic" to the list of appropriately descriptive words beginning with "P"!
Pete.
Ian@StEnochs
Western Thunderer
Ah, small world innit? So you knew old uncle Percy as well?!
Sorry Tim, I couldn't resist that! I am sure you are right, but I have just thought of adding "panic" to the list of appropriately descriptive words beginning with "P"!
Pete.
Persistence is another good one for modellers doing things a bit differently from the mainstream!
Ian.
Tim Watson
Western Thunderer
Peter Insole
Western Thunderer
Wow! I really didn't know that Tim!
Anyway, it is the start of a new week... and I have at last decided to stop procrastinating and thoroughly bite the bullet by starting on what I have long imagined is the most terrifyingly complex bit of oak carving undertaken to date?
This (not quite so) little beastie is what I need to crown the top end of the loco:


I have considered all manner of potential materials and methods of construction, but felt that as other parts; such as the the cylinder stuffing boxes, crossheads and the fountain (manifold) were cut from that oft mentioned collection of oak offcuts, it would be appropriate to use same?!
The conclusion is no way foregone - and is likely to be a trial in the next few days, if for no reason other than the grain being all wrong for working - but I feel up for the challenge!
Starting with the profile outline :

Rather a lot of huffing and puffing later... and managing to knock a couple of small chunks out already, (hmm, that bodes well?) I have so far at least got the basic shape off the block:


There be a fair way, and quite a lot of sawdust to generate yet!
Pete.
Anyway, it is the start of a new week... and I have at last decided to stop procrastinating and thoroughly bite the bullet by starting on what I have long imagined is the most terrifyingly complex bit of oak carving undertaken to date?
This (not quite so) little beastie is what I need to crown the top end of the loco:


I have considered all manner of potential materials and methods of construction, but felt that as other parts; such as the the cylinder stuffing boxes, crossheads and the fountain (manifold) were cut from that oft mentioned collection of oak offcuts, it would be appropriate to use same?!
The conclusion is no way foregone - and is likely to be a trial in the next few days, if for no reason other than the grain being all wrong for working - but I feel up for the challenge!
Starting with the profile outline :

Rather a lot of huffing and puffing later... and managing to knock a couple of small chunks out already, (hmm, that bodes well?) I have so far at least got the basic shape off the block:


There be a fair way, and quite a lot of sawdust to generate yet!
Pete.
Yorkshire Dave
Western Thunderer
I didn't know the MRC logo was designed in 1928 - which explains the art deco stylised Athena/Minerva or Hermes/Mercury.
Who was the original artist/designer?
Peter Insole
Western Thunderer
I'm going really slowly with this one, for three main reasons: Quite apart from the fact that the oak is jolly hard anyway, the awkward shapes require careful consideration and the piece being continuously shifted to get tools in, not only at the right angle, but according to the direction of grain for a good, clean cut. I am also constantly aware that if I am tempted to become impatient and take off too much at a time I could end up encouraging yet another hidden "shake" to break a chunk free!
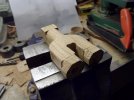
I started by marking up and drilling out the cores from the top and bottom while the valve profile was still a flat, square cut-out that could be firmly held in the drill press. Next, I sawed away as much excess material as possible...


before getting busy with the chisel and files...


It seemed to make sense to initially start the marginally easier (?!) outside shapes first:
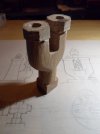
So far, an awful lot of effort, and still quite a bit of fine tuning/finishing to do, but all in all, quite satisfying at the end of a day:


Then the really serious bit of proper carving commenced...
The two valve columns are of a slightly smaller diameter than the base, and there is a distinctive, angled "vee" section at the transition... and just to make life difficult, (as usual) I am very keen to replicate it!
For added "amusement", there is also a shallow web included across the centreline - with a hole for retaining lower end of the tension spring!
I want to fit a proper, working spring in there - not just because it is in my nature, (!) but of a fear that once the long, slender balance arm is fixed atop, the entire assembly might be rather vulnerable without a degree of flexibility being built in?


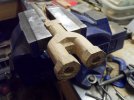
The first side was quite a trial, and a bit rough at the edges... and then had to be repeated on the other side!

I have cut it a wee bit thicker than the prototype, to provide a tad more meat to hold a spring that might come under an occasional high loading!
When the whole thing is installed and painted in "Japan" style black, I trust the discrepancy will be barely noticeable?!
Pete.
I started by marking up and drilling out the cores from the top and bottom while the valve profile was still a flat, square cut-out that could be firmly held in the drill press. Next, I sawed away as much excess material as possible...


before getting busy with the chisel and files...


It seemed to make sense to initially start the marginally easier (?!) outside shapes first:
So far, an awful lot of effort, and still quite a bit of fine tuning/finishing to do, but all in all, quite satisfying at the end of a day:


Then the really serious bit of proper carving commenced...
The two valve columns are of a slightly smaller diameter than the base, and there is a distinctive, angled "vee" section at the transition... and just to make life difficult, (as usual) I am very keen to replicate it!
For added "amusement", there is also a shallow web included across the centreline - with a hole for retaining lower end of the tension spring!
I want to fit a proper, working spring in there - not just because it is in my nature, (!) but of a fear that once the long, slender balance arm is fixed atop, the entire assembly might be rather vulnerable without a degree of flexibility being built in?


The first side was quite a trial, and a bit rough at the edges... and then had to be repeated on the other side!

I have cut it a wee bit thicker than the prototype, to provide a tad more meat to hold a spring that might come under an occasional high loading!
When the whole thing is installed and painted in "Japan" style black, I trust the discrepancy will be barely noticeable?!
Pete.
oldravendale
Western Thunderer
You never cease to amaze, Pete. Traditionally entirely the wrong material for what you're recreating but we all know that it will be perfect at the end of the day.
Brian
Brian
Peter Insole
Western Thunderer
Thank you Fitzroy and Brian. I remember seeing some examples of traditional woodworking, where the pattern produced was an artform of astounding beauty, whereas the purely functional, finished casting was really quite the opposite!
It is indeed the completely wrong kind, let alone individual piece of timber to wrestle with Brian, but as I am enjoying the sheer mental and physical challenge of working with it down at the cellar workbench, it is the perfect distraction from all the grim, frightening stuff going on outside!
Pete.
SimonT
Western Thunderer
Pete.
should you find a shake it is no problem. The Present Mrs T makes wooden things, including turning. Cracks are a way off life that are fixed very simply. Pour the thinest runniest cyano glue into the crack and leave for a while. I am told that clamping will help. The wood will work as one piece. I buy her Screfix's cheapest instead of flowers.
Simon
simond
Western Thunderer
To add to Simon's advice, if a piece of anything brittle breaks out, get it superglued back in without touching the fracture surfaces, as generally they are very clean and they will fit back together very well, and thus give the glue to best chance to bond.
It doesn't work so well on stuff that stretches as it will never quite fit without filing or adjustment.
It doesn't work so well on stuff that stretches as it will never quite fit without filing or adjustment.
Ian@StEnochs
Western Thunderer
Glue is fine for a split or a close fitting joint but for a hole you need a filler. An easy and cheap method of filling a hole almost invisibly is to use 'Monkey Dung'. Just mix some sawdust ,or sanding dust, from the same wood you are working with to a stiff but damp paste with some glue and press it into the cavity leaving it slightly proud. Sand flush along the grain when fully dry!
Ian.
Ian.
Peter Insole
Western Thunderer
Thank you to all for such sage advice. I will definitely have a go with the "monkey dung" method on a hole that went wrong Ian. There is another mountain of fresh sawdust on the bench top for the use of!
The engine does seem to have a little bit of everything in it so far Richard, and it is not quite finished yet!!
I got a rare second wind and kept on going until fairly late last night, quietly fettling away. Every time I turned the piece round, I spotted something else that needed adjustment.
Making the two columns reasonably round and parallel need not have been a concern - if I could have been bothered to make a half circular template... but I decided instead to finish the tube rims first - using my old hole drawing guide to check, and then shape the narrower sections by filing down to a constant depth below.
A strip of masking tape was cut to depth and wound round the finished rims ensure a more accurate line:

The rims should have a curved flare, but I quickly discovered that reproducing that - especially in the harder to get to sections in between the tubes, with either a rat tail, or any other file without a safe edge was way beyond my "pay-scale" - so decided on a make do and hide with paint alternative instead!

The work has started on the tube at top right in the above image.
With the top and bottom rim edges finally "softened" with sandpaper, I hope that the finish looks reasonably acceptable?


I still keep seeing bits that could do with more tidying up, but then again, I'm only too aware that there is rather more work on the rest of the valve yet to come, so might have to be satisfied with leaving it as it is now?!
Pete.
The engine does seem to have a little bit of everything in it so far Richard, and it is not quite finished yet!!
I got a rare second wind and kept on going until fairly late last night, quietly fettling away. Every time I turned the piece round, I spotted something else that needed adjustment.
Making the two columns reasonably round and parallel need not have been a concern - if I could have been bothered to make a half circular template... but I decided instead to finish the tube rims first - using my old hole drawing guide to check, and then shape the narrower sections by filing down to a constant depth below.
A strip of masking tape was cut to depth and wound round the finished rims ensure a more accurate line:

The rims should have a curved flare, but I quickly discovered that reproducing that - especially in the harder to get to sections in between the tubes, with either a rat tail, or any other file without a safe edge was way beyond my "pay-scale" - so decided on a make do and hide with paint alternative instead!

The work has started on the tube at top right in the above image.
With the top and bottom rim edges finally "softened" with sandpaper, I hope that the finish looks reasonably acceptable?


I still keep seeing bits that could do with more tidying up, but then again, I'm only too aware that there is rather more work on the rest of the valve yet to come, so might have to be satisfied with leaving it as it is now?!
Pete.
Last edited:
timbowales
Western Thunderer
Peter, a lovely piece of work. It's going to be a shame to hide that lovely grain under thick black paint 


