A long time ago in a different forum, when Princes Street was still pretty embryonic, I posted my first interpretation of the carriage cleaning platforms.


Construction was out of Evergreen Plastic, with a single photo for inspiration. It looked not too bad until better research photos became available, at which point it started to look "clunky"
Plan B, after the purchase of a Silhouette Cameo was to use that to cut the legs, then laminate the layers together

The rotating blade and the plastic I used seemed not to agree. The sides weren't as symmetrical as I would have preferred. The hole, for the same reasons didn't have right angle corners, and it took months for the solvent to evaporate and the plastic to re harden in an unheated garage. A start was made to tidy them up, but they never received the deck and the scenic surface was never cut to accommodate them.
At Model Rail Scotland, I noticed one of the traders had resin printed a "cleaning gantry". Food for thought.......

The leg, the underside of the deck showing the locating strips for the legs and the 2 in 1 alignment Jig. The jig was accidentally made too thick, restricting the cutting ability of a knife blade. The wider slots are for the walkway legs opposite the signal box which provide safe access over some of the point rodding runs
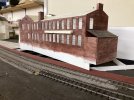
And finally, all glued together, imbedded in the same underlay used on the layout.

2.4 metres to go!