You are using an out of date browser. It may not display this or other websites correctly.
You should upgrade or use an alternative browser.
You should upgrade or use an alternative browser.
7mm David Andrews Princess - 6206 Princess Marie Louise
- Thread starter Rob Pulham
- Start date
Rob Pulham
Western Thunderer
The back head is well on it's way now, but when I got so far I realised that the only hand wheels I had were the teched nickel silver ones that came with the kit. Nickel of course looks different when you are trying to represent brass so I thought I would have a go at turning some.
I did one to work out how, but the four holes came out all over the place. Once I had a method that worked I made the three that I needed. They actually looked the part when fitted to the back head but what was missing were the handles.


At this size I couldn't see any sensible way to add them to the ones that I had made so I had a rethink.
I modified the technique and made rings to solder to the face of the etches and then added half round rod for the handle. This is the best of both worlds. the right shape and three dimensional.

This is a cruel close up but they look pretty god at normal viewing distances.
Out of the castings that I have from the various sources the one that is missing is a sight glass lubricator which sits at the upper left above the brake valve.


Two turnings and a bit of rod and tube later...

That's about it unless I think of anything else. I am struggling as to what was fitted the 1930's and what was fitted later. The Wild Swann supplement has a photo of Princess Elizabeth as built and there is a lot less on the back head than is shown in the GA in part one.
All the parts are removeable until I have painted the main casting.
I did one to work out how, but the four holes came out all over the place. Once I had a method that worked I made the three that I needed. They actually looked the part when fitted to the back head but what was missing were the handles.
At this size I couldn't see any sensible way to add them to the ones that I had made so I had a rethink.
I modified the technique and made rings to solder to the face of the etches and then added half round rod for the handle. This is the best of both worlds. the right shape and three dimensional.
This is a cruel close up but they look pretty god at normal viewing distances.
Out of the castings that I have from the various sources the one that is missing is a sight glass lubricator which sits at the upper left above the brake valve.
Two turnings and a bit of rod and tube later...
That's about it unless I think of anything else. I am struggling as to what was fitted the 1930's and what was fitted later. The Wild Swann supplement has a photo of Princess Elizabeth as built and there is a lot less on the back head than is shown in the GA in part one.
All the parts are removeable until I have painted the main casting.
Rob Pulham
Western Thunderer
In between assembly of the 8f water scoop gear I also managed to prime and top coat the Back Head.


James Spooner
Western Thunderer
Hi RobThe back head is well on it's way now, but when I got so far I realised that the only hand wheels I had were the teched nickel silver ones that came with the kit. Nickel of course looks different when you are trying to represent brass so I thought I would have a go at turning some.
I did one to work out how, but the four holes came out all over the place. Once I had a method that worked I made the three that I needed. They actually looked the part when fitted to the back head but what was missing were the handles.
View attachment 183276
View attachment 183277
At this size I couldn't see any sensible way to add them to the ones that I had made so I had a rethink.
I modified the technique and made rings to solder to the face of the etches and then added half round rod for the handle. This is the best of both worlds. the right shape and three dimensional.
View attachment 183278
This is a cruel close up but they look pretty god at normal viewing distances.
Out of the castings that I have from the various sources the one that is missing is a sight glass lubricator which sits at the upper left above the brake valve.
View attachment 183279
View attachment 183280
Two turnings and a bit of rod and tube later...
View attachment 183281
That's about it unless I think of anything else. I am struggling as to what was fitted the 1930's and what was fitted later. The Wild Swann supplement has a photo of Princess Elizabeth as built and there is a lot less on the back head than is shown in the GA in part one.
All the parts are removeable until I have painted the main casting.
That is an absolutely stunning depiction! For the sake of the driver’s right hand, though, when you reassemble it, I think the top part of the regulator should be against the left hand stop when closed and, when it is closed, the handle of the regulator should be just above and to the left of the fire guard. The driver will then pull the regulator towards himself to open up (and away from the fire).
best
Nigel
adrian
Flying Squad
An excellent result - would you care to elucidate on the method that worked? Whilst I can understand the choice to modify the etched handles - personally this is another perfect example where silver-soldering would be an excellent solution. You could silver-solder a length of wire to the wheels to represent the handles and then soft solder to the backhead without fear of them falling apart.I did one to work out how, but the four holes came out all over the place. Once I had a method that worked I made the three that I needed. They actually looked the part when fitted to the back head but what was missing were the handles.
Dave Holt
Western Thunderer
Looking at the LMS drawing, I would say Rob has got the regulator handle in just about the right place for the closed position. What is wrong is the short tail which, as Nigel says, should be against the LH stop in the quadrant.
Except for the first three locos, the original regulator handle was a double affair, with a second handle extending horizontally to the right. I don't know if that had been removed by BR days.
Dave.
Except for the first three locos, the original regulator handle was a double affair, with a second handle extending horizontally to the right. I don't know if that had been removed by BR days.
Dave.
Rob Pulham
Western Thunderer
Except for the first three locos, the original regulator handle was a double affair, with a second handle extending horizontally to the right. I don't know if that had been removed by BR days.
Dave.
This one is to be depicted as pre war so it does need the double handle, I have created a scale drawing of the handle, I just need to get my finger out and make it.
Rob Pulham
Western Thunderer
An excellent result - would you care to elucidate on the method that worked? Whilst I can understand the choice to modify the etched handles - personally this is another perfect example where silver-soldering would be an excellent solution. You could silver-solder a length of wire to the wheels to represent the handles and then soft solder to the backhead without fear of them falling apart.
Hi Adrian,
The method that worked:
The set up was a Proxxon dividing head on a Proxxon Mini pillar drill.
None of my centre drills are fine enough to use to make four indents on such a small diameter bar (4mm) and the 0.7mm drill bit had a tendency to wander. So to get around this I used a hardened scriber point, which I fitted to the chuck and set the drill running. I then pressed the turning point into the end of the brass bar at 90 degree intervals to give me the spacing. This made enough of an indent to centre the drill.
Changing to the 0.7mm drill bit I started the drill with the bit in the indent rather than with the quill at the top of it's travel and then bringing it down to the work piece. This prevented any tendency for the small drill bit to whip and got repeatable holes all in the same positions.
Thinking about it as I type this, I could have brought the chuck down and turned it by handle for a few turns to get the drill started in the indent too but I didn't think of it at the time.
Rob Pulham
Western Thunderer
Here is it is with most of the bling refitted - just resting in place it will be soldered in from the back later.


I say "most of", because as mentioned above the production locos from 6203 onwards had a double regulator handle and I have only just got around to making it.

I say "most of", because as mentioned above the production locos from 6203 onwards had a double regulator handle and I have only just got around to making it.
Rob Pulham
Western Thunderer
More detailing of the cab has ensued since my last update. The reverser is a mixture of David Andrews and Ragstone castings.


The David Andrews Seats are reasonable castings but I was struggling to work out how best to fit them. They look like the idea is that the two pegs fit into holes but I didn't really want to be drilling holes in the cab side sheets for them. With the pegs removed there is very little to secure them so I made some replacements with a rear strip to solder to the cab side.

What is unclear is whether they fold up or down. At the minute They just drop down but if they fold up I can make a couple of stays to hold them when folded down.
The David Andrews Seats are reasonable castings but I was struggling to work out how best to fit them. They look like the idea is that the two pegs fit into holes but I didn't really want to be drilling holes in the cab side sheets for them. With the pegs removed there is very little to secure them so I made some replacements with a rear strip to solder to the cab side.
What is unclear is whether they fold up or down. At the minute They just drop down but if they fold up I can make a couple of stays to hold them when folded down.
Rob Pulham
Western Thunderer
Thanks Paul,They fold up.
ATB
OzzyO.
I knew that someone would know. My instinct was that they folded up but it's better to ask the question.
Rob Pulham
Western Thunderer
Recently there has been much work but not a lot to show for it. I returned to the chassis in an attempt to get that running before carrying on with the body and cab. Much of the time has been spent fine tuning the fit of the gearbox so that it doesn't rub and getting the rear axle to pass through the gearbox and be a tight fit but still be removable for painting etc. This is more interesting because of the wheels being fixed to the axle stubs and the gearbox having ball races which want to grab onto the axle.
I also had a rather frustrating time trying to make a pin for the outer end of the return crank which attaches the eccentric rod. I had tapped the small end of the return crank 12ba and the plan was to make a small shouldered pin threaded 12BA with a large flat head that I could attach an etched cover to.

This gives an idea of the desired pin with the etched covers below

The observant amongst you will note that the threads look very undernourished on the pin. This was possibly my fifth or sixth attempt and I kept putting it down to my having the pin too thin, too thick etc. as each time the thread came out too small for 12BA. Eventually I examined my 12ba die under some magnification and realised that one of the three cutting edges is out of line with the rest and is what I am sure was causing all the failures.
I can't actually recall if I have used the 12BA die at all (I use the 12 BA tap set regularly but generally for fitting bought hardware) and if I have I would have only used it on brass or nickel so I very much doubt that I have deformed it. It has been consigned to the bin and a new one ordered from Chronos. in the meantime I will probably modify a a couple of 12BA set screws to get on with the job but when the new die arrives I will have to make another to prove once and for all that it's not something that I am doing wrong.
I also had a rather frustrating time trying to make a pin for the outer end of the return crank which attaches the eccentric rod. I had tapped the small end of the return crank 12ba and the plan was to make a small shouldered pin threaded 12BA with a large flat head that I could attach an etched cover to.
This gives an idea of the desired pin with the etched covers below
The observant amongst you will note that the threads look very undernourished on the pin. This was possibly my fifth or sixth attempt and I kept putting it down to my having the pin too thin, too thick etc. as each time the thread came out too small for 12BA. Eventually I examined my 12ba die under some magnification and realised that one of the three cutting edges is out of line with the rest and is what I am sure was causing all the failures.
I can't actually recall if I have used the 12BA die at all (I use the 12 BA tap set regularly but generally for fitting bought hardware) and if I have I would have only used it on brass or nickel so I very much doubt that I have deformed it. It has been consigned to the bin and a new one ordered from Chronos. in the meantime I will probably modify a a couple of 12BA set screws to get on with the job but when the new die arrives I will have to make another to prove once and for all that it's not something that I am doing wrong.
bambuko
Western Thunderer
I personally wouldn't expect miracles from any dies in this size...
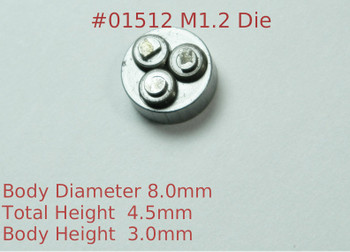
My experience of M1.2 dies (slightly smaller than 12BA) is not encouraging.
Some examples of (expensive) UK sourced die
and (equally expensive) German sourced die
although (I am sure) they are both made in PRC


I have tried instead thread rolling (as shown in this video):
This is far better quality ")
Whether it make sense financially is another question...
I will be interested whether your new 12BA die will be any better...
My experience of M1.2 dies (slightly smaller than 12BA) is not encouraging.
Some examples of (expensive) UK sourced die
and (equally expensive) German sourced die
although (I am sure) they are both made in PRC
I have tried instead thread rolling (as shown in this video):
Whether it make sense financially is another question...
I will be interested whether your new 12BA die will be any better...
simond
Western Thunderer
In the good ol’…
haven’t found a UK option.
a rolled thread will be much stronger & tougher than an equivalent cut thread due to the work hardening, and surface compression reducing any tendency to crack.

haven’t found a UK option.
a rolled thread will be much stronger & tougher than an equivalent cut thread due to the work hardening, and surface compression reducing any tendency to crack.
Rob Pulham
Western Thunderer
To be fair I have 0-10 BA and 14 dies too most which I have used without issue. the 0-10 dies came in a boxed set along with sets of equivalent taps but I had to buy 12 and 14 as individual items.
I got around the problem last night by modifying a 12BA screw and soldering the etched covers on, making a small bush from tube threaded 12BA and a small spacer. Once I get them assembled, I may not need the spacer but if I don't they will go in the spares box.


I still need to add oil corks to the eccentric rods.
I got around the problem last night by modifying a 12BA screw and soldering the etched covers on, making a small bush from tube threaded 12BA and a small spacer. Once I get them assembled, I may not need the spacer but if I don't they will go in the spares box.
I still need to add oil corks to the eccentric rods.
bambuko
Western Thunderer
Yes, anything up to 10BA or M2, particularly with old stock "Made in England" dies usually is fine....I had to buy 12 and 14 as individual items...
It's with the smaller ones (e.g 12BA, 14BA or M1.6, M1.4 etc), specially when attempted with cheap dies
 that difficulties start...
Rob Pulham
Western Thunderer
Hi Dave,Rob.
I hope the assembly of eccentric rods to return cranks is only temporary because the upper one appears to be mounted to the back face of the crank.
Dave.
I hadn't spotted that but it is, I just assembled them for the photos. I still need to add the oil corks to the rods before fitting them.