Class 455/8 Modern Image EMU

Arun Sharma

Western Thunderer
A project that I've been working on for some time as a spare time indulgence rather than as a kit design to sell is the rather angular but stylish class 455/8 as currently operated by SWT on its Waterloo suburban/commuter routes.

The 455 class units are based on the BREL designed 20metre Mk3 bodyshells which were common to a whole host of pre-privatisation EMUs and DMUs. Inded, the first class 150 DMU was built by taking a 455 bodyshell and modifying it so that a diesel engine and suitable transmission could be fitted.
My basic design started life following a series of visits to photograph these units and then transposing the measurements into Autodesk Inventor with the following result [after 3D printing]:
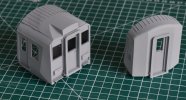
two ends of 455_8 DTSO.jpgThe CAD design itself of the whole DTSO car is:
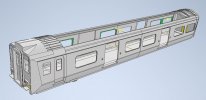
Screenshot 2024-10-26 121745.jpgwith separate doors and seats together with the various MU jumpers and underfloor bits to follow. The rear half of the car, when doubled, forms the entire TSO car which obviously save money and time. The power car of the 4-car set is almost the same as the TSO but has different bogies and a rather different air bag suspension mounting and some odd jumper connections on the rear end but nothing that can't be done in an hour or so when I get some time.

The 3D printed bodyshell had its first outing at the Guildford 7mm Trade show a couple of months ago in primer - which seemed appropriate as these cars are everyday stock on the Waterloo-Guildford routes:

DSC_0001b.jpg
 

Arun Sharma

Western Thunderer
Current work is centered around producing the BT3 bogies for these units. These aren't commercially available in the form used on these cars so again, a bit of 3D CAD is called for. The current design is:

Screenshot 2025-01-04 114628.jpgthis - the trailing bogie is similar but without the steps for the driver. I may need to do some work on the suspension balloon however. The final outer cosmetic bogie should be lost wax brass with an inner etched wheeled chassis. The power car aka MSO has a rather different bogie design - more akin to a HST bogie in general appearance but that's a way off yet.
 

Arun Sharma

Western Thunderer
This is what the inner chassis and bogie design looks like at the moment:

Screenshot 2025-01-04 171934.jpg
I'm going to have to find some way of adding something like a transverse bolster to the chassis pivot so that the whole thing can hang at the right distance below the solebar - a 3D printed transverse block connecting the two air suspension units is probably going to be the way to go.
 

AdeMoore

Western Thunderer
On my watch list! I see you name turn up on Tony Teague thread on RMWeb so aware of your line of work.
interested in seeing this 3D printing process though from CAD to print.
 

Arun Sharma

Western Thunderer
interested in seeing this 3D printing process though from CAD to print.
Thank you
I wrote three articles for the Scalefour Society journal [numbers 180-2 inclusive] that cover some of the philosophy and concepts of 3D design - Whilst in some respects these are a little dated now that is only in terms of their not being completely up to date rather than any redundancy. They are still worth digging out and reading if you know any S4 members.
3D printing is purely a means to an end - of itself it is no more useful than a word processor in the hands of someone who has some issues with literacy. Wheras in the hands of Wm Shakespear, Philip Pullman or JK Rowling [to mention a few] ....... many things are possible.
2D and 3D CAD design is really nothing more than an easily taught way of looking at the world as a collection of cubes, spheres, cylinders and cones. These can then be deconstructed as flat 2D shapes which are then pulled to an appropriate extruded length and combined with other similar primitive shapes.
 

AdeMoore

Western Thunderer
Thanks for the reply Arun, not sure I do know any S4 members but hey.
I can only marvel really at what you do!
I downloaded tinker cad once as I was told that’s a good start point!
Couldn’t get it or didn’t spend enough time trying to get it! Some plumed for Fusion 360 back then a step beyond my level of skill I thought.
watching with interest.
 

Arun Sharma

Western Thunderer
I've drawn the various boxes that fit underneath the driving trailer though I've ignored the centre line underframe trellis structure as I don't normally display models derailed and/or lying on their side.

Screenshot 2025-01-07 115611.jpg
There are still a couple of boxes underneath the driving cab as well as the guardirons and the coupler to add. Note that the trailing bogie doesn't have a shoebeam unlike the leading one.
 

KHC2442

New Member
Thank you
I wrote three articles for the Scalefour Society journal [numbers 180-2 inclusive] that cover some of the philosophy and concepts of 3D design - Whilst in some respects these are a little dated now that is only in terms of their not being completely up to date rather than any redundancy. They are still worth digging out and reading if you know any S4 members.
3D printing is purely a means to an end - of itself it is no more useful than a word processor in the hands of someone who has some issues with literacy. Wheras in the hands of Wm Shakespear, Philip Pullman or JK Rowling [to mention a few] ....... many things are possible.
2D and 3D CAD design is really nothing more than an easily taught way of looking at the world as a collection of cubes, spheres, cylinders and cones. These can then be deconstructed as flat 2D shapes which are then pulled to an appropriate extruded length and combined with other similar primitive shapes.
Hi Arun,
Your last paragraph was what clicked for me. It was a comment like that above on a Narrow gauge forum that got me into 3D design. I had been trying for a couple of years to get there. I tried several different software programs but as at the time I had bad WiFi issues I need software that could be stand alone. So I use Designspark Mechanical as it works with out WiFi. I started with a very simple project namely a trolley coin. Most of my work has required the use of either watching videos or a quick google search. It is surprising how quick one picks it up.

Keith
 

Arun Sharma

Western Thunderer
The basic vehicle is finished now apart from sticking the seats in, a couple of interior cab bulkheads and some roof panels. All the underframe boxes and tanks are in place, the guard irons are in place* - the obvious front coupler is missing but essentially it's a form of buckeye and some form of commercial buckeye will do the job. Once the underframe boxes are printed, the whole lot can go off to CMA for moulding in polyester resin - hopefully in time to be on the DEMU stand at Ally Pally in March.

Screenshot 2025-01-09 151008.jpg

* Actually the guard irons are not in place - They would be stuck on the front of the bogie if they were present. The brown vertical bits are actually steps for ?window cleaners, MU hose pipe connectors to stand on.
 
Last edited:

Arun Sharma

Western Thunderer
Underframe boxes are printed and seats are being done - You can just print one and ask CMA to reproduce it another 20 times but it means the mould wears out rather quickly - and I will want that mould to be available for the MSO and TSO cars idc. The interior design is finished with the seats [three different basic types] and the prominent litter bins [green topped] all [roughly] in place. It should all go off to CMA on Wednesday and hopefully back in time [as a resin kit] for the Ally Pally show.
The etched bogie inner chassis are done and the lost wax bogie outer frames/steps/shoebeams are all being cast in brass at the moment.

Screenshot 2025-01-17 151637.jpg
 

Jim smith-wright

Western Thunderer
Somethings gone a bit odd with that Arun. The the relationship between the front windows and the cabside windows is too great. They should be nearly level (but not quite) at the bottom but you seem to have the bottom of the front window nearer half way up the cab side window. The tops of the main bodyside windows should be virtually level with the tops of the cabside window if not a bit higher but you have them much lower. The gap between the bottom of the door and the bottom of the body also looks too big. You also seem to have some sort of solebar that the real units don't have. The lower bodyside curve looks very wrong to my eye, more of an angle than a consistent curve.
 

Arun Sharma

Western Thunderer
Somethings gone a bit odd with that Arun. The the relationship between the front windows and the cabside windows is too great. They should be nearly level (but not quite) at the bottom but you seem to have the bottom of the front window nearer half way up the cab side window. The tops of the main bodyside windows should be virtually level with the tops of the cabside window if not a bit higher but you have them much lower. The gap between the bottom of the door and the bottom of the body also looks too big. You also seem to have some sort of solebar that the real units don't have. The lower bodyside curve looks very wrong to my eye, more of an angle than a consistent curve.
Thank you - I hear what you say Jim and Brian - I will have a serious look at this. I agree with the cab front windows and I will change these - The front windows need to be lowered about 1.5mm. The bodyside windows look unduly low height because the actual model has etched window surrounds that go around the window openings [not drawn in on these screenshots] and that brings them up to the correct size. The solebar exists on the units but is a little further in than I have drawn it - I suspect I did that to allow the bogie a little more swivel because it's not using prototypical smaller flanged S7 wheelsets.

455-8_cab window wipers.jpg
 

Arun Sharma

Western Thunderer
The other thing to do is to chamfer the lateral faces of the solebars so that the inner faces still allow the bogie/wheelset movement but the outer faces aren't quite so obvious.
 
Top