Buckjumper
Flying Squad
D'you know what, after all this time on here I've not started a workbench thread. So here we go.
I've always got more than one job on the go at any time; work tends to grind to a halt when I realise various bits in a kit are completely useless, and sometimes, like at present, parts I sent for weeks ago have yet to turn up, so I start something else off. It's also handy when paint is curing to be able to get on with something else, and sometimes when a build is causing me to tear my hair out it's a psychological antidote to work on something completely different.
So all of that is to prepare you for the fact that this thread is going to be all over the place - don't expect a nice neat chronology cos that's not how I work.
And feel free to hijack the thread as much as you like, it's not precious... mi casa es su casa and all that jazz.
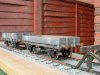
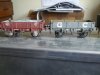
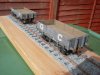
One current commission is to build a pair of ex-Manchester, Sheffield & Lincolnshire 3-plank dropside wagons to Diagram 6 wagons in the Great Central livery circa 1910-12 using the S&T Wagon Works resin bodied kits. These come with whitemetal axleguard/axleboxes, buffer housings, vee hangers, brass buffer heads, etched brass coupling hooks, and steel links.

I'll be adding to this 3' 1" split spoke wheels from Slaters, replacement brass cast coupling hooks from the same source to replace thin etched efforts, WEP compensation units (resin can be a bit flexible, so I never build such wagons solid and the commission doesn't call for sprung units), replacement sprung buffers from Haywood as I hate brass buffer heads, GC goods wagon paint from Precision, and GC transfers from POWsides.
Very little flash exists on the resin body which has been moulded by CMA, just a little under the curb rail which is easily removed. I'm still (weeks later) waiting for the ruddy buffers from Haywoods so I'll not open out the buffer holes in the headstocks quite yet and I'll leave the slot for the hooks for now too. To remove any grease and release agent from the mouldings I gave the bodies a quick scrub with Barkeepers Friend and a vibrating toothbrush. These are often half price in the local supermarkets, and last for ages. Why use a second hand toothbrush to clean your models if they're not in a good enough condition to clean your teeth?

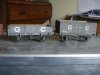
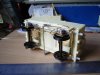
Axleguards, or w-irons in modeller's parlance - only a little flash was present which was quickly removed with a blade and old file kept specifically for whitemetal. The pattern maker really had his brain plugged in for this as he's not only marked the centre line on the underside of the body, but also the position of the axles. Pattern makers take note! This speeds things up no end and leaves no margin for error.

Some Araldite Rapid was mixed up and the axleguards fitted and set aside for 24 hours to cure.
I've always got more than one job on the go at any time; work tends to grind to a halt when I realise various bits in a kit are completely useless, and sometimes, like at present, parts I sent for weeks ago have yet to turn up, so I start something else off. It's also handy when paint is curing to be able to get on with something else, and sometimes when a build is causing me to tear my hair out it's a psychological antidote to work on something completely different.
So all of that is to prepare you for the fact that this thread is going to be all over the place - don't expect a nice neat chronology cos that's not how I work.
And feel free to hijack the thread as much as you like, it's not precious... mi casa es su casa and all that jazz.
One current commission is to build a pair of ex-Manchester, Sheffield & Lincolnshire 3-plank dropside wagons to Diagram 6 wagons in the Great Central livery circa 1910-12 using the S&T Wagon Works resin bodied kits. These come with whitemetal axleguard/axleboxes, buffer housings, vee hangers, brass buffer heads, etched brass coupling hooks, and steel links.
I'll be adding to this 3' 1" split spoke wheels from Slaters, replacement brass cast coupling hooks from the same source to replace thin etched efforts, WEP compensation units (resin can be a bit flexible, so I never build such wagons solid and the commission doesn't call for sprung units), replacement sprung buffers from Haywood as I hate brass buffer heads, GC goods wagon paint from Precision, and GC transfers from POWsides.
Very little flash exists on the resin body which has been moulded by CMA, just a little under the curb rail which is easily removed. I'm still (weeks later) waiting for the ruddy buffers from Haywoods so I'll not open out the buffer holes in the headstocks quite yet and I'll leave the slot for the hooks for now too. To remove any grease and release agent from the mouldings I gave the bodies a quick scrub with Barkeepers Friend and a vibrating toothbrush. These are often half price in the local supermarkets, and last for ages. Why use a second hand toothbrush to clean your models if they're not in a good enough condition to clean your teeth?
Axleguards, or w-irons in modeller's parlance - only a little flash was present which was quickly removed with a blade and old file kept specifically for whitemetal. The pattern maker really had his brain plugged in for this as he's not only marked the centre line on the underside of the body, but also the position of the axles. Pattern makers take note! This speeds things up no end and leaves no margin for error.
Some Araldite Rapid was mixed up and the axleguards fitted and set aside for 24 hours to cure.
")


)")