You are using an out of date browser. It may not display this or other websites correctly.
You should upgrade or use an alternative browser.
You should upgrade or use an alternative browser.
7mm Bleddfa Road
- Thread starter Geoff
- Start date
Geoff
Western Thunderer
Thanks Keith, I rather like that view myself but it should look much better once the hedgerow and trees have been modelled Gordon Gravett style.
In the meantime I have been messing about with a mirror at the other end of the layout, early days yet and the idea will obviously work better once the bridge stonework, and the scenery around it has been modelled rather than cloned.

Geoff
In the meantime I have been messing about with a mirror at the other end of the layout, early days yet and the idea will obviously work better once the bridge stonework, and the scenery around it has been modelled rather than cloned.
Geoff
Geoff
Western Thunderer
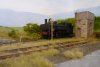
The bridge is slowly coming to life now that the DAS has been carved, painted and weathered, The base coat for the stonework is a mix of black and white acrylic paints, individual stones being dry brushed with Precision Paints weathered wood enamel. The bridge woodwork was painted by dry brushing Humbrol 64 grey and 110 natural wood over a base coat of the aforementioned Precision weathered wood. Whilst the paint was still tacky it was dusted with talc to give a faded appearance. Ignore the 4mm scale tree and the grass in the foreground, both have been salvaged from my scrap box as an aid to planning the scene. The wire armature of a large Gordon Gravett inspired Elm is currently being coated in bark mix, and if all goes to plan it should be covered in Woodland scenics foliage, and rooted firmly into some rough weed infested grass by this time next week. I have used one of those self adhesive car wing mirror repair kits behind the bridge, the material is only 1mm thick so the prismatic effect and distortion is somewhat reduced. In the meantime the area around the buffer stop is slowly being worked up with some homemade grass tufts, an unkempt hedge is coming to life down in the goods yard, and so endeth this update.
Geoff


Geoff
john lewsey
Western Thunderer
This is Looking great Geoff
Yorkshire Dave
Western Thunderer
I have used one of those self adhesive car wing mirror repair kits behind the bridge, the material is only 1mm thick so the prismatic effect and distortion is somewhat reduced.
Very effective Geoff - especially the photo of the loco and wagon.
I presume the way to almost elimate the prismatic effect and distortion would be to use an absolutely flat highly polished (and sealed) steel, aluminium or chrome sheet where the mirror is on the surface rather than behind a layer of glass.
I think one of the hardest items to disguise in this situation is a mirror as it's the shadows cast under the bridge with the current lighting arrangement which are the tell-tale.
As you've alluded to a few well placed trees will complete the illusion and I presume, coupled with some lighting rearrangement (midday sun) to alter the angle of the shadow cast by the bridge so it falls onto the track.
I've often thought whether a photo on a miniature screen or an old smartphone would work in a situation like this.
Geoff
Western Thunderer
I assume that is a mirror on the other side of the bridge. It works well if it is.

It is one of these which can be cut to shape with scissors Alan, the material has a self adhesive backing and is attached to a piece of card that slides in place behind the bridge abutments.
This is Looking great Geoff
Thank you John
")
Very effective Geoff - especially the photo of the loco and wagon.
I presume the way to almost elimate the prismatic effect and distortion would be to use an absolutely flat highly polished (and sealed) steel, aluminium or chrome sheet where the mirror is on the surface rather than behind a layer of glass.
I think one of the hardest items to disguise in this situation is a mirror as it's the shadows cast under the bridge with the current lighting arrangement which are the tell-tale.
As you've alluded to a few well placed trees will complete the illusion and I presume, coupled with some lighting rearrangement (midday sun) to alter the angle of the shadow cast by the bridge so it falls onto the track.
I've often thought whether a photo on a miniature screen or an old smartphone would work in a situation like this.
Thank you for your comments and interesting thoughts Dave, I don't think there is an easy, fool proof way to avoid any distortion or prismatic effects. As you point out a change in lighting could improve things shadow wise, but even a slight change of camera or mirror angle throws a spanner in the works. I did experiment with a photo as you suggest, but had problems when it came to aligning the track so that it continued seamlessly into the distance. To be honest the best solution would be to knock a hole through the wall and extend the layout
Geoff
Geoff
Western Thunderer
Thank you Phil that is very kind of you, apologies for not responding earlier, you can blame BT and a Windows 10 update for that! In the meantime a little more progress has been made in and around the goods yard area..........

I decided to model some young saplings rather than trees along the backscene, and am rather pleased with how they are blending into the backscene. A couple more will be planted to the left of the iron mink, I have also started work on the water tower ladder.


A Gordon Gravett inspired unkempt hedgerow is also taking root, both saplings and hedgerow are made from 30 gauge florist wire covered in Woodland foliage mat.
Geoff
I decided to model some young saplings rather than trees along the backscene, and am rather pleased with how they are blending into the backscene. A couple more will be planted to the left of the iron mink, I have also started work on the water tower ladder.
A Gordon Gravett inspired unkempt hedgerow is also taking root, both saplings and hedgerow are made from 30 gauge florist wire covered in Woodland foliage mat.
Geoff
Geoff
Western Thunderer
Lovely work Geoff.
Thanks Alan, I was admiring your AC railbus before and came very close to getting one myself a couple of weeks ago.
Geoff


Geoff
Western Thunderer
Looks lovely, Geoff.
Thanks Rob
I'd been mulling over buying one for a couple of months and finally succumbed earlier this week. I've been weathering it today, hopefully will post photos tomorrow.
Really looks the part Alan, I too had been mulling over the purchase of one for months, couldn't make my mind up between a Class 122, an AEC railcar or a railbus like yours. Had I been able to get a new one with speed whiskers I reckon I would have gone down the same route as yourself.
Geoff
Geoff
Western Thunderer
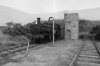
I've not made much progress of late, a few more wire armatures have been made for the hedgerows, trees and saplings. The water tower has been completed, well I think it has, but no doubt I will look at it again once its surroundings have been worked up a little more, and that's about all ")

And the same scene again from a different angle in glorious monochrome, which I think is best suited to the era that I model..

I also made the decision to have 7416 professionally weathered, normally I do everything myself but not having an airbrush, and still finding my way with weathering washes I decided to play safe. I asked for an overall simple dusting of soot and grime, with subtle traces of rust in the usual places. I might add to the finish once I have mastered those Lifecolor' washes, but for now I am more than happy with the models appearance.

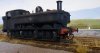
Finally 7416 prepares to depart for civilisation with a short goods train, first in Bradford Barton style....

And finally in colour....

Geoff
And the same scene again from a different angle in glorious monochrome, which I think is best suited to the era that I model..
I also made the decision to have 7416 professionally weathered, normally I do everything myself but not having an airbrush, and still finding my way with weathering washes I decided to play safe. I asked for an overall simple dusting of soot and grime, with subtle traces of rust in the usual places. I might add to the finish once I have mastered those Lifecolor' washes, but for now I am more than happy with the models appearance.
Finally 7416 prepares to depart for civilisation with a short goods train, first in Bradford Barton style....
And finally in colour....
Geoff
Attachments

Geoff
Western Thunderer
It certainly has been a while since you were last poking around here Brian, welcome back and thank you for your kind words.
Larry,
Of course I don't mind you giving your idea a spin on my photo, looks all the better for it thank you. The Pannier weathering was carried out by Steve Johnson of Grimy Times Weathering Services, Renumbering & Renaming after I chickened out.
Geoff
Larry,
Of course I don't mind you giving your idea a spin on my photo, looks all the better for it thank you. The Pannier weathering was carried out by Steve Johnson of Grimy Times Weathering Services, Renumbering & Renaming after I chickened out.
Geoff