4mm An EM Workbench - EM Intermodal Interlude

AJC

Western Thunderer
And yet, When one starts intensive operation there are never enough brake vans! :(

This is also a problem the real railway had (in the case of the M&GN, this means all sorts of LMS and Midland vans turn up in pictures - a Caley six-wheeler at Peterborough was a bit surprising, for example...), so I feel quite content in having quite so many...

Adam
 

Stevers

Western Thunderer
Looking at the picture, this end is a bit of a mess: perfectly resolvable with a large file and a bit of plastic strip.
A knife edge support under the top of the verandah would have made all the difference to how that printed - especially if the whole thing had been started on a grid. I add knife edges and grids in the 3D CAD package prior to doing grid style supports in Blueprint Studio, then slicing in Anycubic Workshop.
 

simond

Western Thunderer
A knife edge support under the top of the verandah would have made all the difference to how that printed - especially if the whole thing had been started on a grid. I add knife edges and grids in the 3D CAD package prior to doing grid style supports in Blueprint Studio, then slicing in Anycubic Workshop.
Stevers,

If Adam will please indulge me/us, would you please add a photo or two of the “grid style supports”?

ta
Simon
 
  • Like
Reactions: AJC

Stevers

Western Thunderer
Lion Class Boiler - Knife Edge Supports on a grid.jpgLion Class Boiler - Knife Edge Supports on a grid - Blueprinted.jpg
Trusting in Adam's forbearance; this is my Lion Class Boiler/Firebox/Smokebox unit. On the left (applied in OpenSCAD) are the knife edge supports on the bottom edges, which themselves are on a 'grid' to tie them together. It's very likely that the 'bottom' of the grid will be poorly formed, but as they're sacrificial that's OK. On the right is the veritable forest of fine Chitubox style 'grid' supports added by Blueprint Studio. In an ideal world these on their own would be sufficient for a successful print, but my 3D prints seem to have great difficulty in getting started accurately without assistance. The 'assisted' boiler print in my humble Anycubic Photon Mono 4K, was very accurately printed, a huge advance on the unassisted version produced on a more state of the art Elegoo Saturn with Chitubox 'grid' supports before I could do my own 3D printing. The Elegoo print had better surfaces (probably due to having Anti-Aliasing that actually works), but neither the dangling cylinder fronts nor firebox sides were where they should have been.

The grid and knife edge supports stay on for washing and curing, keeping everything aligned nicely, but they do need to be placed so that they can be safely and easily removed post-curing. Usually this involves cutting grid members and snapping off the now free to rotate knife edges by scoring and bending. As an aside it's only now dawned on me that we have two varieties of 'grid' supports causing some confusion - an 'actual' grid (frame?) and point supports 'on a grid' - alternative terminology needed!
DSC03626.jpgTender with Supports v3.jpg
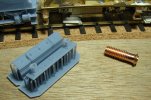
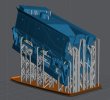
Of course some prints don't need a 'frame', just the knife edge supports to start any 'bottom' edges accurately as with my two faced Lion Class buffer unit. For a brake van end I'd add the knife edges under the 'bottom' edge of any verandah tops and see if the point supports when added would then be sufficient to get those started OK. On my Beattie tender I employed knife edge supports to keep the buffer beam and footplate straight, and a row of knife edge supports on a frame to form the axlebox retainers in a nice straight line, none of which could be achieved (on an Elegoo printer with Chitubox supports) without them. In this case the fairly random point supports were created by Lychee Slicer before I had moved over to Blueprint Studio. The idea of knife edge supports was not mine*, and where I found out about them correctly attributed on one of my other threads.

[Edit] *It was Paul Sterling and his project 65033:
https://www.rmweb.co.uk/forums/topic/164432-project-65033-a-3d-printed-lner-j21/?do=findComment&comment=4438911
 
Last edited:

AJC

Western Thunderer
Gunpowder van ready for touching up. I've added joining strips from shim, and treated it to a coat of etch primer.

IMG_0956.jpeg

Once that had dried, I glued it in place on the body and once that was dry, treated it to a coat of primer.

IMG_0957.jpeg

Clean up and touching up (that might be delayed, because the LMS brown I thought might do, doesn't), next before lettering and weathering. The thinness of the roof is a big improvement for not much effort.

Adam
 
Last edited:

AJC

Western Thunderer
An interlude: a 'pet' train - EM Intermodal.

The class 70 is dad's, the assortment of (mostly) modified RTR flats, a mix. People actually knowledgeable about these operations probably ought to look away now, but it was fun to assemble, rewheel and weather, and entertaining to run.


Adam
 

simond

Western Thunderer
Good stuff!

I made that 18 - we were recently in Germany (I will post the photos, promise) where the freight trains along the Rhine were remarkable. Typically an electric BoBo on the front, and 50, 40' box wagons on the hook. Now, the wagons are obviously a bit longer than the 40' boxes, but even so, that is 2000 feet of train.

That's 4 metres in 2mm/N gauge, and 14 metres in 0...
 
Top