JimG
Western Thunderer
I've been thinking about doing my own 3D printing for a while but didn't want to get too involved in it while I was getting the switching layout into some reasonable state to exhibit in November. But once the exhibition was over I ordered up the machine I was interested in, the Phrozen Shuffle
Phrozen Shuffle (XL) Review - Stunning Prints, Stuffy Workflow | All3DP
I followed various of the groups on Facebook dedicated to the less expemsive 3D resin printers and, although the Phrozen was a bit more expensive than the others, chose it since it seemed to have fewer problems than others and it also had a supplier in the UK who also used it himself in his jewellery business and was providing good support to users.
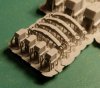
The first results were good. I had done a 1:32 scale file for a Caledonian axlebox and that became the guinea pig.

The file was set up in the slicing software at various orientations since adjusting the orientation can often improve the surface finish but in this case the flat orientation proved best. The closer strip has 30 micron layers (approx 1.25 thou) and the far one has 50 micron layers (approx 2 thou layers) and I couldn't see much difference between them. You can just about see the embossed "CR" lettering on the closest samples which got itself mirrored in my messing around in the slicing software.") The resin printing process requires special base layers so that when the part is held upside down in the printing process it adheres well to the plate on the machine. The parts are held off this layer by the thin stalks (supports) and these can be generated automatically by the slicing software.
The resin printing process requires special base layers so that when the part is held upside down in the printing process it adheres well to the plate on the machine. The parts are held off this layer by the thin stalks (supports) and these can be generated automatically by the slicing software.
The next test was to half the scale of the axlebox and print it in S scale...

...which came out quite well but the detail - like the lid on the axlebox - was almost lost since it was a bit too fine for the process. The resin has a minimum wall thickness of 0.4mm and some of the detail on the reduced scale file was finer than this. The "CR" lettering is still there, and readable - you can just about see it on this picture. The main lesson from this exercise was that re-scaling might not work well for fine detail. Detailing for smaller scales will probably have to be a bit overscale to survive in the process and if these files are up-scaled, the detail will probably be too heavy in larger scales.
I also had some S scale files to hand given to me a while ago by Justin Newitt, so I popped them all in one large sliced file to see how they looked...

..and they came out really well - a selection of BR axleboxes and springs. These, and my S scale ones above, were printed with 30 micron layers and these looked really good. Justin had drawn these as masters for casting hence the sprue work.
I'm really pleased with the results. The quality is excellent and will be more than good enough for most S scale detail parts. I will have to draw up some chimneys and domes to see how they fare under the process.
It is not a fast process and the above prints took between a half and one and a half hours. The main factors are the height and the layer thickness. The process exposes the resin to UV light through an LED screen so the horizontal area of the print has no effect on the process. The printer has a small horizontal area - 120mm x 68mm, but has a print height of 200mm so parts longer than 120mm can be printed by standing them on end or angling them towards the vertical axis.
Just to show that all did not go well...

... a print that was sliced at 30 micron layers and printed with the printer set to 50 micron layers.
Jim.
Phrozen Shuffle (XL) Review - Stunning Prints, Stuffy Workflow | All3DP
I followed various of the groups on Facebook dedicated to the less expemsive 3D resin printers and, although the Phrozen was a bit more expensive than the others, chose it since it seemed to have fewer problems than others and it also had a supplier in the UK who also used it himself in his jewellery business and was providing good support to users.
The first results were good. I had done a 1:32 scale file for a Caledonian axlebox and that became the guinea pig.
The file was set up in the slicing software at various orientations since adjusting the orientation can often improve the surface finish but in this case the flat orientation proved best. The closer strip has 30 micron layers (approx 1.25 thou) and the far one has 50 micron layers (approx 2 thou layers) and I couldn't see much difference between them. You can just about see the embossed "CR" lettering on the closest samples which got itself mirrored in my messing around in the slicing software.
The resin printing process requires special base layers so that when the part is held upside down in the printing process it adheres well to the plate on the machine. The parts are held off this layer by the thin stalks (supports) and these can be generated automatically by the slicing software.The next test was to half the scale of the axlebox and print it in S scale...
...which came out quite well but the detail - like the lid on the axlebox - was almost lost since it was a bit too fine for the process. The resin has a minimum wall thickness of 0.4mm and some of the detail on the reduced scale file was finer than this. The "CR" lettering is still there, and readable - you can just about see it on this picture. The main lesson from this exercise was that re-scaling might not work well for fine detail. Detailing for smaller scales will probably have to be a bit overscale to survive in the process and if these files are up-scaled, the detail will probably be too heavy in larger scales.
I also had some S scale files to hand given to me a while ago by Justin Newitt, so I popped them all in one large sliced file to see how they looked...
..and they came out really well - a selection of BR axleboxes and springs. These, and my S scale ones above, were printed with 30 micron layers and these looked really good. Justin had drawn these as masters for casting hence the sprue work.
I'm really pleased with the results. The quality is excellent and will be more than good enough for most S scale detail parts. I will have to draw up some chimneys and domes to see how they fare under the process.
It is not a fast process and the above prints took between a half and one and a half hours. The main factors are the height and the layer thickness. The process exposes the resin to UV light through an LED screen so the horizontal area of the print has no effect on the process. The printer has a small horizontal area - 120mm x 68mm, but has a print height of 200mm so parts longer than 120mm can be printed by standing them on end or angling them towards the vertical axis.
Just to show that all did not go well...
... a print that was sliced at 30 micron layers and printed with the printer set to 50 micron layers.
Jim.
")


 I'm going to do some tests now to find out what I have to do to get an obvious join line. I know that the real thing probaly had hairline joins between the blocks, but we modellers like to see quite obvious lines in our scales.