Martin Gentle
Member
In 2025, the 3mm Society will be celebrating its Diamond Jubilee and the Society has been considering how to recognise the occasion. In 2005, it was the 40 to 1 challenge, in 2015 it was the “50-Something” displays so what to do for the 60th anniversary? Rather than another modelling competition, it was decided to have a
“Celebration of 3mm modelling” at the AGM in May next year.
For the “Celebration”, the Society has asked members to produce a 3mm scale diorama depicting a scene anytime from 1965 onwards and as it’s the diamond anniversary the diorama must include some form of diamond for example… a diamond crossing, a diamond sign on a signal, a wagon with a diamond bogie or anything else that is diamond shaped!
In over 50 years of railway modelling, I have only ever completed one layout in that time so I decided that I was, at last, going to build a 3mm layout and complete it. I have always liked cameo or micro layouts as showcased by the likes of the late Iain Rice. More recently James Hilton’s book, Small Layout Design has also been an inspiration so the idea of what to build was beginning to be formed.
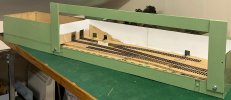
I decided to use laser cut baseboards from Scale Model Scenery as they specialise in diorama baseboards to fit Really Useful storage boxes. I bought a BB018 Micro layout baseboard which is designed to fit in a Really Useful 22 litre box and also a BBO23 centre extension which gave me in total 1100mm in length and a width of 210mm.
So, I now had my blank canvas – what to put on it? I decided on the following criteria:-
Progress has been quite quick (for me!) and I have now laid the track, made the storage cassettes and connected the power and now have a small working layout. I have also made the proscenium arch from 4mm plywood and I am now ready to move onto ballasting the track and starting on the scenery and buildings. I hope to l provide an update and photos of progress in due course
You will notice there is no diamond crossing in my layout plan so I will have to include some other diamond. I’m still thinking of what to do………
“Celebration of 3mm modelling” at the AGM in May next year.
For the “Celebration”, the Society has asked members to produce a 3mm scale diorama depicting a scene anytime from 1965 onwards and as it’s the diamond anniversary the diorama must include some form of diamond for example… a diamond crossing, a diamond sign on a signal, a wagon with a diamond bogie or anything else that is diamond shaped!
In over 50 years of railway modelling, I have only ever completed one layout in that time so I decided that I was, at last, going to build a 3mm layout and complete it. I have always liked cameo or micro layouts as showcased by the likes of the late Iain Rice. More recently James Hilton’s book, Small Layout Design has also been an inspiration so the idea of what to build was beginning to be formed.
I decided to use laser cut baseboards from Scale Model Scenery as they specialise in diorama baseboards to fit Really Useful storage boxes. I bought a BB018 Micro layout baseboard which is designed to fit in a Really Useful 22 litre box and also a BBO23 centre extension which gave me in total 1100mm in length and a width of 210mm.
So, I now had my blank canvas – what to put on it? I decided on the following criteria:-
- Rather than a non-working diorama, I wanted a micro layout that could be operated.
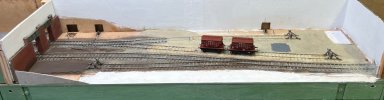
- It would be in 14.2mm gauge (rather than 12mm) as I had some society track and a couple of suitable copper clad points already
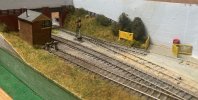
- It would be set in the 1980s and use blue diesels
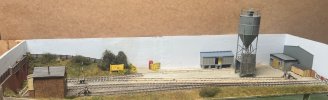
- It would use as its inspiration an article in the first Model Railway Journal Compendium which featured a cement silo and associated sidings. I already had six cement Presflos built.
- I would use a simple cassette system as hidden sidings
- I would use a proscenium arch to create a display box.
Progress has been quite quick (for me!) and I have now laid the track, made the storage cassettes and connected the power and now have a small working layout. I have also made the proscenium arch from 4mm plywood and I am now ready to move onto ballasting the track and starting on the scenery and buildings. I hope to l provide an update and photos of progress in due course
You will notice there is no diamond crossing in my layout plan so I will have to include some other diamond. I’m still thinking of what to do………


")