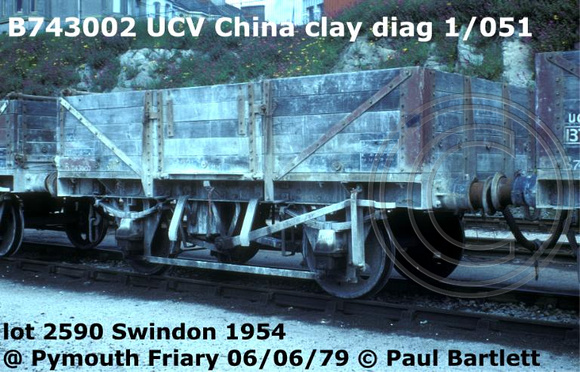
7mm In Search of Clays

smgee

Active Member
A friend and I have a WR blue-diesel era obsession interest and agreed that some hooded china clay wagons (diagram 1/051) would be an excellent idea - a combined rake of 10 or so. With the 7mm Skytrex RTR no longer available (and the more I learn, the more I realise just how much is wrong with it), it was a case of looking for kit alternatives.

Here's what I've found:
  1. Skog Carriage and Wagon Works
    These are 3D-printed (FDM) kits for a 1/051. A former to make your own hood is available.

  2. J and M Hughes
    These are a cast resin 1/051 with etched brass and whitemetal parts, available as kit or RTR. Not much info on their website, but Michael Hughes has the odd picture on his Flickr. No hood available.

  3. Walsall Model Industries
    An etched brass kit for a GWR diagram O13 china clay, which should be possible to convert to a 1/051, as the basics are the same. No hood.

If anyone knows of any others, please let me know!

All three kits cost around £35 and need wheels and (I think) couplings. My plan is to build one of each and then decide which to go with. This will also be a journey of learning and improving my skills. I must also mention the awesome resource that @hrmspaul has here.


So, to start, here is the entry from Skog Carriage and Wagon Works. This is a bit of a wildcard, as the 3D printing means there's some very obvious stratification and less finesse than I'd like. The question is, once painted and weathered and trundling past in a rake at a reasonable distance, will that matter?
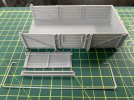
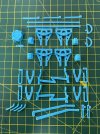
419131354_719956880262258_2515012248193278384_n.jpg

420530096_1544442113067543_4229199957055098447_n.jpg


Straight away, I ran into a problem when the body was placed on a flat surface:
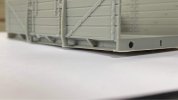
426720541_3792615830970524_6819893168594370165_n.jpg

Whereas the top of the body was flat:
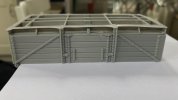
421695299_1820427851718597_400354317805539619_n.jpg

OK, how on earth do I fix that?! Time for a tea break...
 

simond

Western Thunderer
Well, I’d suggest a linisher…

that might be a bit dramatic. But a sheet of coarse sandpaper glued to a bit of MDF will remove any high points, then, I guess you stick the W irons on so it sits flat of a sheet of glass/kitchen unit, and hope the saggy chassis doesn’t show.

I'm surprised by this, our work Bambu FDM printer doesn’t seem to suffer such issues, though I’ve never printed a wagon on it.
 

smgee

Active Member
Apologies Simon, I should have said it was a rhetorical question! I had similar thoughts about sanding the bottom flat and also wondered how much distortion would be noticeable in the finished article. I contacted Rob, the vendor, and he was confused how it had happened. I think if I'd pushed he would have printed me another body, but I had an idea...

I trimmed back (some might say butchered) the lower web of the solebar so that it was flush with the vertical section, essentially making the vertical part taller. I wiped out a few bolt heads in the process, but figured they'd be hidden by the brake lever:
420595071_7493259407448938_4606354999220142234_n.jpg

I then filed that bottom edge back to make it level-ish and made a new lower web from plasticard:
426742410_1341953896512664_2228286437501164698_n.jpg

It's not perfect, but short of major surgery it's the best I could do. I decided that there was no point in chasing perfection with this kit, and that "good enough" was what I should aim for:
418781881_909039014291305_4755106246565653687_n.jpg


I've no idea if anyone is interested in any of this. It pales by comparison with some of the outstanding work elsewhere on the forum, but I figure it may be a useful resource once I've finished, and may give encouragement to others to see an inexperienced idiot bumbling along and making mistakes!

(For context, I'm a single parent to neurodivergent teenage twins, and I'm returning to the hobby after a prolonged absence - thinking about it, I packed it in when I was their age! Learning by doing is my new mantra.)
 

smgee

Active Member
P.S. I'm actually cheating as this is all historical and the kit is already finished...

So, next it was a case of following the instructions and assembling the various bits of underframe. After some trial and lots of error, I found that Plastic Magic by Deluxe Materials would dissolve and bond the plastic, but I ended up mainly using different viscosities of superglue.

429583727_380351921425065_6499714536422057756_n.jpg

I decided to not glue the axleboxes in place just yet.
429516975_948127933330852_1540914085904458074_n.jpg

I think the brake gear is broadly correct, if a little course in appearance. I know I could have spent longer tidying up the printed parts (more on that later), but at this stage I wasn't sure it was worth the extra effort. Also the plastic has a slight waxy quality and doesn't sand as well as styrene.
431872887_281361831658464_5640177103965724795_n.jpg

432090469_1082555119527063_3971152118248208155_n.jpg

The brake levers are supplied flat, so I had a go at bending them roughly to shape whilst trying not to destroy them. Again, I probably could have taken a bit more time and got a fractionally better result. Those missing rivets/bolts on the solebar are now fairly hidden.
431914896_383317424568473_5682893518066498137_n.jpg
 
Last edited:

smgee

Active Member
I forgot to say, the kit includes parts to make sprung buffers. I thought about swapping them for something better, but decided they'd do for this test build:
426413225_1189434455771494_8835720906386804406_n.jpg

End tipper door on, buffer shanks and side-door springs in place, just the lamp brackets, vacuum hoses, coupling hooks and tie-rods between the W-irons to fit. Oh and glue the axleboxes in place, as they're free to wander here!
431811278_860417165888430_3079251612961959302_n.jpg

So, before I break out my first proper airbrush, it's worth acknowledging the positives in this kit. While the detail is a bit course, the wagon does have the correct 9ft wheelbase, the correct brakes, correct strapping and an end tipper door, all of which I think are missing/wrong on the previously-mentioned Skytrex model.

I'm going to stop spamming now and make a start on the loathsome task of Christmas present wrapping...
 

paulc

Western Thunderer
Hi ????? , i think your fix for the chassis was very well done . Overall i think the kit looks a bit clunky( not your fault ) but with a coat of paint , some weathering and a load it will be okay .
Ref your bumbling along , we all have moments like that and it's called ' learning process ' . On a different subject but the same theme , raising kids is all about bumbling along and learning as you go . By the time you have a handle on it they up and leave but hopefully you got some of it right .
I'll be interested to see how the next kit goes together .
Happy Christmas to you and the twins .
 

smgee

Active Member
Hi ????? , i think your fix for the chassis was very well done . Overall i think the kit looks a bit clunky( not your fault ) but with a coat of paint , some weathering and a load it will be okay .
Ref your bumbling along , we all have moments like that and it's called ' learning process ' . On a different subject but the same theme , raising kids is all about bumbling along and learning as you go . By the time you have a handle on it they up and leave but hopefully you got some of it right .
I'll be interested to see how the next kit goes together .
Happy Christmas to you and the twins .
Thanks Paul. It's Steve, sorry! Now added to my signature.

You're quite right about the kit, clunky is a good word. I frequently obsess over details, perhaps unnecessarily, whereas the friend I mentioned earlier doesn't. His view is when a train is running around a large layout (he frequents Preston O Gauge Group open days) nobody will see a lack of fine detail and he may have a point. I wouldn't want this wagon sitting in a siding on full view though!

I didn't want to bring up too much about kids, as it's of no interest to anyone else, but their mother died when they were 3 and I've raised them more-or-less on my own, so LOTS of mistakes along the way! I see less of them now they're 16 (except when they're hungry!), which has allowed me a bit of spare time to get back into modelling.

I've got more photos to post of this wagon - painting, weathering, and the tricky matter of making the distinctive blue hood. Not sure I've cracked that one yet. I have got the other two kits mentioned in my initial post, but haven't started them yet.

Merry Christmas to you and all. I may be back later today if I can get the rest of the damn presents wrapped...

Steve
 

paulc

Western Thunderer
Thanks Paul. It's Steve, sorry! Now added to my signature.

You're quite right about the kit, clunky is a good word. I frequently obsess over details, perhaps unnecessarily, whereas the friend I mentioned earlier doesn't. His view is when a train is running around a large layout (he frequents Preston O Gauge Group open days) nobody will see a lack of fine detail and he may have a point. I wouldn't want this wagon sitting in a siding on full view though!

I didn't want to bring up too much about kids, as it's of no interest to anyone else, but their mother died when they were 3 and I've raised them more-or-less on my own, so LOTS of mistakes along the way! I see less of them now they're 16 (except when they're hungry!), which has allowed me a bit of spare time to get back into modelling.

I've got more photos to post of this wagon - painting, weathering, and the tricky matter of making the distinctive blue hood. Not sure I've cracked that one yet. I have got the other two kits mentioned in my initial post, but haven't started them yet.

Merry Christmas to you and all. I may be back later today if I can get the rest of the damn presents wrapped...

Steve
Hi Steve , try doing a search on here ref the clay hoods . It's the sort of thing someone would put up . I'll do a search on the GOG forum for you and see if anyone has some ideas .
 

hrmspaul

Western Thunderer
I forgot to say, the kit includes parts to make sprung buffers. I thought about swapping them for something better, but decided they'd do for this test build:


So, before I break out my first proper airbrush, it's worth acknowledging the positives in this kit. While the detail is a bit course, the wagon does have the correct 9ft wheelbase, the correct brakes, correct strapping and an end tipper door, all of which I think are missing/wrong on the previously-mentioned Skytrex model.
You also omitted that the floor correctly has the longitudinal planking, Something to watch for in the other kits.

Buffers look like a reasonable representation of the chunky self-contained buffers of the BR builds. I think thinning down the V hangers would make a big difference to the overall appearance of the brake rigging. To me the most obvious ugly is the huge gap between the bottom of the springs and top of axlebox, there should be an overlap with that small raised flange on top of the box going above the bottom of the spring.

The bar for the end door mechanism could be a bit more clunky! I don't think a steel rod of the diameter you have modelled would have survived many uses, they wouldn't have been treated with any care when end tippled.


With so much interior detail it seems a shame to put a blue hood on it! That was only for one type of traffic, plenty operated without the hoods.

Paul
 

smgee

Active Member
You also omitted that the floor correctly has the longitudinal planking, Something to watch for in the other kits.

Buffers look like a reasonable representation of the chunky self-contained buffers of the BR builds. I think thinning down the V hangers would make a big difference to the overall appearance of the brake rigging. To me the most obvious ugly is the huge gap between the bottom of the springs and top of axlebox, there should be an overlap with that small raised flange on top of the box going above the bottom of the spring.

The bar for the end door mechanism could be a bit more clunky! I don't think a steel rod of the diameter you have modelled would have survived many uses, they wouldn't have been treated with any care when end tippled.


With so much interior detail it seems a shame to put a blue hood on it! That was only for one type of traffic, plenty operated without the hoods.

Paul

Hi Paul, thanks for your comments. Of course, I'd forgotten about the longitudinal planking of the floor! My friend is adamant he wants them with hoods, but maybe there could be the odd one without.

There's definitely room for improvement with many aspects of the wagon, but at the point of building I wasn't sure if it was worth the effort, as there are some areas (e.g. the body strapping) that would be hard to improve without significant work. Regarding the axleboxes, if you're referring to the last photo above, it's because I put them on upside down! Not glued in place, so no panic. The photos in earlier posts show them the right way up.

Steve
 

smgee

Active Member
So, with the majority of construction complete, it was time to think about paint. I tried some Halfords filler primer in an attempt to reduce the ugly printing textures/stratification, but a couple of coats and some mild sanding had little effect.

IMG_4791.JPG

IMG_4792.JPG

I ended up using some Mig brushable putty in several places to flatten the texture, particularly on the body sides where I thought decals would need to go. Again, I could have gone much further with this. Here's the first stab with my new airbrush - Railmatch bauxite acrylic and something not black for the underframe - with a bit of touching up needed. Axleboxes now glued in place, tie bar and the sub-optimal vacuum hoses (ripe for replacement) fitted.

IMG_4790.JPG
 

smgee

Active Member
Me again. Next job: try to make the distinctive shaped hood...

I thought I'd try using layers of tissue paper over some sort of former. I was going to use a shaped wooden block, but decided to try building a cardboard former on top of the wagon and covering it all in clingfilm. I had to hack up the end-door hinge, but it wasn't going to be visible anyway.
IMG_4770.JPG

A large piece of tissue paper (plus triangular ends) stippled with liquid epoxy kind of worked, but it wasn't really soft/pliable enough to be able to form the creases I wanted and the tissue paper turned translucent, so I couldn't really see what was going on anyway!

IMG_4768.JPG

I slapped on some paint and it looked dreadful. Full of gaps that I hadn't seen. Ok, what about diluted PVA to make the tissue softer, and coloured tissue paper to make it less translucent? I also decided to use small strips of tissue and build up the layers gradually.

IMG_4769.JPG

I persisted with this. It took a lot of layers to make it rigid enough, which unfortunately obliterated many of the wrinkles I'd carefully created with the cling film. I also found (as any radio-control aero modeller will tell you) wet tissue paper shrinks as it dries, causing the hood to distort in places and making it a rather tight fit on the wagon body. Here it is trimmed, and being filled/sanded/primed (repeat til bored).

IMG_4773.JPG

IMG_4772.JPG

Painted, holes drilled for the lashing ropes, and an English China Clay logo from Railtec added. It looks dreadful due to the lighting, but not quite as bad in reality.

IMG_4774.JPG

I struggled to find any transfers for this wagon other than the logo above. Paul Bartlett's fantastic resource that I mentioned previously shows a lot of variations in markings and I found it hard to figure out what changed and when. I don't know when the yellow circuit markers were added, but I don't think I need them for early-mid 70's. I eventually found that Cambridge Custom Transfers do a sheet of china clay markings, so one was ordered. Unfortunately it didn't really provide what I thought I needed:

IMG_4800.jpeg


There's only one thing for it then, I'm going to have to try making my own...
 

hrmspaul

Western Thunderer
I would expect the yellow circuit to date from mid 60s, wasn't needed after TOPS was introduced, although may have been more practical for the staff on the ground. It simply pointed to the label clip which had a plastic Darvic label to explain where the empty wagon should be returned to.

Paul
 

smgee

Active Member
Me again, again. Hope everyone's having a great Christmas. Apologies for waffling on at length, I'll try to keep it under control!

I had a go at making my own decals using some sheets of clear, laser printer decal paper. White paper would probably have been a better choice as clear really needs a white background, so I had to paint the body areas white, apply the decals, then touch in the edges.

I bought some of @hrmspaul 's wonderful UCV pics, but randomly chose to model something close to 743665 as shown here. Paul - thanks for the circuit info above. Looking afresh at 743665, I can now see the remains of a yellow circuit symbol, which I didn't spot. Also, while messing around with the artwork, I ended up printing 743664 by accident! Ah well. Anyway, here I am making more mistakes/mess. An inkjet printer would probably give better detail, but these are good enough I think:

IMG_4775.JPG

IMG_4778.JPG


Next problem: what to attach the lashing ropes to. Prototype photos appear show more than one fixture, but the hooks seen here seem to be most common, so I had a go fashioning something from tiny rectangles of 0.2mm plasticard and 0.3mm wire. Overscale, but better than just drilling a hole in the bodyside (looking at you, Skytrex). P.S. That's PAINT under my thumbnail!

Unknown-8.jpg

Unknown-6.jpg

For ropes I used this silk bead cord (for making bracelets I guess) which is available in a range of colours and diameters. I think I used 0.45mm, but the smaller 0.35 or 0.3mm diameters would have been better. It soaks up thin superglue, so was glued at the hood end, wrapped around the hook, pulled tight and glued to it.

Unknown-13.jpg

IMG_4335.jpeg

IMG_4339.jpeg
 

smgee

Active Member
Thanks Tim, nearly finished!

Finally, a bit of weathering. First I ran a dirty enamel wash around all the details. It soaked into the ropes a bit too much - don't panic Steve!

IMG_4346.jpeg


These wagons are always photographed covered in a layer of white clay dust. I was not confident about airbrushing it and not ruining everything, so was on the lookout for a low-risk option. I discovered that Ultimate Modelling Products did a range of water-based washes that when dry, could be manipulated by rubbing, or fully removed with water.


I brushed some light streaks on the hood to get a feel and then sprayed the whole thing:

IMG_4785.JPG

IMG_4786.JPG


I could have stopped there, but it all felt a bit too uniform. I'm learning that an important part of weathering is knowing when to stop, but I tend to only realise after the event! I removed some areas of white, added some more to the end door, added streaking to the hood and parts of the underframe, some dark washes to simulate leaking axleboxes and general dirt, a brown filter here and there for rust. Basically, I fiddled about for ages until I had a word with myself and sealed it with a coat of Vallejo Ultra Matt varnish. I'm pretty pleased with the result and actually surprised myself!

IMG_4787.JPG

IMG_4788.JPG

IMG_4360.jpeg

So, despite my reservations at the start, I think it turned out pretty well. There are definitely improvements that could be made, but close-up you can't escape the limitations of the printing technology. Does that matter? I don't know. I'll wait until I've built the other 2 contenders before deciding on a winner!

To be continued...
 
Last edited:

Osgood

Western Thunderer
The ropes are passed through the eyelets and interwoven to form loops, George.
However they may possibly have been replacements fitted by the tarp works, they'd bought a large batch of these used clay covers.

Damn - I now have a vision of some plastic Karabiner style clips in the back of my mind though, but it may just be one of those induced reverse-dejavu things :rolleyes:
 
Top