7mm In Search of Clays

smgee

Member
A friend and I have a WR blue-diesel era obsession interest and agreed that some hooded china clay wagons (diagram 1/051) would be an excellent idea - a combined rake of 10 or so. With the 7mm Skytrex RTR no longer available (and the more I learn, the more I realise just how much is wrong with it), it was a case of looking for kit alternatives.

Here's what I've found:
  1. Skog Carriage and Wagon Works
    These are 3D-printed (FDM) kits for a 1/051. A former to make your own hood is available.

  2. J and M Hughes
    These are a cast resin 1/051 with etched brass and whitemetal parts, available as kit or RTR. Not much info on their website, but Michael Hughes has the odd picture on his Flickr. No hood available.

  3. Walsall Model Industries
    An etched brass kit for a GWR diagram O13 china clay, which should be possible to convert to a 1/051, as the basics are the same. No hood.

If anyone knows of any others, please let me know!

All three kits cost around £35 and need wheels and (I think) couplings. My plan is to build one of each and then decide which to go with. This will also be a journey of learning and improving my skills. I must also mention the awesome resource that @hrmspaul has here.


So, to start, here is the entry from Skog Carriage and Wagon Works. This is a bit of a wildcard, as the 3D printing means there's some very obvious stratification and less finesse than I'd like. The question is, once painted and weathered and trundling past in a rake at a reasonable distance, will that matter?
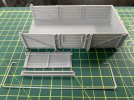
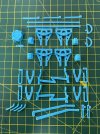
419131354_719956880262258_2515012248193278384_n.jpg

420530096_1544442113067543_4229199957055098447_n.jpg


Straight away, I ran into a problem when the body was placed on a flat surface:
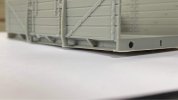
426720541_3792615830970524_6819893168594370165_n.jpg

Whereas the top of the body was flat:
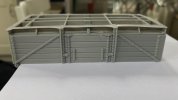
421695299_1820427851718597_400354317805539619_n.jpg

OK, how on earth do I fix that?! Time for a tea break...
 

simond

Western Thunderer
Well, I’d suggest a linisher…

that might be a bit dramatic. But a sheet of coarse sandpaper glued to a bit of MDF will remove any high points, then, I guess you stick the W irons on so it sits flat of a sheet of glass/kitchen unit, and hope the saggy chassis doesn’t show.

I'm surprised by this, our work Bambu FDM printer doesn’t seem to suffer such issues, though I’ve never printed a wagon on it.
 

smgee

Member
Apologies Simon, I should have said it was a rhetorical question! I had similar thoughts about sanding the bottom flat and also wondered how much distortion would be noticeable in the finished article. I contacted Rob, the vendor, and he was confused how it had happened. I think if I'd pushed he would have printed me another body, but I had an idea...

I trimmed back (some might say butchered) the lower web of the solebar so that it was flush with the vertical section, essentially making the vertical part taller. I wiped out a few bolt heads in the process, but figured they'd be hidden by the brake lever:
420595071_7493259407448938_4606354999220142234_n.jpg

I then filed that bottom edge back to make it level-ish and made a new lower web from plasticard:
426742410_1341953896512664_2228286437501164698_n.jpg

It's not perfect, but short of major surgery it's the best I could do. I decided that there was no point in chasing perfection with this kit, and that "good enough" was what I should aim for:
418781881_909039014291305_4755106246565653687_n.jpg


I've no idea if anyone is interested in any of this. It pales by comparison with some of the outstanding work elsewhere on the forum, but I figure it may be a useful resource once I've finished, and may give encouragement to others to see an inexperienced idiot bumbling along and making mistakes!

(For context, I'm a single parent to neurodivergent teenage twins, and I'm returning to the hobby after a prolonged absence - thinking about it, I packed it in when I was their age! Learning by doing is my new mantra.)
 

smgee

Member
P.S. I'm actually cheating as this is all historical and the kit is already finished...

So, next it was a case of following the instructions and assembling the various bits of underframe. After some trial and lots of error, I found that Plastic Magic by Deluxe Materials would dissolve and bond the plastic, but I ended up mainly using different viscosities of superglue.

429583727_380351921425065_6499714536422057756_n.jpg

I decided to not glue the axleboxes in place just yet.
429516975_948127933330852_1540914085904458074_n.jpg

I think the brake gear is broadly correct, if a little course in appearance. I know I could have spent longer tidying up the printed parts (more on that later), but at this stage I wasn't sure it was worth the extra effort. Also the plastic has a slight waxy quality and doesn't sand as well as styrene.
431872887_281361831658464_5640177103965724795_n.jpg

432090469_1082555119527063_3971152118248208155_n.jpg

The brake levers are supplied flat, so I had a go at bending them roughly to shape whilst trying not to destroy them. Again, I probably could have taken a bit more time and got a fractionally better result. Those missing rivets/bolts on the solebar are now fairly hidden.
431914896_383317424568473_5682893518066498137_n.jpg
 
Last edited:

smgee

Member
I forgot to say, the kit includes parts to make sprung buffers. I thought about swapping them for something better, but decided they'd do for this test build:
426413225_1189434455771494_8835720906386804406_n.jpg

End tipper door on, buffer shanks and side-door springs in place, just the lamp brackets, vacuum hoses, coupling hooks and tie-rods between the W-irons to fit. Oh and glue the axleboxes in place, as they're free to wander here!
431811278_860417165888430_3079251612961959302_n.jpg

So, before I break out my first proper airbrush, it's worth acknowledging the positives in this kit. While the detail is a bit course, the wagon does have the correct 9ft wheelbase, the correct brakes, correct strapping and an end tipper door, all of which I think are missing/wrong on the previously-mentioned Skytrex model.

I'm going to stop spamming now and make a start on the loathsome task of Christmas present wrapping...
 

paulc

Western Thunderer
Hi ????? , i think your fix for the chassis was very well done . Overall i think the kit looks a bit clunky( not your fault ) but with a coat of paint , some weathering and a load it will be okay .
Ref your bumbling along , we all have moments like that and it's called ' learning process ' . On a different subject but the same theme , raising kids is all about bumbling along and learning as you go . By the time you have a handle on it they up and leave but hopefully you got some of it right .
I'll be interested to see how the next kit goes together .
Happy Christmas to you and the twins .
 

smgee

Member
Hi ????? , i think your fix for the chassis was very well done . Overall i think the kit looks a bit clunky( not your fault ) but with a coat of paint , some weathering and a load it will be okay .
Ref your bumbling along , we all have moments like that and it's called ' learning process ' . On a different subject but the same theme , raising kids is all about bumbling along and learning as you go . By the time you have a handle on it they up and leave but hopefully you got some of it right .
I'll be interested to see how the next kit goes together .
Happy Christmas to you and the twins .
Thanks Paul. It's Steve, sorry! Now added to my signature.

You're quite right about the kit, clunky is a good word. I frequently obsess over details, perhaps unnecessarily, whereas the friend I mentioned earlier doesn't. His view is when a train is running around a large layout (he frequents Preston O Gauge Group open days) nobody will see a lack of fine detail and he may have a point. I wouldn't want this wagon sitting in a siding on full view though!

I didn't want to bring up too much about kids, as it's of no interest to anyone else, but their mother died when they were 3 and I've raised them more-or-less on my own, so LOTS of mistakes along the way! I see less of them now they're 16 (except when they're hungry!), which has allowed me a bit of spare time to get back into modelling.

I've got more photos to post of this wagon - painting, weathering, and the tricky matter of making the distinctive blue hood. Not sure I've cracked that one yet. I have got the other two kits mentioned in my initial post, but haven't started them yet.

Merry Christmas to you and all. I may be back later today if I can get the rest of the damn presents wrapped...

Steve
 
Top