And for my next trick...another restaurant car!
The plan this time was to turn this:

into this:

It involved fitting a new pantograph, the metal steps below the doors and trickiest of all, removing the Klein windows' glazing bars and frames. This was to be done with finer and finer sandpaper followed by TCut for a final polishing. The shell was repainted in green and Railtec transfers applied. It was then be weathered but not too much as I think this one's colours need to be shown off a bit.
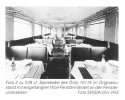
Here's a colour shot of one of the prototypes by the great Max Hintermann. This was the level of weathering I proposed to do:

The first job after stripping the paint was to remove the steps under the main doors as they have to be replaced. Some very careful filing and sanding was required to preserve the tumblehome at the bottom of the door aperture.
The white line at the end of the side is filler that was needed to correct for the misregistration of the mould where the end meets the side.

The interior needed some major surgery. Liliput had made the bulkhead at the toliet end of the saloon solid, so it needed to be cut to create the doorway. They had also omitted the bulkhead between the main saloon and the single table that was used by the staff so that had to be added. The kitchen was a bit of a shambles in that the bulkhead was in the wrong place that meant there was no access to the kitchen at all. The corridor wall and the bulkhead had to be cut and removed. The hole created in the floor was filled with 60 thou plasticard and Tamiya putty. The bulkhead was then repositioned further to the right to create the entrance to the kitchen. The stump of the remaining bulkhead behind the rightmost seat of the staff table had to be extended so that there was no way for passengers to see into the kitchen from the saloon.
I then created the upstand behind the sinks opposite the corridor wall as these can be seen from outside the coach and are quite distinctive:


I also opened up the bulkhead between the kitchen and the storage area and created some high level cupboards. I don't think these details are particularly accurate but I think it looks better than the bare kitchen interior that Liliput created. I wish I could have laid my hands on an LS Models spare EWI kitchen/restaurant interior. It's got every detail imaginable and much nicer seats. All that's missing is the food!

I next had to create new steps for under the main doors. I used an piece of Evergreen plastic channel section that gave me the step once the top web was removed. I thought that creating the step from two pieces glued together would be too flimsy:

It was attached to the coach using a reinforcement piece on the inside that meant the step would have more strength than if it was simply attached from underneath:

I then had to file away part of the chassis to clear this new element:

Painting was next. Halfords' rattlecan grey primer very carefully applied followed by three or four sprayed coats of Cherry Paints SBB Green...
...which turned out not to be the correct colour. It's more akin to GWR & BR green in that there's not enough blue in it. I eventually found a supplier in Grimsby that does the correct NCS range of colours. As it turns out, although the 'absolute' colour is NCS 8010-B90G, that had too much blue in it. I therefore took an LS Models RIC coach in what I judged to be the correct green to Humberside Paints and they spectroscopically scanned it to assess its colour. I asked them why the given shade was too blue and they told me it's caused by the fact that British pigments are slightly different from the ones used in Switzerland. The colour they came up with from the scan was one shade removed from the 'real' one, namely, NCS 8010-G10Y, so I got them to mix me a 100ml tin in cellulose which should last me for years.
Next job: those windows. As you can see the original model had the Klein pattern two element droplights:

But they have to be modified to the earlier full-pane droplights. I had seen videos on You Tube that showed the way aeromodellers remove unsightly seams etc. from aircraft canopies so I decided to try it. I used various sanding sticks, starting with fairly rough to get the window frames off and then went to finer and finer grades to get the glazing completely flat as it is very slightly concave as moulded:

I used further finer and finer flourpapers until I ended up polishing with TCut which gave me the high gloss transparency I was looking for:

Next, the interior got a repaint:

This is the finished interior. I found out that there were curtains that came about one third of the way up the windows in the saloon that gives a quite distinctive look from outside so I added a strip of 10thou plasticard on each side of the interior painted in the correct colour to represent them.


