Arun's 3D Printed Masters

Arun Sharma

Western Thunderer
Rather than hi-jack Mickoo's Commercial Models thread I am using this new one to answer Dan Randall's question. Like all threads, it will probably wander a bit.

The original note by Dan was a response to my assertion that 3D printed parts were lifed.

Accepting that many folk choose not to believe that uv cured 3D printed parts are effectively lifed, the alternative [if they are for sale] to ageing them for ten years, is to use them as masters for polyurethane resin casting. Yes, it's more expensive than just printing them but you do have a responsibility to your customers.
Hi Arun

As someone who enjoys designing and 3D printing stuff, but mindful of any potential long-term cons (such as warping and/or brittleness), I’d be interested in knowing more about the polyurethane resin casting process.

For example, do the items being cast need to be sprued in any way (with subsequent clean-up), or are they just cast, as one would wish the final product to appear? Also, what about things like window apertures and the like?

If you have the time and inclination, a thread on the basics of the process, with a few examples of patterns and finished castings would be very interesting please.

(With apologies to Mickoo for the hijack).


Regards

Dan

There are at least six different commonly recognised mechanisms of Additive Manufacture which go under the general heading of 3D printing. The only two generally available to home printers are:
1. Fused Deposition Modelling [FDM] where a thread of hot styrene or polylactic acid is deposited sequentially on a build plate. This process can produce models of great strength and size but they also often have a fairly coarse surface finish with obvious stratification.
2. Stereolithography [SLA] where a part is built up in layers on a metal plate covered in a UV light sensitive acrylic liquid. A UV light source is projected through a series of cross-sections of an object and the light hardens the acrylic liquid where it touches.

Both processes require a CAD file of the object to be printed to be digitally sliced into sections and it is the thickness of these sections that dictates how smooth the final print is. This process is no different to that of an ink jet printer driver chopping up a page and printing it line by line or a colour laser printer driver printing a whole page by printing three or four colour separations at one go.

In a nutshell, the FDM print [Acetyl Butyl Styrene = ABS] has advantages of strength and durability but can lack or distort fine detail. It can be glued to styrene with various solvents and for that reason is popular with folk producing bespoke modification parts for polystyreme models.

Elsewhere on this forum, I've described the creation of a 48 inch long battleship hull and some of its superstructure by means of joining together ABS FDM printed parts:

Oblique layout1.JPGBasic non-detailed hull form.JPGThe only reason I used FDM ptocesses on the superstructure of the ship was that these parts were either horizonal orvertical with no oblique surfaces. This minimises stratification. However, the gun turrets [15inch and 5.25inch]and the ships' boats clearly had all sorts of strange angles and curves. Thus they had to be printed via the higher resolution SLA process. You can see from the picture that the smaller gun turret print was used as a master for lost wax casting as were the gunbarrels - wonky plastic gun barrels don't look right!
The hull:

Vanguard Hull-trimmed.jpg

The hull is built up of 22 x FDM [ABS] printed sections glued and bolted together. It could have been printed by SLA but would have been subject to distortion and breakage as its continued exposure to UV light would have continued to make it more and more brittle. Each individual section could have had a cold cure silicone mould made and a polyurethane resin casting made but mould charges x22 would have been prohibitive. Hence ABS used. ABS takes fine surface car body fillers well so the gaps between sections will vanish eventually.

The next section will deal with how to design and print models that are going to be used as masters for some form of casting process.
 

Arun Sharma

Western Thunderer
As far as designing CAD files for casting goes, to date a master needs to be printed. It is possible commercially to have printed a flexible mould block that has an empty space within it which matches the item that you would like reproduced but that technique seems to be rarely used in practice.
Leaving aside masters for lost wax and possibly white metal casting, there is no need to either add sprues to a master print or to actually produce a christmas tree type sprue with two or more masters on it.
Resin casting, as Mickoo described in his Commercial Models thread, really requires that you first go and speak to who ever is doing the casting. This will save you endless heartache. The part you have printed needs to be 'watertight'. What I mean by that is that the part needs to be capable of being removed from the mould without damaging the mould. Because silicone moulds are produced under partial vacuum so as to get rid of any bubbles, any [tiny] full thickness holes will have rubber forced through them trapping the part inside the mould. Careful design work [especially when dealing with assemblies rather than single parts and again, when dealing with parts that have been mirrored should reduce this possibility.
When mirroring parts, it is important that the plane of mirroring does not allow a slightly skewed part to be formed as that could allow a defect/hole to form in the midline - and hence trap a mould.
As someone who produced printed masters of buses and such like with windows:

1707422221007.png
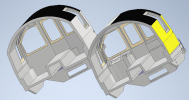
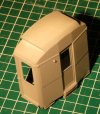
Here is the cab of a LT 1985 Battery Loco. The cab on the LHS is complete and has had the window openings offset and deepened by about 1mm to make glazing easier and appear more flush. The cab on the right has had a control desk added.
It is equally perfectly possible to print either of these cabs but only the first one can be readily moulded and cast. The tiny "Deadmans' Handle" in the second cab will trap silicone around it and trap the part in the mould. The windows and the rectangular hole in the headstock will do this as well of course but that is readily solved by the mould makers. I use CMA-CSL in Birmingham and they will place very thin film in the window cavities such that the glazing depth seems hardly diminished. Because the material is so thin it casts equally thin and is thus readily removed from the final cast. Thus the cab as supplied in the kit will be the first type with a separate control desk.
Many resin casters will ask you to supply a master that has had a thin coat of a gret plastic primer applied. That, I'm told, is more likely to show up areas of possible entrapment. Places to consider are under seats for example:

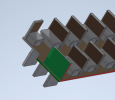
1707423321986.pngThis is a fairly simple assembly of the floor of an RF single decker bus populated by a load of seats. The prototype seat sits on a steel tubular frame. If reproduced on the model, this would trap pieces of the mould under every seat. Thus for the purposes of simplicity, the seat pans reach the floor forming a seamless joint and the casters had no troble casting it in this form.
To be continued:
 

Arun Sharma

Western Thunderer
Essentially there are two types of mould - a flat mould which can be done at home quite easily and generally gives good results - with perhaps the odd small bubble. The other is a complex mould which is either composed of several pieces that envelop the master or a single piece where the master has to be cut out of it to open up the cavity for filling with polyurethane casting resin. This can be made and used at home but requires a small vacum pump for decent results. But it is the system that commercial resin casters use.
Flat moulds are frankly pretty easy. From the CAD point of view the master has to be flat on one side:
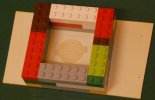
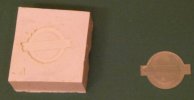
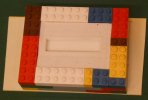
P1002023.JPGTake a piece of plastic card. Stick the master to the card with double sided 'Sellotape' [other brands are available] with the detail surface uppermost, surround it with a square of LEGO [other brands might not work as well] - also stuck down with double sided tape and fill the cavity with cold-cure liquid silicone rubber. This usually comes as a two-pack mix. Leave for 24 hours or so on a level surface at room temperature. You should end up with this:


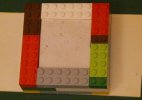
P1002024.JPG Take the now hard lump of solid silicone rubber out of the surrounding LEGO. Turn it upside down and you should see this. This space can now be filled with a casting resin of your choice - Again, these are normally 2-pack mixes. After 25-30 minutes [or less] you should get a perfect reproduction of your master.

P1002025.JPGWhat's this got to do with 3D design, you ask?

Prints like this are easy to handle and don't cost much - especially if you print them at home.
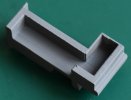
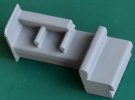
P1002027.JPGSome time ago on this forum, I described the design of the underframe of a Gresley 52'6" Diag 9 coach which as expected had various battery boxes and similar underneath. The commercial charge for printing a single battery box is probably close to £25. Most agencies charge about £7-00 per cc of photosensitive resin. If you're going to copy it at home, then accepting that few people will ever see the inward-facing backside of the battery box, you should design it as a five-sided hollow box. Much cheaper because much less photosensitive resin used. Such a print is shown above after the newly-created mould has been turned over in its LEGO frame. Once you take the master out of the mould and fill the mould cavity with your preferred casting resin, the resultant battery box casting will be solid of course and not a five-sided box.

So thinking about the design viz., trying to generate a flat unseen back side and then considering how the part is going to be processed can save you money.

Personally, I'm quite happy to do this sort of casting at home. The biggest parts I would consider home casting would be 0gauge roof sections about 3inches long. They can always be designed to have a flat base so lend themselves to this type of mould. A carriage would then just have a roof made up of several identical pieces with the last part trimmed to an appropriate length to fit.
Complex multi-part moulds and moulds which need an experienced mould-cutter to open them up or require filling under pressure are best left to agencies who specialise in it.

PS - The reason for using LEGO bricks is that when surrounding the turned over mould and filling it with casting resin, there is bound to be some spillage. For some reason, whilst this resin will stick immovably to all sorts of surfaces and objects, it doesn't stick to the plastic that LEGO blocks are made of.
 
Last edited:

mickoo

Western Thunderer
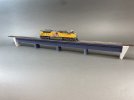
Do you have any preferred resins or mould silicones because I have just the need for this to make my 4 mm HO bridge. 3DP is okay but costly in resin and machine time and eventually (possible) degradation. All the parts are designed (or can be adjusted) with a sacrificial face. I'm fairly sure the piers will last for a few years but the spans and deck might not.

IMG_0322.jpeg

Oh and if you got charged £25 for a battery box then you've been royally ripped off or I seriously need to increase my fees :))
 

Arun Sharma

Western Thunderer
I didn't pay £25 because the five-sided box is far cheaper. The other thing is that many agencies have a fixed price per cc of the photosensitive stuff. If you get say, five pieces each less than 1cc in volume, I know of companies who will want to charge you 5 x the 1cc rate rather than add up the total volume and charge you pro rata. Once they get to know you, they might be more friendly.
Others in the past suggested that if you had made up a sprue with five or six identical things on it, they would charge you a separate set up charge for each identical item. The trick [as always] is to find a company that you can talk to over the 'phone or face to face. Complex 3D print parts, I send away but small parts I do at home these days.

Anyway, I just happen to have a copy of an invoice in front of me from Pottery Crafts of Campbell Road, Stoke on Trent, Staffs, ST4-4ET; 01782-745000
www.potterycrafts.co.uk
They have bought out the long established firm of Alec Tiranti and I reckon their service and quality is pretty good. The website has lots of good stuff like scalpels and mixing bowls, calibrated beakers, syringes [for measuring small amounts of catalyst] and even needle file handles!
I bought:
1 kg of T25 Silicone Rubber kit [i.e., silicone + catalyst] at £27-94 less vat [Stock Code 403-650]
2 kg EC-4 Fastcast Urethane Resin kit at £45-32 less vat [Stock Code 409-705]

I've used these and can say they work as advertised.

Afternote: Try also Tiranti's old website which directs you to a more user friendly area of the Pottery Crafts website:
 
Last edited:

Arun Sharma

Western Thunderer
Looking at designing 3D printed parts as masters, here is one of the 'hatchet-shaped' seats from a Q35 District Line trailer.

DSC_0003.JPGDSC_0004.JPG
First of all, this is something I could print at home quite happily though in this instance it was sent away as part of a larger FDM-ABS order. Because it is a seat inside an enclosed glazed body, and will be covered with a transfer moquette the surface detail is not terribly important. However it would be a real pain to cast because of the hole underneath - so this can only be moulded by means of a cut open mould or a two part [separate top and bottom halves] mould. The armrests present a problem - if they were just left as cylinders sticking out, then that would render the upper part of the mould trapped around the cylinders. By extending the armrests downwards, the mould can be removed by gentle pulling which allows it to roll over the cylindrical armrests.
Again, simple redesign simplifies mould making.
 

mickoo

Western Thunderer
I didn't pay £25 because the five-sided box is far cheaper. The other thing is that many agencies have a fixed price per cc of the photosensitive stuff. If you get say, five pieces each less than 1cc in volume, I know of companies who will want to charge you 5 x the 1cc rate rather than add up the total volume and charge you pro rata. Once they get to know you, they might be more friendly.
Others in the past suggested that if you had made up a sprue with five or six identical things on it, they would charge you a separate set up charge for each identical item. The trick [as always] is to find a company that you can talk to over the 'phone or face to face. Complex 3D print parts, I send away but small parts I do at home these days.

Anyway, I just happen to have a copy of an invoice in front of me from Pottery Crafts of Campbell Road, Stoke on Trent, Staffs, ST4-4ET; 01782-745000
www.potterycrafts.co.uk
They have bought out the long established firm of Alec Tiranti and I reckon their service and quality is pretty good. The website has lots of good stuff like scalpels and mixing bowls, calibrated beakers, syringes [for measuring small amounts of catalyst] and even needle file handles!
I bought:
1 kg of T25 Silicone Rubber kit [i.e., silicone + catalyst] at £27-94 less vat [Stock Code 403-650]
2 kg EC-4 Fastcast Urethane Resin kit at £45-32 less vat [Stock Code 409-705]

I've used these and can say they work as advertised.

Afternote: Try also Tiranti's old website which directs you to a more user friendly area of the Pottery Crafts website:
Ordered, it's gone up a bit :eek:

I couldn't find any of what you listed on the Potterycrafts page but the second link worked well :thumbs:

Also picked up a vacuum pot off Amazon, probably overkill but it's not overly expensive and it might come in useful.
 

Arun Sharma

Western Thunderer
Seats and odd underframe boxes are all very well but there are some items that just have to be printed externally at high resolution and then resin cast by professionals as they are highly visible parts of kit/loco/piece of rolling stock.

Such is this trailing end of a LT Q35 EMU trailer. There would be no sense in compromising on the quality of this part.

3D print-Q35 trailing end.JPG
 

Overseer

Western Thunderer
Many resin casters will ask you to supply a master that has had a thin coat of a gret plastic primer applied. That, I'm told, is more likely to show up areas of possible entrapment. Places to consider are under seats for example:
A coat of primer or paint on the master can make a big difference when casting resin. As well as filling any tiny gaps, the small radius formed by the paint on internal and external edges lets the resin flow into rivets and bolt heads much better - far less problem with air entrapment in the small details.
 

Arun Sharma

Western Thunderer
A coat of primer or paint on the master can make a big difference when casting resin. As well as filling any tiny gaps, the small radius formed by the paint on internal and external edges lets the resin flow into rivets and bolt heads much better - far less problem with air entrapment in the small details.
Thank you - Similarly, where possible avoiding acute angles and 90degree bends by radiussing [is that a word?] corners will also aid pattern removal from moulds.
Afternote: CMA-CSL reckon on only filling a mould twice in one day owing to the exothermic reaction of the resin setting damaging a mould if used too often close together. Similarly, they reckon a mould becomes 'tired' and loses its definition after about 50 pours. So anything that can be done to ease a model's removal from a mould will prolong the life of that mould - and save money.
Simon T wrote, "Talk to your caster as some primers react badly with some mould materials."
It isn't always the case now, but in the past when cyanoacrylate resins were being used as 3D prints as well CA glues to repair them, they did occasionally interfere with the setting of silicone rubbers. A coat of grey primer was supposed to prevent that.
 
Last edited:

SimonT

Western Thunderer
the case now
It was only two years ago and with CMA. I don't do the finishing, so I have dumped the details, but we did have to change the primer on the printed masters to avoid chemical reactions. I have a vague memory it was with RTV moulds.
 

Arun Sharma

Western Thunderer
It was only two years ago and with CMA. I don't do the finishing, so I have dumped the details, but we did have to change the primer on the printed masters to avoid chemical reactions. I have a vague memory it was with RTV moulds.
Might it have been a problem with cellulose primers [as opposed to acrylic ones]. Cellulose primers can react badly with urethane resins so if there was any residue in the mould it might scar the casting.
 
Top