Steve Cook
Flying Squad
Anyone expecting a large impressive garden railway should look away now! (with due apologies to those who have seen this before)
I'm not sure that you can get much simpler overall, about 45' of single line track running from a shed to outside the patio doors. The garden itself is not huge, about 34' deep and 22' wide at the widest point with a single garage taking up a large percentage of the left hand side.
The basic premise behind the layout was simply to run Gauge 1 trains in the garden, no more. I would have loved a continuous circuit, but with a suggested minimum radius of 10', I would have had to tunnel through the garage...not an option! As it happened, after a visit down to Simon's, he gave me a set of CNC machined plywood boards on a 9? radius, as good a starting point as I could have hoped for. A bit more thinking and a solution presented itself to the problems of continuous movement on an end to end line, the autoshuttle function (asymmetric DCC function) that is available on Lenz Gold and Silver decoders. This would allow me to run a push-pull train that paused at each end of the line before returning whence it came. With the basics sorted out, it was time to make a start...
Right, a shot of the garden before work started. Cleared a couple of years ago (mainly to make it very low maintenance), this was how it looked on the 1st of May last year.

The 9' radius baseboards were laid out on the ground, and a tape measure used to get a feel for the shape of line I wanted.

A 'garden claw', borrowed from a friend at work, was used to do a test bore?in the ground. The only time I have been happy to have a clay based soil, the garden claw produced a nice round hole, perfect for filling with concrete and posts.

The route of the line was laid out more accurately using spray cans, spaced at four foot intervals. The cans were moved and aligned by eyeball until I was happy.

The position of the posts was marked out using the cans and baseboards as a guide (white primer being ideal for this). 6 hours of twirling with the garden claw, and all the holes are ready (fence panels have been repainted by this point in time too).

The posts are lengths of 65mm square drainpipe. Each hole is about 16" deep, the top of the posts standing at least 14" clear of the ground. The process was to put the post in the hole, tap the top to seat it down square, then fill the outside of the hole with postcrete mix (water added first). When this had gone off, add a touch more postcrete to the top if required, half fill the post with water and then add postcrete to this. When all is done, the bottom of the post is completely immersed in postcrete, and filled to within 6? of the top. Plenty strong enough for toy trains, and not too arduous a task either. Here we have a couple of shots showing the general principle of levelling the posts


By the end of the first weekend, I'm committed!

The next week was spent sorting ideas out for mounting the track base to the posts. A bit of trial and error, and I found it easiest to buy a couple of 3" square fence posts, and rip these down to be a good fit within the drainpipe. They were then cut to a suitable length for each post and numbered (there was some variation in the level of the postcrete fill in each post, so the wooden insert takes this into account to leave a minimum of 1" clearance). Four 6' x 2' sheets of 6mm WBP ply were ripped into 55mm wide strips, giving me a total 240', not enough as it turned out.

The strips were clamped together, three thick, to produced a laminated beam, each join being 2'away from the next nearest, hopefully reducing any weak points. Here we see a dry run of the laminated side beam around the curve.

All of the wooden post inserts were painted with wood preservative and screwed to the posts, the tops being levelled throughout.

Here is the start of laying the strips into place, lots of clamps required!

As you can see from this picture, the posts were not perfectly in line, giving a slightly strange shape. Not a problem, this was taken out when laying the baseboards themselves

After a day of getting covered in glue and fighting 6? lengths of ply, the beams have had the first of many coats of wood preservative to protect them from the weather during the week

A series of wooden blocks were then glued and screwed into place between the two beams, tying the whole structure together (me and my brother happily used the track base as a seat during the shed move)

Got to upload some more pics, then I'll carry on...
Steve
I'm not sure that you can get much simpler overall, about 45' of single line track running from a shed to outside the patio doors. The garden itself is not huge, about 34' deep and 22' wide at the widest point with a single garage taking up a large percentage of the left hand side.
The basic premise behind the layout was simply to run Gauge 1 trains in the garden, no more. I would have loved a continuous circuit, but with a suggested minimum radius of 10', I would have had to tunnel through the garage...not an option! As it happened, after a visit down to Simon's, he gave me a set of CNC machined plywood boards on a 9? radius, as good a starting point as I could have hoped for. A bit more thinking and a solution presented itself to the problems of continuous movement on an end to end line, the autoshuttle function (asymmetric DCC function) that is available on Lenz Gold and Silver decoders. This would allow me to run a push-pull train that paused at each end of the line before returning whence it came. With the basics sorted out, it was time to make a start...
Right, a shot of the garden before work started. Cleared a couple of years ago (mainly to make it very low maintenance), this was how it looked on the 1st of May last year.
The 9' radius baseboards were laid out on the ground, and a tape measure used to get a feel for the shape of line I wanted.
A 'garden claw', borrowed from a friend at work, was used to do a test bore?in the ground. The only time I have been happy to have a clay based soil, the garden claw produced a nice round hole, perfect for filling with concrete and posts.
The route of the line was laid out more accurately using spray cans, spaced at four foot intervals. The cans were moved and aligned by eyeball until I was happy.
The position of the posts was marked out using the cans and baseboards as a guide (white primer being ideal for this). 6 hours of twirling with the garden claw, and all the holes are ready (fence panels have been repainted by this point in time too).
The posts are lengths of 65mm square drainpipe. Each hole is about 16" deep, the top of the posts standing at least 14" clear of the ground. The process was to put the post in the hole, tap the top to seat it down square, then fill the outside of the hole with postcrete mix (water added first). When this had gone off, add a touch more postcrete to the top if required, half fill the post with water and then add postcrete to this. When all is done, the bottom of the post is completely immersed in postcrete, and filled to within 6? of the top. Plenty strong enough for toy trains, and not too arduous a task either. Here we have a couple of shots showing the general principle of levelling the posts
By the end of the first weekend, I'm committed!
The next week was spent sorting ideas out for mounting the track base to the posts. A bit of trial and error, and I found it easiest to buy a couple of 3" square fence posts, and rip these down to be a good fit within the drainpipe. They were then cut to a suitable length for each post and numbered (there was some variation in the level of the postcrete fill in each post, so the wooden insert takes this into account to leave a minimum of 1" clearance). Four 6' x 2' sheets of 6mm WBP ply were ripped into 55mm wide strips, giving me a total 240', not enough as it turned out.
The strips were clamped together, three thick, to produced a laminated beam, each join being 2'away from the next nearest, hopefully reducing any weak points. Here we see a dry run of the laminated side beam around the curve.
All of the wooden post inserts were painted with wood preservative and screwed to the posts, the tops being levelled throughout.
Here is the start of laying the strips into place, lots of clamps required!
As you can see from this picture, the posts were not perfectly in line, giving a slightly strange shape. Not a problem, this was taken out when laying the baseboards themselves
After a day of getting covered in glue and fighting 6? lengths of ply, the beams have had the first of many coats of wood preservative to protect them from the weather during the week
A series of wooden blocks were then glued and screwed into place between the two beams, tying the whole structure together (me and my brother happily used the track base as a seat during the shed move)
Got to upload some more pics, then I'll carry on...
Steve


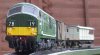
 A week or so later, all of the wire links were made from 2.5 mm electrical cable, bent around four screws in a piece of wood to achieve the correct shape. These are then soldered to the underside of the rails. A very temporary track connection in the shed, and old Gaugemaster unit pressed into service results in the first (period perfect
  ) train running down the line


")

 But do you ever wish that you had either a) put in a run round at the station end or b) two roads, one a platform & one a stabling line?
 Well up for a combined session in your garden

") Any chance of a loco loan Simon? :lol:
Any chance of a loco loan Simon? :lol:


 ........mind you even though the concrete held it firmly , I omitted a expansion gap at one joint & on a very hot day that piece of track lifted out off the concrete & about an inch in the air :shock: